Author:
Eric Farmer
Date Of Creation:
6 March 2021
Update Date:
1 July 2024

Content
- Steps
- Method 1 of 5: Repairing a Broken Bridge with Glue and Paper
- Method 2 of 5: Repairing a Broken Bridge by Sewing
- Method 3 of 5: Using heat and a pin to repair a broken nose
- Method 4 of 5: Replacing a Lost Screw
- Method 5 of 5: Removing or filling in lens scratches
- Tips
- Warnings
Glasses are great, but we don't always handle them right. As a result, they break, break, or screws are lost in them at the most inopportune moment. If your pieces of glass let you down, show who is the boss by fixing them by following the steps below.
Steps
Method 1 of 5: Repairing a Broken Bridge with Glue and Paper
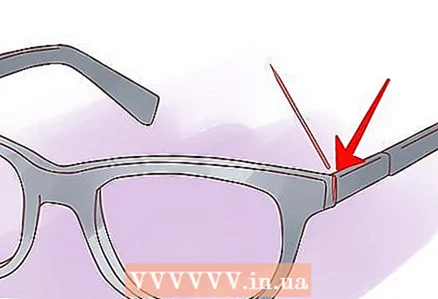
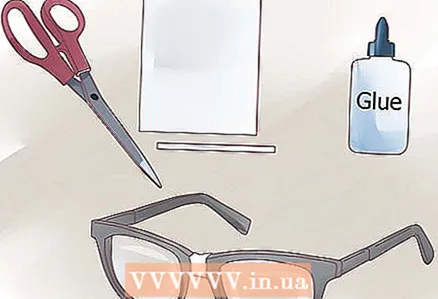 1 Use glue and paper. For an effective workaround, a broken nose bridge can be repaired by gluing (the part above the nose).
 - Clean up. Make sure the two pieces you are trying to glue are clean. (Remove any glue left over from previous attempts. If it's "super glue," acetone nail polish remover will help, but it's awkward to apply on frames.)
- Prepare materials. You will need: super glue (Locktite, Krazy Glue, etc.), pieces of glossy brown paper or thick magazine pages that will fit your frame, sharp scissors.
- Cut the wrapping paper into thin strips that approximate the width of the frame.
- Glue the paper to the frame, one strip at a time. Use a short strip of paper as a wrap for a broken nose, or wrap a longer strip for a premium headband.
- Wait for each strip to dry before sticking on the next.
Method 2 of 5: Repairing a Broken Bridge by Sewing
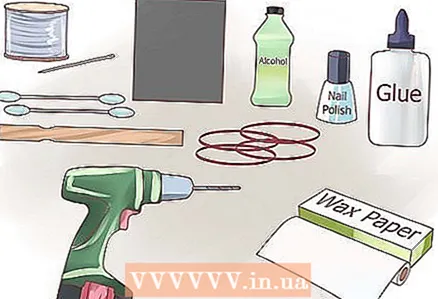 1 Prepare materials. You will need: thread, needle, drill, sandpaper, superglue, wooden stick, rubber bands, wax paper, cotton swabs, rubbing alcohol or nail polish remover, and a utility knife.
 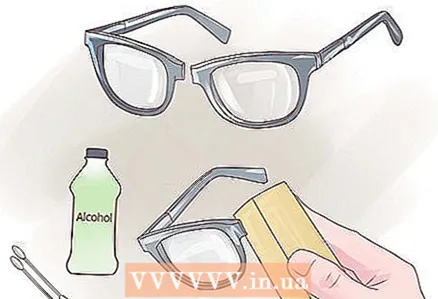 2 Clean and sand the broken parts. Use sandpaper to clean and sand the surface to be bonded. Wipe this area with a little rubbing alcohol or nail polish remover to prepare the surface.
 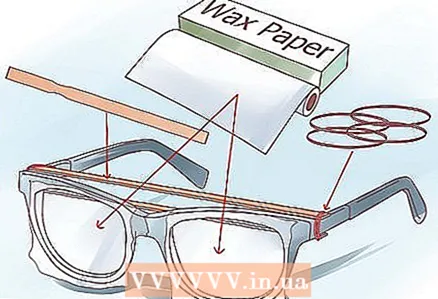 3 Clip the two pieces together. Cut a piece of wooden stick to a length corresponding to the distance between the temporal (side) parts of the glasses. Cover the lenses with wax paper to prevent scratching, then wrap an elastic band around the end of the stick and secure it to the glasses. Do the same at the other end.
 - Align the two halves carefully and make sure the rubber bands are holding tight. If the pieces break off unevenly and there are some voids, line up the pieces as closely as possible to make sure there are certain points of contact.
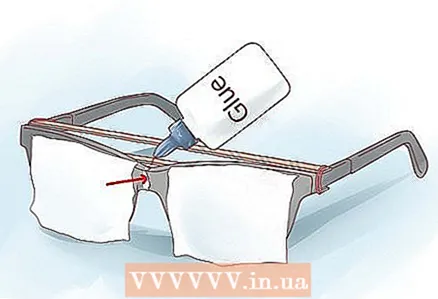 4 Glue. Fill the seam at the fracture site with glue; use enough to hold the nosepiece in place, but not too much to keep the glue from running out. Squeeze out the glue slowly and carefully so that there are no bubbles. When you fill in the joint, make sure there are no gaps or voids. Use a cotton swab to gently remove any glue residue; wipe off before it dries and becomes sticky. Set your glasses aside for at least an hour to allow the glue to dry completely.
 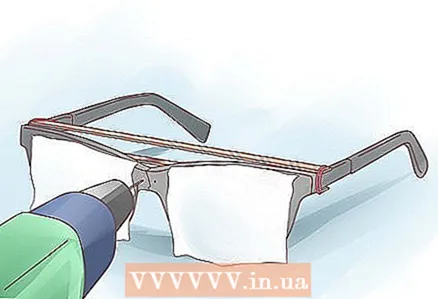 5 Drill two holes. Choose a small drill that is appropriate for the thickness of your frame. Take a utility knife and cut pilot holes on either side of the newly repaired joint. Place the glasses on a soft cloth spread out on the table beforehand and carefully drill holes on each side of the broken parts. The holes should be parallel so that you can pull the thread through them around the main joint.
 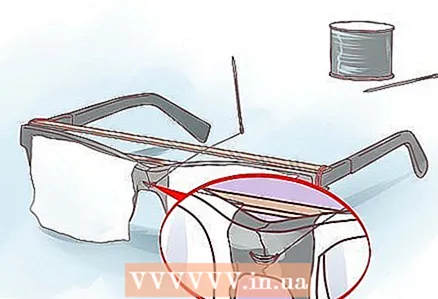 6 Sew. Use a fine needle and 10 to 15 centimeters of thread that matches the color of your spectacles frames and “sew” the two repaired sides for extra strength. Pass the needle and thread through the two holes a sufficient number of times, but do not pull too hard or press on the repaired connections. Finish when the holes are tightly filled with thread. Fill the drilled holes with glue to soak the thread and wipe off any excess with a cotton swab. Cut the ends of the thread and set aside to allow the glue to dry for at least an hour.
 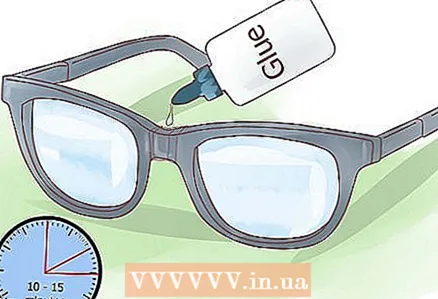 7 Wrap. If you want the patch to be even stronger, you can add this step to the process. Do not cut the ends of the thread as described above. Instead, after the glue is dry, take the remaining thread from one side and wrap it around the bridge from front to back. Wrap as neatly as possible: there will of course be some weaves, but do your best to keep the wrapping from looking bulky. Leave the short end to trim later. Fill the wrapped area with glue and let it dry for 10-15 minutes. Take the string from the other side of the glasses and wrap it around the nose in the opposite direction (back to front). Pour in the new wrapping with glue and let it soak for a couple of minutes before cutting off the loose ends. Set your glasses aside for at least 24 hours before putting them on.
Method 3 of 5: Using heat and a pin to repair a broken nose
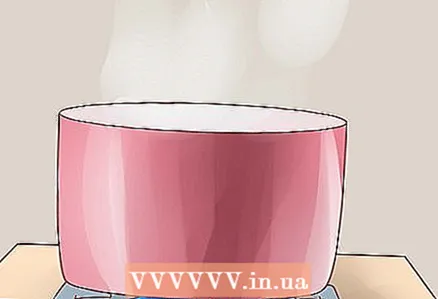 1 Boil water. Fill a small saucepan with water and place over high heat. Since you are going to use heat, the frames on your glasses must be plastic for this to work.
 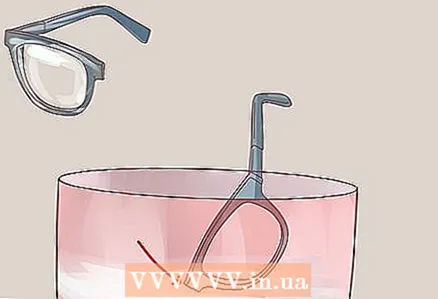 2 Melt the plastic. Once the water boils, hold the broken edges of the glasses over a saucepan close enough to heat to soften the edges.
 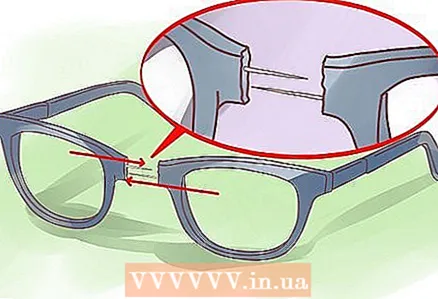 3 Insert a pin. Insert a short pin into one end and then push the other end over the pin. While the plastic is still hot, flatten it over a pin.
 - Never hold plastic frames directly over a fire.
Method 4 of 5: Replacing a Lost Screw
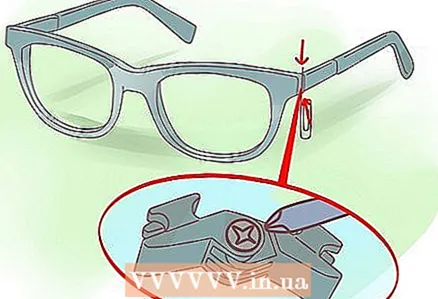 1 Use a glasses repair kit. Repair kits are sold at drugstores and contain everything you need to repair - screws, a small screwdriver, and sometimes a magnifying glass. The new version of the kit also has longer screws that are easier to work with. You insert screws into the holes, screw them in, and then break off the tip of the screw to fit the hinge.
 - If you find it difficult to fit the screws on the temples and front, it may be because the hinge mechanism inside the temples is holding them back. To fix this, use a crochet hook made from a paper clip: insert it through the hole in the temples of the glasses and pull carefully. To keep the screw hole in place, insert a second paperclip upright into the “gap” that formed when you pulled the screw out of the hole. Align the holes in the front and temples, insert the screw and tighten. When you're done, pull out the paperclip so the screw hole snaps into place, creating a firm fit for the glasses.
 2 Try using a toothpick. When the screw falls out of the hinge that holds the front and temples together, try temporarily inserting a toothpick instead of the screw. Line up the hinge holes in the temporal and anterior parts and insert a wooden toothpick through them as far as possible. Break off or cut off the excess.
 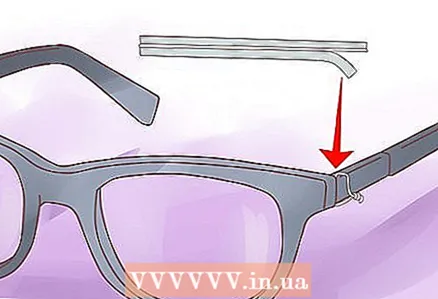 3 Replace with wire. Remove the paper from the wire (such as on a bread package). Line up the holes and thread the wire through them. Twist the wire so that the temple is in place. Cut the ends of the wire to prevent scratching. You can also use a small safety pin (such as is sometimes used on clothing price tags). Insert a pin through the holes so that it holds the pieces in place.
Method 5 of 5: Removing or filling in lens scratches
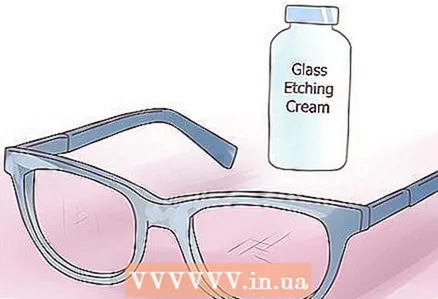 1 Use a scratched lens cleaner. Apply glass engraving solution to your scratched lenses. It removes the anti-reflective and scratch-resistant coatings on plastic lenses, but leaves the plastic lens itself intact. Use glass engraving agent only on plastic lenses, do not use on glass lenses. Other specialty products temporarily fill in scratches on your lenses, making them less visible, but leaving a glossy film.
 - Be careful not to clean or polish the lens until the surface thickness changes. Any product or procedure that changes the surface can also change the refraction and efficiency of the lens.
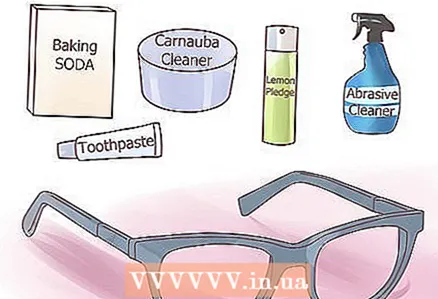 2 Use a household cleaner. Abrasive cleaners, baking soda, and toothpaste can be used to polish scratched surfaces. Wax products like Lemon Pledge Carnauba Cleaning Wax actually fill in light scratches. However, the wax reduces visibility and needs to be reapplied every few days. You can also try rubbing alcohol or diluted ammonia. After treating your glasses with one of these products, polish them with a soft cloth, ideally made specifically for cleaning your glasses.
 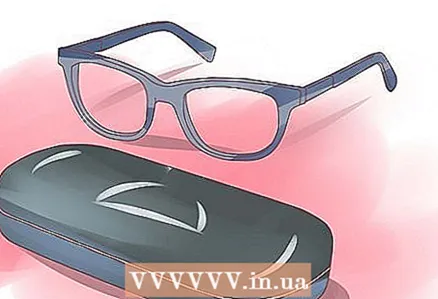 3 Prevent future scratches. Lenses are thin and must be handled with care to prevent scratches.
 - Use a glasses case. A durable, soft case protects your glasses. Put them in a case, not in your pocket, or straight into your purse.
- Wash your lenses. Clean your glasses every day with soapy water and dry them with a clean, soft cloth made for this purpose.
- Do not use inappropriate products. Do not use face wipes or paper towels to clean the lenses, and it is also not recommended to wash with antibacterial soap. Be careful when using hairspray, perfume, or nail polish remover - these can destroy the coating on your lenses.
Tips
- Be careful not to get glue on the lenses and fingers.
- As a last resort, to secure the broken nose bridge, simply wrap the tape around it to connect the two pieces. Choose the colored tape that best matches the color of your frame, or challenge the fashion and wrap them with a piece of decorative duct tape.
- If a white residue forms from exposure to acetone, try wiping it off with an oil-based lotion.
Warnings
- Until the glue is completely dry, keep freshly glued surfaces away from eyes.

")

