Author:
Janice Evans
Date Of Creation:
1 July 2021
Update Date:
1 July 2024
![[2021] How to Transfer Photos/Videos from iPhone to Any Mac!!](https://i.ytimg.com/vi/lJlKHznNc9Q/hqdefault.jpg)
Content
- Steps
- Method 1 of 3: Using Photos
- Method 2 of 3: Using AirDrop
- Method 3 of 3: Using iCloud Music Library
- Tips
- Warnings
This article will show you how to transfer photos from iPhone to Mac.You can do this using Photos or Image Capture, and AirDrop. What's more, photos can be uploaded to iCloud and then downloaded to your computer. The important thing to remember here is that the iCloud capacity must be large enough to hold all of your iPhone photos.
Steps
Method 1 of 3: Using Photos
 1 Connect your iPhone to your computer. Connect one end of your smartphone's charging cable to the iPhone's charging port and the other end to your computer's USB port.
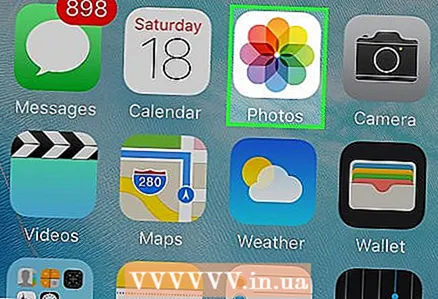
  2 Open the Photos app. Click on the multicolored flower-shaped icon in the dock.
 - Perhaps this program will open itself if you connect your iPhone to your computer; in this case, skip this step.
 3 Select iPhone. Click on the iPhone name on the left side of the window to select the device. You will find the name under the "Devices" section.
 - If your smartphone is not in this section, unlock your iPhone.
 4 Select the photos you want to copy. Click on each photo and / or video that you want to transfer to your computer.
 - If you want to copy all the photos that are not already on the iPhone, then skip this step.
 5 Click on Import selected. It's in the upper-right corner of the screen. This gray button will also display the number of selected images (for example, "Import 34 Selected").
 - To copy all new photos, click Import All New Photos.
 6 Wait for the copying process to complete. Now click on "My Albums" (on the left side of the window) to view the copied photos on your computer.
Method 2 of 3: Using AirDrop
 1 Activate AirDrop on your Mac. To do this, open Finder, click AirDrop (on the left side of the Finder window), click the Allow My Discovery link and select Everyone from the drop-down menu.
 - If you see a Bluetooth Enable button in the middle of the AirDrop window, click it to activate Bluetooth on your computer.
 2 Open the Photos app on iPhone. Click on the multi-colored flower icon.
  3 Click on Albums. You will find this option in the lower right corner of the screen.
 - If the Photos app is open to the Albums page, skip this step.
- If a list of photos is open in the Photos app, tap Back in the upper left corner of the screen, and then go to the next step.
 4 Click on camera roll. This is the top option on the screen. A list of photos stored on iPhone will open.
 - If you've turned on iCloud Music Library, this option will be called All Photos.
 5 Click on Choose. It's in the upper right corner of the screen.
  6 Select photos. Click on each photo you want to transfer to your computer. A blue and white icon will appear in the corner of each selected photo.
  7 Click "Share"
  . This arrow-shaped icon is in the lower-left corner of the screen. A menu will open.
  8 Click on the "AirDrop" icon. It looks like a series of concentric circles and is located at the top of the Share menu. The smartphone's Bluetooth and Wi-Fi will turn on (if disabled) and the computer name will be displayed on the screen.
  9 Click on the computer name. It's in the AirDrop menu. The photos will be uploaded to the Downloads folder on your computer. To open it, click on Downloads on the left side of the Finder window.
 - If you have different Apple IDs on your computer and smartphone, confirm to copy your photos when prompted.
Method 3 of 3: Using iCloud Music Library
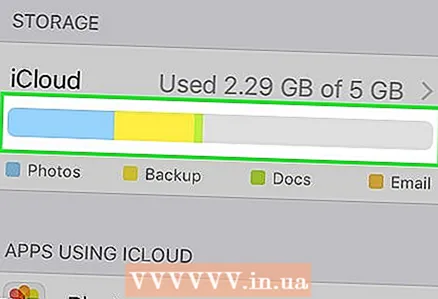 1 Make sure you have enough free space in iCloud. This method involves uploading all of your photos to iCloud, and then downloading them to a computer that has Internet access. However, iCloud storage must be larger than the combined size of all photos. The free storage is 5 GB, but you may need to buy more storage.
  2 On your smartphone, open the "Settings" application
  . Click on the gray gears icon.
  3 Tap your Apple ID. It's at the top of the settings page.
 - If you haven't signed in yet, click Sign In, enter your Apple ID and password, and then click Sign In.
 4 Click on iCloud. This option is in the middle of the screen.
 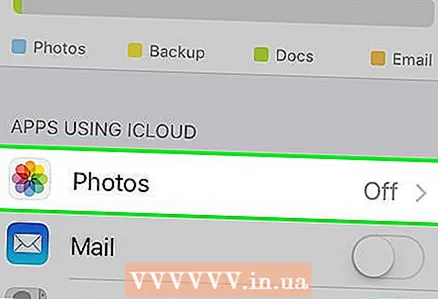 5 Tap Photo. You'll find this option at the top of the Programs Using iCloud section.
  6 Click on the white iCloud Music Library slider
  . It will turn green
  ... The process of uploading photos to iCloud begins.
 - Loading times vary depending on the number of photos, so make sure your iPhone battery is fully charged (or connect your smartphone to a charger) and that your smartphone is connected to a wireless network.
- To free up space on your iPhone, click Optimize Storage when prompted.
- To automatically upload photos you take in the future to iCloud, click the white My Photo Stream switch.
 7 Open the Apple menu
  on the computer. Click on the Apple logo in the upper left corner of the screen. A dropdown menu will open.
  8 Click on System settings. It's near the top of the drop-down menu. The System Preferences window will open.
  9 Click "iCloud"
  . You will find this cloud-shaped icon on the left side of the System Preferences window.
  10 Click on Settings. It's in the upper right corner of the screen. A new window will open.
 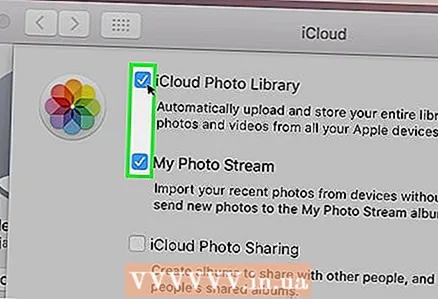 11 Activate photo sync. Check the box next to iCloud Library and My Photo Stream. Now the photos that are stored in the iPhone memory will be available on the computer.
  12 Click on Ready. It's a blue button at the bottom of the window. The changes made will be saved. Photos stored on iPhone can now be opened in the Photos app on your computer, although it may take some time before they become available.
Tips
- To transfer just a few photos, send them to yourself via iMessage, then open and save using your PC version of the Messages app.
- You can also use any cloud storage like OneDrive or Google Drive to upload photos to it and then download them to your computer.
Warnings
- Photos take up a lot of space. If your computer's hard drive is low on free space, store your photos in iCloud or transfer them to an external hard drive using Image Capture (Others option).


