Author:
Mark Sanchez
Date Of Creation:
4 January 2021
Update Date:
1 July 2024
Content
- Method 2 of 3: Method One: Realistic Monkey Face
- Method 3 of 3: Method Three: Monkey Sketch
- Tips
- What do you need
- This will be the head of the monkey.
 2 Draw the body and tail.
- For the body, draw an English letter “U” under the circle. Let the letter be slightly smaller than the head.
- Add a long, curved tail.
3 Add legs.- Draw 2 ‘arms’ in the upper body and 2 legs in the lower body.
- The arms and legs do not have to be in proportion to the body; it is good to make them somewhat long. It all depends on the preferences of the artist.
4 Add ears, muzzle, hands and feet.- Draw 2 ovals on the sides of the head for the ears. Add another oval at the bottom of the head for the muzzle.
- For the hands, draw small circles.
- Draw elongated ovals for the feet.
5 Add eyes and nostrils.- Draw a small heart at the top of the muzzle for the nostrils.
- Draw two circles for the eyes. It's okay if they are slightly enlarged. Again, it all depends on the wishes of the artist.
6 Draw the outlines of the drawing according to the sketch.- After drawing the outlines with a pen, remember to erase the pencil sketch to keep the drawing clean.
7 Erase the pencil lines and add details.- Add lines for the ears and belly.
8 Color the monkey.Method 2 of 3: Method One: Realistic Monkey Face
 1 Draw a large, rounded oval.
- Use a pencil to sketch so that you can erase it later.
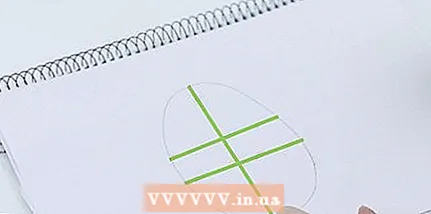 2 Add lines to outline the face.
- Draw a vertical line for the middle of the face.
- Draw a horizontal line for the middle of the face. Then draw another horizontal line above the first. These two lines should be parallel and should form something like a rectangle.
 3 Add ears and muzzle.
- Along the edges of the ‘rectangle’ draw two arcs of the ears.
- Draw a large circle from the bottom of the face to the middle horizontal line.
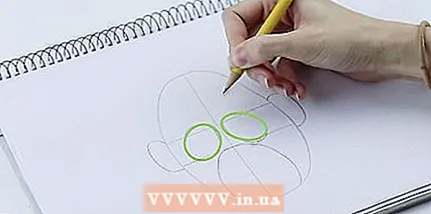 4 Draw two circles.
- Draw two teardrop-like circles overlapping the parallel lines. They should be slightly closer to the center.
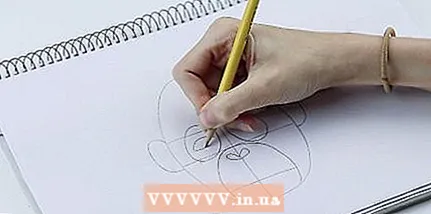 5 Draw in the details of the face.
- Add a horizontal line for the mouth at a distance of 1/3 of the muzzle.
- At the top of the muzzle, draw two beveled drops connected in the center. They should look like a horizontally stretched heart.
- For the eyes, draw almond-shaped ovals centered between the parallel lines.
 6 Use a pen to draw the outline of the drawing.
- Don't forget about those intersecting lines that need to be hidden.
- The line art may not be perfect, but it should look clean when you erase the pencil lines.
 7 Erase your pencil sketch and add details to the drawing.
- You can add fur and skin folds.
- Try adding more detail if necessary. The skin of the monkeys is wrinkled and their fur is quite thick and rough, so don't be afraid to add more lines than you should.
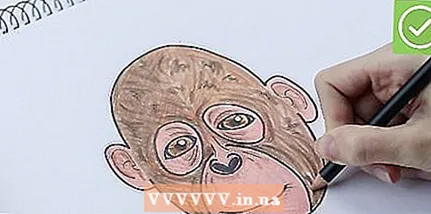 8 Color the monkey.
Method 3 of 3: Method Three: Monkey Sketch
- 1 Draw two circles: small for the mouth and large for the head. Draw guide lines for the location of the face details.
- 2 Draw two circles for the eyes and one circle for the nose. Don't draw your mouth too close to your nose; you can make it big or small as you like.
- 3 Draw two ovals for the ears. Draw in the details of the ears, or simply add in an arc inside the ear.
- 4 Draw a circle and an oval for the body, with a second oval inside.
- 5 Draw a long tail! Bend it as shown in the image, or twist it around a branch so that the monkey hangs from the tree.
- 6 Draw the arms. Make them long, possibly as long as your body itself. You can make them a little plump for a prettier look.
- 7 Draw legs that are much smaller and shorter than the arms. Monkeys do not need legs as much as hands, as they spend all their time moving from tree to tree using their arms and tails, not legs.
- 8 The arms and legs of the monkeys are very similar to those of humans. The only difference is that the fingers need to be made longer to make the drawing more realistic. If you do not pretend to be realistic, just draw kugas and ovals of fingers on them.
- 9 Add details. Add fur if you want, you need to do it in this step.
- 10 Draw the outlines and color in the monkey. Add shadows if you like. It is better to do this using watercolors of the same color that was used to paint the fur.
Tips
- Do not press hard on the pencil while sketching, so mistakes can be easily corrected.
- If desired, use markers or watercolors to color the drawing, use thicker paper for drawing and draw well the outlines before coloring.
- Draw out the outline of the drawing with a black pen or thin marker.
- In practice, perfection is born!
What do you need
- Pencil
- Pen
- Washing gum


