Author:
Clyde Lopez
Date Of Creation:
23 June 2021
Update Date:
1 July 2024

Content
- Steps
- Part 1 of 4: Choosing ceramics and glazes
- Part 2 of 4: Preparing the product and glaze for firing
- Part 3 of 4: Applying the glaze
- Part 4 of 4: The firing process
- Tips
- Note
- What do you need
Earthenware glaze is a complex mixture that is used to process ceramics before they are sent to a high-temperature kiln. With the help of glaze, they not only decorate the ceramics, but also form a protective glossy layer, which prolongs its service life. Although the processing of ceramics with glaze is a long and laborious process, it is still possible to learn how to glaze, and the results will be more and more impressive with experience. If you don't already have your own kiln, ask an experienced potter to kiln for a while before you start making your first clay creation. Read more about this in the “Firing Section”.
Steps
Part 1 of 4: Choosing ceramics and glazes
 1 Try working with hard unglazed china to get started. You can get the idea for the first piece in a pottery store or from famous pottery masters. Unglazed porcelain is usually bisque fired to harden.Unlike some types of ceramics, biscuit has a porous water-permeable structure, which allows it to absorb the glaze, which after the second firing turns into a protective waterproof layer.
 - Depending on the type of clay used, the pottery will turn out to be either white or red.
- Burn your ceramic product in a kiln to harden it. After firing, the shard will still remain porous, now it is necessary to process it with glaze. The exact firing temperature will depend on the size and type of clay, so it is best for you to ask an experienced potter for advice before proceeding. It is possible that he will offer you to use his oven, or will lease it to you.
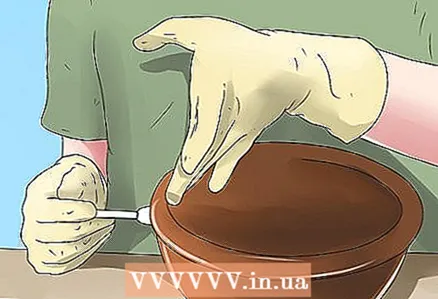
 2 Wear special disposable gloves when handling the pottery. Make sure that the workpiece of the future product is insulated from foreign substances, dust, and any other dirt entering it. Even natural grease or sweat from your palms can affect how the frosting will adhere. Therefore, be sure to use latex gloves when working. Change your gloves every time before touching the ceramic product, especially if you see that the gloves are dirty.
  3 If possible, use ready-made glaze mixtures. Since during their self-preparation, special precautions must be taken, wear a respiratory mask, otherwise you can accidentally inhale glass powder particles. With ready-mixed mixtures, it is most likely that there will be no problems during firing. This is the best option if you've never had to mix the icing yourself before.
  4 Select the glaze according to the firing temperature. Different types of glaze require firing at different temperatures, it depends on how smoothly and firmly the layer will lie and be fixed on the product. In no case do not use two types of glaze on the same product that require different firing temperatures, otherwise your product may simply crack.
 - For simplicity, the firing temperature can be divided into “high” and “low” or “moderate”, or it can be measured using the Seger cone, presented in “numbers” from 1 to 59, for example, cone “number” 2 or cone “number” 4 etc. This measuring system consists of pottery cones made of different types of clay, which bend at different temperatures to determine whether the desired temperature has been reached during firing. To do this, a clay cone is applied to the product, if it is bent, then the procedure was carried out correctly.
 5 You should be aware that the composition of the glaze may contain substances hazardous to health. Before buying, ask what the glaze is made of. It is not recommended to use a leaded glaze for a second finishing coat on pottery. You should not work with toxic glaze of any type if you have children, especially if they will be present during the glazing process, or they have access to the place where you intend to store the glaze.
 - Underglaze paint containing lead under a protective top coat of non-toxic glaze can be safe at first, provided the glaze is properly fired. However, over time, after long-term use, lead can begin to be released through the non-toxic glaze due to the thinning of the top layer, especially if the ceramic dishes are often scraped during washing or stored in them with high acid content, such as tomatoes and the like. Ref> http: //fantes.com/ceramics.html/ref> Therefore, you should immediately stop using such utensils if you find traces of powder or cracks on the surface of the glaze.
 6 Purchase one or more underglaze colors, depending on the color you would like to achieve after firing. Underglaze paint for decorating and painting ceramic products can be of various colors. For your first pot, you can use as many colors of underglaze paint as you like. However, keep in mind that the glaze inside the oven is involved in a chemical process that can change the original color beyond recognition. To find out what the final color will be in the paint, use the manufacturer's special table. Make no mistake that the glaze will retain its original color after firing.
  7 Get some frosting. Whether you choose to decorate your piece with underglaze paint or not, you will need a single color glaze for the shiny top coat anyway. Buy a clear glaze so it doesn't affect the color of your decorative paint. If you are not using paint, you can use any color of glaze.
 - Note: As described above, if you are using several types of glaze for the same product, you should use a glaze with the same firing temperature. If the glaze is fired at the wrong temperature, the product may crack.
Part 2 of 4: Preparing the product and glaze for firing
 1 Sand down any bumps and bumps. If you notice drops of clay or bumps on the surface of the product, which should not be there, using sandpaper with a grain size of at least 100, sand the workpiece until you achieve a flat surface. After sanding, be sure to clean the product from dust residues with a damp sponge.
 - If you bought, rather than made, the glaze blank yourself, all irregularities should also be eliminated.
 2 Blot the shard with a wet sponge before starting the glazing process, it can also be used to wipe the product in case of contamination. Before starting work, as the product becomes dirty, or if you have used too much glaze, wipe it with a wet sponge. But also avoid excessive moisture on the product, and make sure that no water droplets remain on it. Gently use each side of the sponge to clean the product; for one shard you may need several sponges.
 - Do not forget also, every time you touch the shard or pick it up, put on gloves so as not to leave dirt on it again.
 3 Apply a layer of wax to the outer bottom of the vessel and where the two parts to be separated meet. A layer of wax will prevent the glaze from leaking to the bottom of the ceramic pot, otherwise the product would stick to the oven grate during firing. For the same reason, wax the edges of the oven lid or any other part of the oven or product where it might come into contact with another object during firing. While some potters use slightly warmed paraffin wax for this purpose, a safer, less unpleasant odor is a professional wax, found in potters or some art stores. You can apply professional wax to the product with a paint brush. Store this brush separately from the icing jars.
 - Colored wax crayons can be crumbled onto the product to form a wax layer, but there is a possibility that crayons can stain the shard.
- If you are going to glaze pottery with children, it will be easier to skip this step and glue a clay disc to the shards that the children will glaze with hot glue, which will collect drops of glaze and peel off during firing.
 4 If you are mixing the glaze yourself, be sure to follow directions and safety guidelines. For the first few glazing procedures, we still recommend using ready-made glazes due to the risk of injury and the difficulty in preparing the glaze. If you nevertheless decide to make icing at home, i.e. mix dry powder with water, carefully follow all manufacturer's instructions, otherwise your glaze may not acquire the desired properties.Always (strictly required) wear a respirator mask to avoid accidentally inhaling particles of the dry glaze mixture. It is better to prepare the glaze outdoors or in a well-ventilated area. Do not allow anyone else to approach the glaze preparation area without a respirator mask. It is also advisable to wear rubber or latex gloves and safety glasses.
 - We do not provide detailed step-by-step instructions for preparing the glaze here, since there are differences in the preparation of different types of glaze. But in any case, you will need: water, a spoon with a long handle for stirring and a device for measuring the density of the liquid to determine the density, or "relative density" of the resulting mixture.
Part 3 of 4: Applying the glaze
 1 Stir the frosting thoroughly. Even if you are using pre-made icing, you may need to stir it to achieve a uniform consistency. Follow the directions on the package and stir the mixture until the bottom sediment is completely dissolved or the aqueous layer disappears from above.
  2 Pour each type of frosting into small bowls, using a separate brush for each. To keep the multicolored glaze from mixing with the other, remember to use a different brush for each color. Pour the icing into small containers, never wet the brush directly from the jar. This will make the remaining glaze suitable for future use.
  3 Apply underglaze paint with paint brushes. You can decorate the product to your liking. Ordinary brushes are suitable for decorating. Apply the drawing by wetting them in the desired paint. This fun process is not limited in time and depends entirely on your artistic talent. If you don't like monotonous work and are more impatient and creative, then you can decorate the vessel using other methods, for example, sprinkling the pot, applying large strokes without a specific pattern, or even simply sprinkling the icing on it with a spray bottle. Or you can choose a solid background for the product and paint the pot in one color.
 - When developing a design, you should take into account the final color of the paint, which it will acquire after firing.
- Spray decorating is often used by pottery decorators to achieve a greater artistic effect, but beginners should be careful with this technique as they tend to be more artistic. too thick a layer of droplets can change the texture of the product and lead to a violation of the firing technology.
 4 Remove excess glaze with a metal scraper. If you accidentally put the glaze in the wrong place, or it leaks, you can scrape it off with a knife or other metal object, a razor, a utility knife, and so on. After removing the paint, wipe the product with a damp sponge.
 - If you've used a knife, be sure to rinse it thoroughly in hot, soapy water afterward.
 5 Glazing from the inside of jugs and other utensils with narrow necks. If you have to glaze a ceramic pot, mug, or other container from the inside, it can be difficult to completely glaze it with a brush. Alternatively, you can pour a small amount of the glaze into a container and tilt it to one side and slowly twist it in your hands to spread the glaze evenly. Naturally, gloves should be worn on the hands.
  6 Let each layer dry before applying the next one. Wait until your piece is completely dry before trying out different underglaze or top coat colors. To speed up this process, place the product in a place with good air flow. Do not overlay a new layer until you are sure that the previous one is dry enough, i.e. there are no dents on the product when you touch it with a brush.
  7 The final stage of glazing is the application of a protective glaze layer. If you have a pair of pottery tongs, this procedure is much easier and takes very little time. Take the product with tongs and lower it into a container with glaze, hold it in the mixture for 1-3 seconds. If you want a layer that is thicker and more glossy and shiny, dip the item in the glaze for a shorter time, let the pot dry completely, then submerge it in the mixture again. When re-glazing, you can dip the pot several times, but the total contact time of the product with the mixture should not exceed 3 seconds.
 - The top layer of glaze can also be applied with a brush. This must be done so that the entire surface is completely covered with a thin layer of the mixture. It is better to let the garment dry and then apply a second thin coat than to apply a thick coat in one go.
 8 Remove any glaze from the surfaces of the product that will come into contact with the oven and may stick to it. Also remove any glaze from surfaces that might come into contact with other ceramic items in the oven, such as the lid. If you have followed the rules described above, the bottom of your vessel should be waxed before firing. This will make it easier to wipe off any drops of glaze that might stick the pot to the oven grate. Use a damp sponge to clean the container.
 - Wipe off drips from these surfaces with each application of the glaze before they have time to dry.
- If the icing is constantly leaking or dripping, leave an area of about ¼ ”(6mm) or more near the bottom edge of the container unpainted. This technique is used by many professional artists who paint ceramics, porcelain and faience.
Part 4 of 4: The firing process
 1 Try to find a rental kiln. Buying your own oven can be expensive. If you live near a large city, most likely there are pottery studios where they rent out areas with kilns. Search the internet for kiln rental or pottery studios that you can contact to inquire about renting a kiln.
 - If you live in the US, the following listing of kilns will come in handy, although not all studios are listed here.
 2 If you nevertheless decide to purchase your own stove, seek qualified advice, or if you have already bought a new stove, but do not know how it works, ask a specialist to explain to you all the necessary nuances of its operation. If you decide to buy a pottery stove, then you are most likely interested in a portable electric stove. Here are a few guidelines for choosing a kiln for many factors, including cost, installation of all necessary equipment, and advice on purchasing additional tools. The operation of the kiln is very complex and potentially dangerous, so you may need the help of an experienced potter, who will help you learn how to use the kiln, at least the first few times you will definitely need such help.
  3 The glaze should be fired according to certain rules. Different types of glaze require firing at either low or high temperatures, and a violation of the temperature regime can lead to the fact that the product will crack, or the glaze will not stick at all. Make sure the oven is set to the correct setting according to the instructions on the glaze packaging, you can check this with the Zeger cone mentioned above.
 - If you decide to entrust your ceramic product to the studio for firing, leave a note indicating the desired firing temperature. Do not attach a note directly to the product.
 4 Pick up your pottery in a few hours. Firing involves various operations and techniques, and some of them may take longer than others. In any case, it will take several hours to bake one piece.When the firing is finally completed and your product has completely cooled down, you can carry it home to the admiration of your household and boast to your friends and acquaintances. If there are many firing orders, you may have to wait a day or two.
 - Keep in mind that the wax from the bottom of the item must completely burn out in the oven. If it stays on the pot or has a smudge on the glaze, use a different type of wax next time.
Tips
- Clean the tools used as often as possible to avoid mixing the glaze with other substances. Place the wax brush and frosting brush in different places, or clean them completely after each use.
- There are hundreds of types of ceramics and glazes. You can learn about many other methods and technologies for decorating ceramics and creating unique spectacular designs using glaze from special literature, or teach you this, share your experience and knowledge with an already knowledgeable potter with experience.
Note
- Avoid applying too much glaze at once, as it may drip and result in an uneven finish. Try to find a quantity sufficient to completely process the item.
What do you need
- Sponge cake (unglazed stoneware)
- One or more types of underglaze paint for the first coat (requiring the same firing temperature)
- One type of glaze for the top protective layer
- Professional wax
- Two or more paint brushes or art brushes
- Sponges
- Pure water
- Clean containers (containers) for the preparation of glaze
- Metal scraping tool (knife, scraper, etc.)
- Pottery tongs
- Kiln
- Cylindrical kilns


