Author:
Carl Weaver
Date Of Creation:
22 February 2021
Update Date:
1 July 2024

Content
Decorating the tree with any other material grabs the attention of your guests. It is best to start with straight lines, and then move on to round and oval shapes if you are decorating a tree for the first time, and only then tackle more complex types of design. The simple method detailed below will not require any special skills or tools from you, while more sophisticated instructions will allow you to create intricate, beautiful wood décor once you have the right equipment and a little bit of experience in the field.
Steps
Method 1 of 2: Simple decor
 1 Choose a base for decorating. Pick a wood object that you want to transform, such as wood furniture or a guitar. For decoration, you can use any thin, flat material such as veneer, mother-of-pearl, or ivory.
 - Dark and light materials will create the desired contrast and will not allow you to notice "holes" between them.
 2 Bring the material you are going to decorate with in a simple form. You may already have the simple shape material you desire. If not, cut it into a simple, beautiful shape.
 - Wear a respirator when handling mother-of-pearl or other material that converts to hazardous, fine dust during handling.
- Mother-of-pearl can be created in any desired shape, but it must be washed periodically under water to avoid burnt marks from the electric saw.
- Limit yourself to simple freehand drawings or small geometric shapes. If you want a more sophisticated design, scroll down the article for more detailed and complex instructions.
 3 Temporarily attach the processed material to the base. You can use double-sided tape or glue that takes a long time to dry. This will immobilize the material while you cut the shape at the base.
 - Alternatively, you can transfer the drawing to the base using tracing paper.
- If the drawing is simple enough, you can skip attaching it to the base and cut right around it. The key is to make sure you don't hurt yourself while doing this.
 4 Attach the material to the base. Trace the shape with a pencil. Try not to oversize the shape too much.
 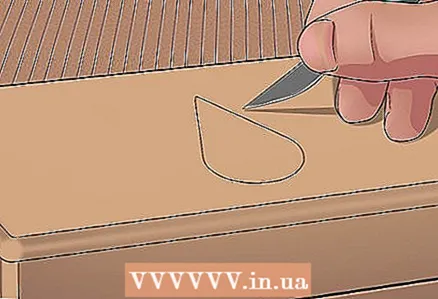 5 Gradually cut with a sharp knife along the drawn shape.
- Start with small notches to make the notches in shape. Once the notches are done, start carving more confidently. By making notches, you prevent the risk of damage to furniture and all work in general by careless movement of the knife.
- Cut carefully and to the correct depth so that the piece of material with which you want to decorate the tree hits the hole as accurately as possible. If you make a hole that is too shallow, you will have to grind a piece of material under the table, but if you go too far with depth, you will have to grind the table.
 6 Remove the part and scrape out the depth of the wood. Now that you have a border and a depth set, you can make a suitable indentation for the part. Don't make the indentation too deep.
 - Small, simple patterns can be scraped out by hand with a paper knife or a penknife. Larger and more complex shapes will be easier and faster to make with special powerful electric tools of the right size.
- If you've used double-sided tape, you'll have to peel it off the base by wiggling the flat, wide blade underneath.
 7 Smooth the groove. Scrape the inner sides of the groove with sandpaper when you remove the bulk of the wood.
  8 Check that the base and the piece of material fit snugly together. If the shape for a piece is "tight" - ideal; you can just gently hammer a piece of material into the groove with a hammer, after pouring glue there.
 - You can grind a wedge-shaped depression tapered towards the bottom. This will make it easier to fit the part and not leave unnecessary gaps.
- Sometimes it happens that the part fits into the groove so well that you cannot pull it back. If this is the case, you can place a neat thin layer of clear glue on the border of the mold for extra strength and leave it to dry.
 9 Stir in fine shavings and wood dust into the glue. This technique hides all the gaps, creating the effect of the whole material.
 - Use any wood glue to decorate furniture, or epoxy if the decor is not made of wood.
 10 Apply glue evenly and attach the part. Cover the walls and bottom of the groove with glue and bond the part to the base. Tap the part gently with a hammer so that it fits as tightly as possible to the bottom of the groove.
 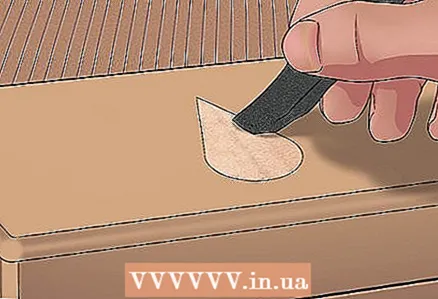 11 Finishing touch. Remove excess glue, but not the one that remains in the gaps between the base and the part! If the part rises slightly above the surface of the table, sand it to the height of the base.
 - Use a 220-grit sandpaper or less to keep the part looking neat and polished.
Method 2 of 2: Complex decor
 1 Create your part. Transfer a design from your monitor or an art history book to tracing paper, or draw your design directly on tracing paper.
 - Avoid thin chunks and intricate lines if you are not experienced enough in decorating wood yet.
- Think about what materials you will use for each element of the decor detail. Use different materials for more contrast.
 2 Make separate copies of the individual elements of the part. If you just cut the pattern drawn on tracing paper into pieces, then, most likely, it will be easier for you to comply with all proportions and sizes. Leave yourself an uncut pattern drawing too.
  3 Trace the pattern through the carbon paper.
- You can also make additional notes for yourself at this stage.
- If you don't have a carbon copy, take a cut copy and attach it to a tree. You will need to trace both the lines between the elements of the part and its outer contour.
 4 Take the separately cut elements of the pattern. Please note that if you cut out elements from the overall drawing of the part, it will turn out to be smaller than it could be. Number the elements and duplicate the numbering in the full figure in the order in which you will install them. Start with the secondary elements or the farthest if your part is to be multi-layered.
 - Cutting out larger pieces from the borders will create a "overlapping" effect. You can even cut out parts of the pieces, if it is appropriate in the drawing: as if part of the part is behind another part.
 5 Make a fibreboard template. For greater accuracy, you can first draw a drawing, and then carefully cut it out using a circular saw, jigsaw, etc. using the correct technique:
 - For working with fibreboard, use only carbide blade or carbide drill.
- Use goggles to protect your eyes while you work.
- Clean the saw thoroughly before cutting to avoid unwanted results and some difficulties.
- Secure the template and mark the notches with a knife before sawing out the shape.
 6 Cut out the first segment of the future drawing. Trace the template on the wood with a pencil, notch marks, or cut out the shape if you are already experienced enough.
 - Use any knife suitable for the veneer. Make cuts first to avoid unwanted scratches.
- For parts that are difficult to cut with a knife, use any suitable saw. Always use a respirator and hair dryer, do not inhale wood dust.
 7 File the borders. Smooth the sides of the desired piece so that it fits better with the rest of the details and the base you are decorating.
  8 Temporarily attach the part or its template to the base. Attach the piece with double-sided tape and check with your fingernail if it adheres tightly to the base and if it is smooth enough. Remove the tape and replace the piece.
 - You can use a long-drying glue. It will allow the part to stand in place, but not stick completely while you cut out the outline.
- If your double-sided tape is too weak, try finding "turner's tape" at a specialty store.
- When you put the piece back in place, cut off the excess, interfering tape around the edges with a knife so you can see what you are doing with the piece of material.
 9 Carefully cut out the shape and remove the wood from the inside. As described in the previous instructions, start with neat notches first and then carve deeper into the wood. Use a thin, flat spatula to separate the piece of material from the glue or tape. Try not to damage or spoil the base you are decorating.
  10 When making cuts, make them visible! First trace the border with a pencil, and then scrape with a knife directly along the lines, not along them!
 - But be careful not to scrape off the tags you will need to attach the next piece.
 11 Start carving. The jigsaw is the most reliable tool for wood carving. If you don't have one, use a Dremel with different detachable parts or a less reliable trimmer.
 - Set the depth of your cutting tool to just 1mm less than the height of the part itself.
 12 Cut out everything you can (be careful!) with a 1/8 drill (3 - 3.5 mm). Remove the tree to the desired depth, but do not get close to the boundaries of the shape. This is a slightly more subtle job.
  13 Cut out the shape along the edges with a 1/6 drill (1.5 - 1.6 mm). Change the drill bit to a finer one and very carefully remove the remaining wood. Stop as soon as you reach the intended outline.
 - When you stop seeing dust and start observing strange changes on the surface of the tree, stop immediately. This means that you have reached the scraped contour.
- It will be much easier to work with a magnifying headset.
 14 Glue the piece in place. Apply the adhesive evenly to the bottom of the groove, using a brush to brush over the sides of the groove as well.
 - Use a special glue for wood or veneer. Use epoxy or other strong, specialized adhesive for a variety of materials.
- Lightly sandpaper the edges of the mold before gluing the part: the glue will mix with the wood dust, which will mask the boundaries between the base and the part.
- When the part is in place, rub the glue with your fingers into the remaining gaps between the base and the part.
 15 Press down firmly and leave to dry. Place the newly glued piece under a press to which it will not stick (for example, a piece of wood wrapped in duct tape). Let the glue dry for 4-6 hours.
  16 Trim the part. Remove the remaining glue and sandpaper the part to make it level both in relation to its elements and to the table.
 - For mother-of-pearl or abalone, you will need to additionally polish the part with 300-grit sandpaper.
 17 Cut and place the rest of the pieces. Move from item to item by following the instructions above.
 - Remember that you need to make a little more pieces that are located under other elements of the whole part. The rest of the boundaries should be made as accurate as possible.
Tips
- You can first glue all the pieces of the part together and wait until they dry, and then decorate the wood with the resulting part. This method will save a lot of time, but it is not as accurate as step-by-step.
- Shape the edges of the shape into a wedge so that the part fits better into the hole.
- You can buy a custom wood décor kit that will save you time and effort by helping you create the perfect fit. This type of work is most efficient with materials 3 - 6 mm thick and with milling machines.
Warnings
- Wear safety glasses to protect your eyes from dust and pieces of wood flying off, especially when using a saw or jigsaw.
- Wood dust can be hazardous to your lungs, much less mother-of-pearl dust. Use a respirator and hair dryer to blow dust off your work and face.
You will need
- Any base for wood decor
- Veneer, mother of pearl or any other material
- Knife
- Wood glue or epoxy
For complex decor:
- Tracing paper
- Carbon copy
- Medium Density Fiberboard
- Putty knife
- Jigsaw, Dremel or Trimmer
* Magnifying headset
- Paper
- MDF
- Milling machine
- Wood decor set
- File
- Wood glue
- Clamp
- Manual scraper
- Sandpaper
- Protective glasses


