Author:
Janice Evans
Date Of Creation:
28 July 2021
Update Date:
1 July 2024

Content
WhatsApp is a cross-platform messaging application that lets you chat without having to pay for SMS. You can also send and receive unlimited media files from your contacts. If you want every photo or video you receive to download to your phone, you can set WhatsApp to automatically download.
Steps
 1 Make sure the app has access to your camera roll. When you first download the application, you should be asked: "Do you want to allow WhatsApp access to your Camera Roll?" If you want to automatically download images, allow access. If you don't know if this feature is enabled or not, check your phone settings:
 - Go to "Privacy" or "Permissions".
- Find the "Photos" or "Camera Roll" section.
- Check if WhatsApp is on the list of allowed apps. If not, then give him access.
 2 Launch the WhatsApp app and go to settings. To enter the settings page, click on the corresponding icon in the lower right corner of the screen.
 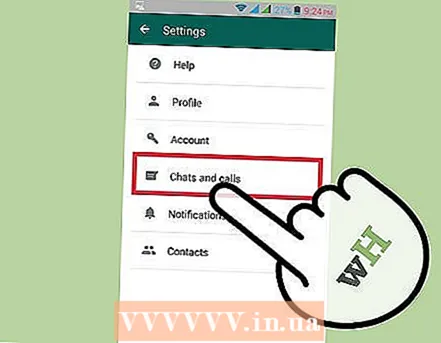 3 Click on the "Chat & Calls" option and then find "Save Incoming Media". Enable this feature so the slider turns green. Now all photos and videos will be saved automatically.
  4 Customize the settings for yourself. You can choose which network connection your phone should have. This will help conserve battery power. Click on the "Auto-upload media files" option to change the settings:
 - The "Never" option should be disabled. Otherwise, your phone will ask for confirmation before every download.
- "Only when connected to Wi-Fi." This option is recommended for those who want to conserve battery power. Automatic download will only occur when your phone is connected to a Wi-Fi network.
- Select the Wi-Fi & Cellular option to download images, audio and video files. For example, you can set WhatsApp to always download images and download large video files only if you have a Wi-Fi network.
 5 Click Back to save your changes. You don't need anything else for this. Just click on the Back button in the upper left corner of the screen until you return to the main settings menu. Here you can navigate to options such as Favorites, Recents, Contacts, Chats, or Settings.
Tips
- Make sure that you don't have the Never option enabled on the Auto Upload Media page.
Warnings
- If you're not connected to a Wi-Fi network, enabling automatic downloads can be risky. Unless you have unlimited internet, downloading media files can incur additional costs.You can upload images without this feature.


