Author:
John Stephens
Date Of Creation:
22 January 2021
Update Date:
1 July 2024

Content
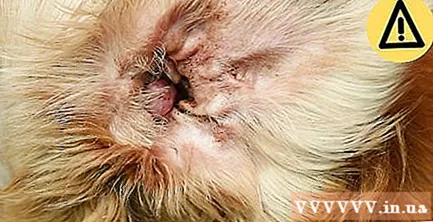
- Observe if water is draining from the ear canal (colorless, gray, or brown), if the wax is thick, blisters, scabies, or any other wounds develop. If you notice any of the above, do not clean the dog's ears but contact your veterinarian for advice.
- You cannot see deep inside the dog's ear canal because of the twisted structure of the base of the ear where it touches the head. Do not clean too deeply inside their ears without the guidance of a doctor. Never use a cotton ball to clean the ear canal because if you put a hard, small object deep into your dog's ear, you can rupture the eardrum.
- Mites, ticks, and fleas all like to parasite in relatively hidden places in and around the dog's ears. The mite will make your dog itchy and may cause a sticky, brown discharge from the inside of the ear canal. You will need a veterinarian to diagnose and treat dog ear mites. As for ticks and fleas, they can be destroyed (and prevented) by a variety of chemicals that you can easily get from a veterinarian's office.
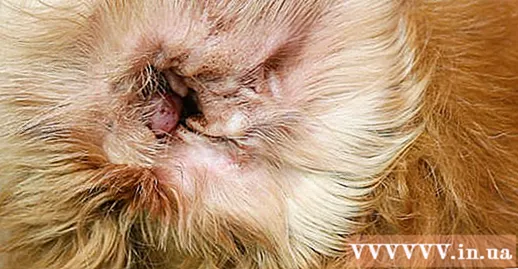
Check for an infection in the dog's ear. A yeast infection causes their ears to smell, itchy, and have brown discharge. Such fungal diseases require special medicine to disinfect; Just cleaning without using medicine not only does not cure the illness, it can also make the condition worse. If you experience any of these symptoms, bring your dog to a veterinarian right away.
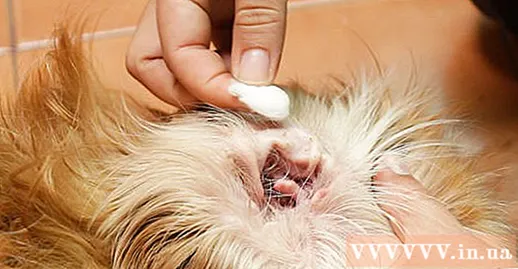
- Alternatively, you can wrap a gauze pad around your index finger moderately and dip it in the cleaning solution. The gauze should not be too wet. If you accidentally let the solution absorb too much, gently squeeze the swab and continue cleaning your dog's ears. This is an alternative to earwax, but it can be a bit uncomfortable for your dog. Just use your thumb and index finger to hold the swab.

Gently wipe the inside of the dog's ear lid. Remove all dirt and debris you see. If the dog's ears are too dirty, it may take a few cotton pads to clean. The puppy will be obedient as long as you gently wipe and clean only the outside of the ear canal.
- Be gentle as you can easily scratch their skin. Vinegar and alcohol can also be painful when the skin is scratched.
- Be sure to carefully clean the crevices in the ear canal as dirt and wax may get in these areas.
- Clean inside both ears.

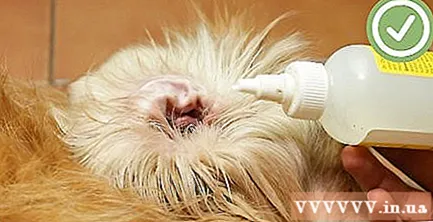
- To do this, place the tip of the ear cleaning vial right at the tip of the ear canal, below the ear cap. Squeeze the bottle to let the liquid run into the dog's ear. Slowly work and rub your dog's ears (thumb on one side, index finger on the other side, gentle action!) For 60 seconds.
- Use gauze or cotton to clean the mucus in your dog's ears. Chances are you'll use a lot of cotton if your dog's ears are covered with dirt.
Let the dog shake its ears after cleaning. Usually, your dog will shake his head after having his ears cleaned. Let it shake its ears, but you have to turn your face away so that the liquid or dirty debris won't get in your eyes. This will help eliminate any leftover cleaning solutions.
- After your dog has rinsed any remaining ear fluid, wipe his or her ears again with a gauze pad or cotton pad. While the dog shakes his head, dirt will be splashed out of the ear canal and this will help remove them.
Advice
- Giving your dog something after cleaning his ears will help him relax and realize that if he stays there obediently the next time he'll be rewarded again.
- A good time to clean your dog's ears is after he's done bathing. Hygienic solutions help to get rid of any water that gets stuck in your dog's ears. This is recommended as water can infect its ears.
- Your veterinarian can show you the right way to clean your pet's ears. If your dog has had ear problems in the past, you should pay special attention to this.
- Be extremely slow and cautious, your puppy may shiver while it is being cleaned and you could permanently damage his ear.
Warning
- Never put a cotton swab deep into your dog's ear canal! This could cause permanent hearing damage to the dog.
- Never use water to clean the dog's ears, as water can get into the ear canal and cause infection.
Things You Need
- Ear cleaning tools for dogs
- Cotton pad and gauze


