Author:
Monica Porter
Date Of Creation:
16 March 2021
Update Date:
1 July 2024

Content
Want to change the spacing settings on Google Docs, change single spacing between lines to double spacing? Here are some guidelines for adjusting double spacing between lines of Google Docs documents on your computer. Note that Google Docs documents may or may not show this option on the phone, so if you try to follow this guide on your mobile phone and still cannot find the option description, go to another method, or refer to the Tips section.
Steps
Method 1 of 3: Use the Top Menu (Horizontal Menu)
Select the piece of text for which you want to create double space between lines. If you click anywhere in a piece of text, the whole paragraph will be affected when you change the spacing. If you want to adjust the spacing of the entire document, select the entire document.
- You can select an entire document automatically using Edit → the Select all option in the Google Docs menu bar.
- The spacing between each line in the paragraph should be equal. If you only want to change the spacing of several lines in a paragraph, you have to separate these lines into separate paragraphs.

Show the Top menu bar if necessary. The Google Docs menu bar is a horizontal menu bar that lists a series of options just below the document's name, the first being File. If you don't see the bar, it's probably hidden. Try double-clicking the ^ icon in the upper right corner of the document to bring up the menu bar. Alternatively, you can also press the key combination ctrl + Shift + F.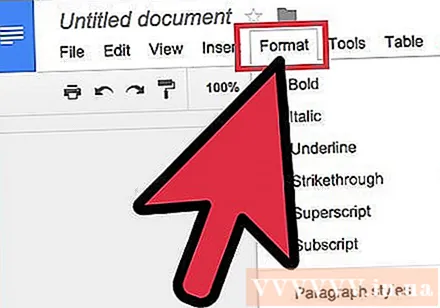
Click Format in the Google Doc menu bar. Click the Format button on the menu bar, there will be a list of options displayed under this button.- Note, this menu bar are not Like the menu bar in a browser, because the browser's menu bar is at the top of the screen and the Google Docs menu bar is in a lower position, inside the browser window.

Move the cursor over Line Spacing on the drop-down menu box. The Line Spacing option is in the middle of the menu box. You can either click, or just move the cursor over this option and then many more options are displayed.
Select Double (Twice the single line spacing). When the new menu box displays several options for adjusting text spacing, choose Double to create double spacing between lines of the document. If you are not satisfied with double spacing, try other spacing by pressing 1.5 or pressing Custom spacing ....
- Any option with a check mark next to it is the current distance option for that text.
Method 2 of 3: Using the Line Spacing Icon
Select the text you want to double line. Click anywhere in the text, or select the entire document by pressing cmd + A.
Find the Gray Toolbar. This toolbar is above the document body, but below the document name and menu bar. A toolbar is a bar with many symbols on a gray background, starting with the printer icon on the left and ending with the double ^ symbol on the right.
Find the Line Spacing icon on this toolbar. The Line Spacing icon is like a series of horizontal lines representing text, next to a vertical arrow pointing to both up and down. If you don't see it, you can check each icon from right to left. The Line Spacing icon is located on the right half of the toolbar.
Click the Line Spacing icon and select Double. Click the Line Spacing icon and choose Double on the drop-down menu box. You can also choose another line spacing, like 1.15 or 1.5 spacing. You can enter another spacing yourself by clicking the Custom spacing ... option also in the drop-down menu box. advertisement
Method 3 of 3: Create Double Spacing Default for new document
Open a double spaced document. Make sure the document has the text settings you want to use most often. If you have changed the font, or added customizations such as bold or italic, these settings will be set by default for all new documents.
Open the menu bar "Normal text". Click on any text in normal size, not in large header format. Select the Normal text button on the gray toolbar right on the page of the document.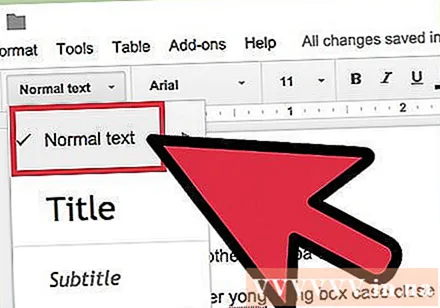
Follow the path to find the correct option. Open the drop-down menu box, find the larger Normal text button just below the first button. Hover your mouse directly to the right of this large button, locate and click on →. Finally, click the button Update 'Normal text' to match.
Create a new document to test again. New documents created in Google Docs must be double spaced, in "Normal text" format. Create a new document and enter text to check that your settings changes have been saved.
- Note, old documents will not change according to your new settings unless you choose Apply 'Normal text', in the same menu box of the option "update".
Advice
- If the Google Docs app on your phone or phone OS doesn't have the option to set line spacing, you can follow the following method, but it is not guaranteed that this solution is always successful. Log in to Google Documents on your computer and follow the "Making Double Space the Default" method. Then, log in online with your phone to update this setting, followed by the Apply 'Normal text' option to change the document to double-spaced format.


