Author:
John Stephens
Date Of Creation:
2 January 2021
Update Date:
1 July 2024

Content
Many people use Google Sites to create their own website. This is a great way to make a mark of yourself, or to sell to your customers. However, many of the Google Site's help pages are rather vague, difficult to figure out on your own. Adding images will improve your website significantly, making your website look more professional. Fortunately, you can add images to your Google Site with just a few simple taps.
Steps
Part 1 of 2: Downloading Google Site Photos
Take a photo. Use the camera and take pictures of your home, friends or pets. You can also find the desired images online. Since the Google Site is a public site, make sure the image content is relevant.

Download Image. If you are using photos from a digital camera, connect the camera to your computer first via USB. Depending on the program you use, a new screen will appear. Select "import images". You can select individual images or all of them. If uploading pictures online, right-click (PC) or double-click (Mac) the photo.- A drop-down menu appears, select "Save As". You are asked to name a photo, remember to name something easy to remember.

Visit the Google Sites online page. Type in the address bar or click on the bookmark. You can do this on any web browser, for example Google Chrome or Internet Explorer. Click the "Edit" button (with a pencil icon) in the upper right corner of the screen. You will be switched to "Edit Mode" to make it easy to change / add images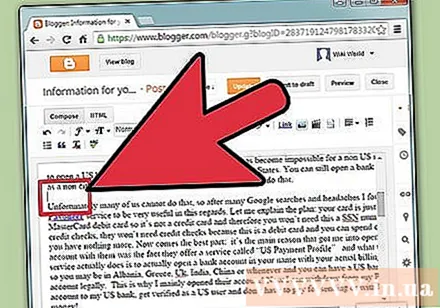
Click on the right edge of the object or text below. Press the button ⏎ Return to create space. This is the action of adding space so the image doesn't stick to the object or cover up text.
Select the "Insert" button. This button is in the upper left corner of the browser's screen. A drop-down menu will appear. Scroll down and select "Image".
Click "Choose File" or "Browse". Select photos you want to add from your computer. The preview image will appear in the window. You can upload multiple images by clicking the "Choose File" button on the right side of the preview window. Once you have selected a photo, just double click it and it will be uploaded to Google Site.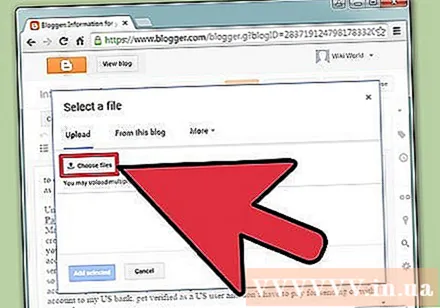
Link to web URL. Instead of downloading pictures from your computer, you can link to web addresses. Under the "Insert" tab, select "Web Address" instead of "Image". You will be prompted to use your own photos, not copyrighted photos. Avoid piracy. Once checked, just paste the URL into the dialog box that appears.
- Provide the correct URL, the image will appear in the dialog box for you to check, uploading large images will take longer. If you encounter any problems, check the URL again.
Click on the "OK" button in the lower left corner of the pop-up window. This is the action of inserting an image on the Google Site. After the picture appears, close all other windows and align the picture. advertisement
Part 2 of 2: Format Photos on Google Site
Move the image to the desired position. Click on the photo and move. Once completed, a blue rectangle appears around the image, offering a few options as follows: change the image position, wrap or resize the image. Feel free to customize with these options.
Contour images. Click on "HTML" in the upper right corner of the Google Site page. When the photo address appears, add an outline snippet. The image address will appear between the 2 symbols as follows: <(image address)>.You add the code after the address, before the second parenthesis.
- For example: <(image address) style = "border: 1px solid black; padding: 5px;"> This code will create a black border 1 pixel wide, 5 pixels away from the image.
- For example: <(image address) style = "border: 5px dashed blue; padding: 15px;"> This code will create a dashed blue border with a width of 5 pixels, the border 15 pixels from the image.
Image alignment. Access "Edit Mode" and click on the photo. The editing window will appear. You will see options to align left, center, and right. Click the option you want to align the image. Click "Save" when finished.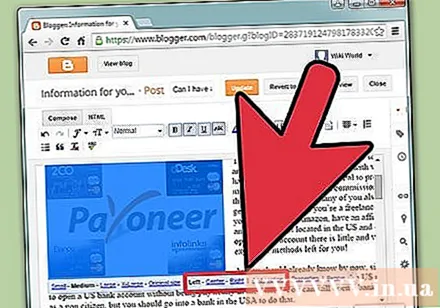
Resize the photo. Access "Edit Mode" and click on the photo. Click S, M, L or Original. The above characters stand for small, medium, large, or the original size of the image. You can click another option to customize the size. Once done, select "Save".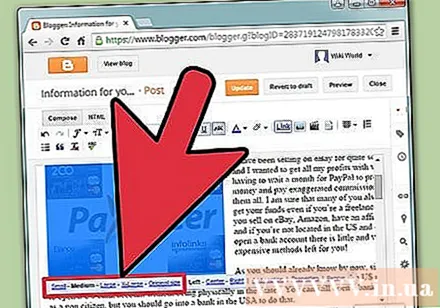
Save. If the draft has not been saved, click "Save" in the upper right corner of the screen. Always save your edits or you will have to start over. advertisement
Advice
- Refer to some other complex contour code snippets. You can use code from simple to extremely complex.
- Customize options. There are no fixed options, so you can optionally resize and align images to the other side of the page.
Warning
- Remember to save everything. Check 2 or 3 times.
- Make sure your image content is relevant to the public eye, as it will show up when people search for your Google Site address.


