Author:
Robert Simon
Date Of Creation:
19 June 2021
Update Date:
1 July 2024

Content
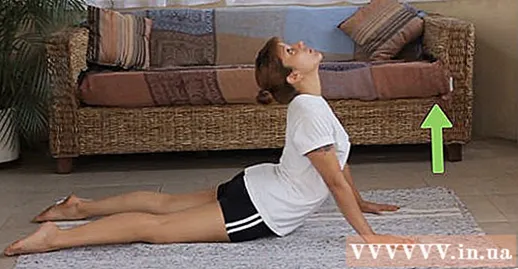
- Try to touch all ten fingers and ten toes on the floor. In this position the toes should never be bent inward.
- Remember to keep your elbows close to your body, facing out behind you instead of facing the side.
Push your shoulders back a little - down and away from your ears.
- If you feel your hips lift off the floor, use your abdominal muscles to push the pelvic area down.

- Remember: you can use your hands to lift your body, but drill too much pressure on your hands. Try to let your back and abdominal muscles bear most of your body mass.
- If you find it uncomfortable to tilt your chin up, try to keep your neck straight and stare at the floor. The head should be relaxed and let alone.
Hold this position for 4-5 normal breaths. Try to hold the pose for five breaths before gently lowering yourself to the floor or stretching further back. If you feel any pain or tightness in your back, stop doing this position immediately.
- You may or may not be able to straighten your arms in this pose, depending on your arm's length. If your pelvis starts to leave the floor as you straighten your arms, keep your elbows slightly sagging. Remember that keeping your lower body still is more important than trying to bend it further.
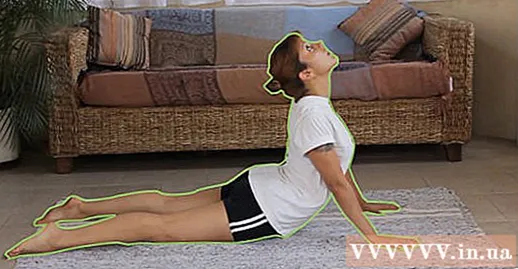
Correct posture is more important than trying to stretch as much as possible. The more accurately you perform the posture, the more benefits you will get. Watch the attached video and pay close attention to how each muscle and joint is relaxed and positioned neatly. In short, you should:
- Always keep the backs of your feet, thighs, hips, and palms firmly on the floor.
- Keep your shoulders low and push back, away from your ears.
- Toes and fingers should be spread out for balance, but still relax. In general, you can still shake each finger easily.
- Do slow, controlled breathing.
- Focus on keeping your central muscles firmly and contracting your abdominal muscles to help with movement.
Part 2 of 4: Transition to cobra pose and vice versa
Start with a basic mountain pose with your feet pressed together on the ground. The hands are in front of the heart. Slowly raise your hands above your head and then lower to the ground as if you were touching your toes. Be sure to bend your hips - you don't have to touch the ground with your hands.
Place your palms on the ground like you're doing a cobra. You can slack your knees if you feel that way. Place your palm face down so your fingers are below your shoulders. The hands should be separated by shoulder width.
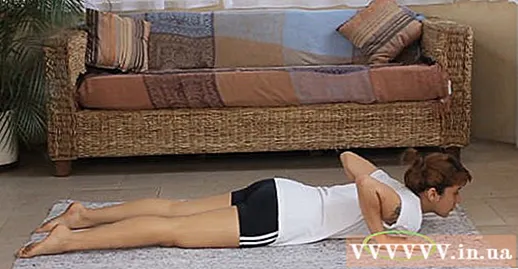
Depress your feet back to bring your body in a position similar to a push-up, with your knees on the ground. You will be in a plank with the palms on the sides and the feet kicking back. You are resting on your toes at this point, but you can also skip this step and rest on the instep if the ankle doesn't hurt. Knees resting on the ground.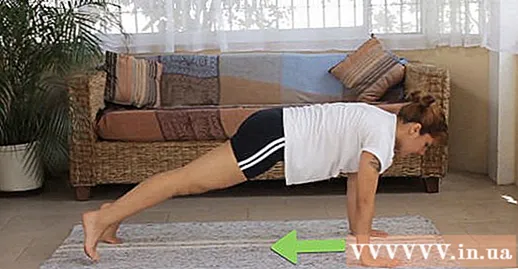
Lower your chest to the ground so that your butt is the highest point now. Your body is in a chi pattern with your feet and chin low and your buttocks high. This pose is just a short transition period.
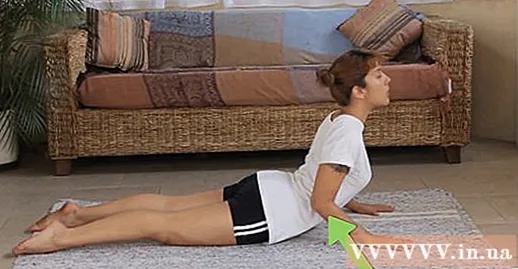
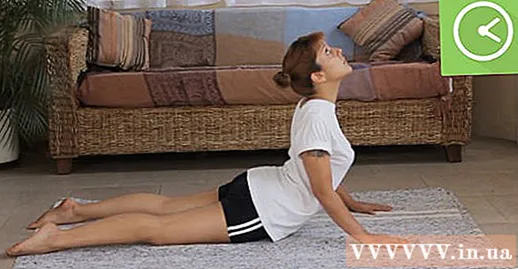
Roll your upper body forward and up, pushing your chin up as your butt and hips fall to the floor. This is a cobra - lower body touches the floor while the back is arched and the head is raised. Once done you will be in a cobra.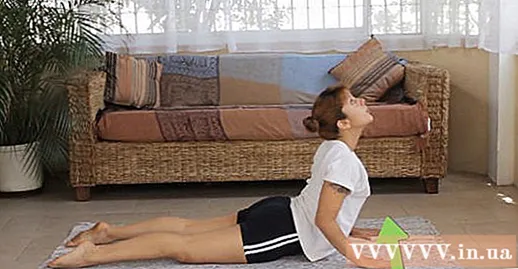
- Initially this is difficult to do, you just need to lower your buttocks so that your hips are still on the floor. You can then adjust your hands and feet to achieve a cobra.
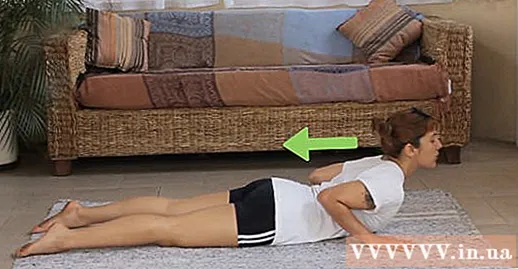
Lower your chest back to the floor to get out of the cobra. You will transition to a face-down dog pose from this position. In short, you will lower your body so that your whole body is on the floor.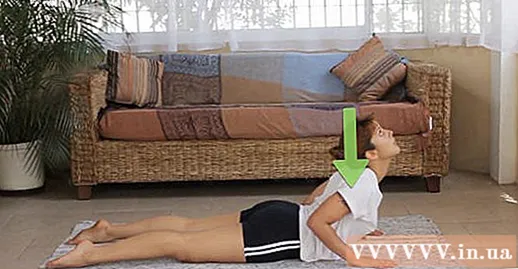
Roll your feet back so you rest on your toes. This pose is very similar to the basic push up pose.
Use both hands to push back and up to move into a face down dog position. First push from the upper body to your knees with your buttocks raised. Then continue moving until your legs are straight. The palms of the hands and the soles of the feet should rest firmly on the floor, the buttocks lying high so that your body forms a triangle with the ground.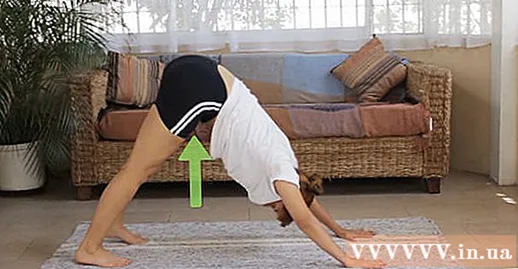
- Keep toes and fingers comfortably wide open so that all fingers can be easily shaken.
- The arms and legs are both straight and slightly slack in the knees and elbows.
Part 3 of 4: Adjusting cobra pose
Lower your posture. If the cobra is difficult to do, take it slowly and bend your back slightly. It is also okay to practice in a low cobra instead of a more difficult high. Never force a back bend if you feel uncomfortable as this could lead to serious injury.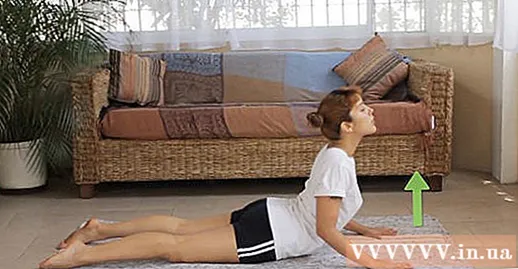
- If you feel discomfort in your back when you rest your palms on the floor, try resting your forearms on the floor with your elbows below your shoulders like in the Sphinx.
- You can also perform a standing cobra by placing your hands on the wall, pushing your hands as if pushing the floor in a normal cobra. Extend your chest and curl your back by pulling your shoulder blades together and tilt your head back slightly. This is a variant suitable for pregnant women.
Adjust your posture to make it harder. If the cobra is too easy for you, you can include some adjustments to enhance strength, flexibility, and balance. {Giffirst = Perform Cobra Pose in Yoga Step 22,360p. first.gif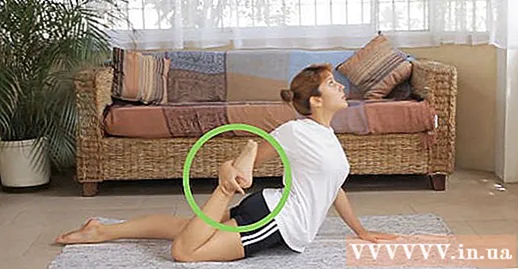
- To improve your balance in cobra, slack your right knee and hold your right ankle like in a half frog position. Hold for five breaths and repeat for the other side. Use the opposite hand to hold the ankle to increase the difficulty of the posture.
- If you want to bend your back a little more in the cobra pose, place a yoga pillow under your hands.
- Raise your hands a few centimeters from the floor to increase balance and pull your back muscles to participate more in work.
Arch your back more. Only do more back arching if the normal cobra pose is too easy for you and you want to be more challenged. The face-up dog pose is similar to cobra but has to bend the back more, as hips and thighs are raised off the ground, so the weight is on hands more.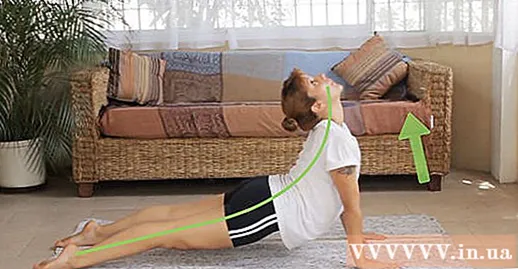
- Many people confuse the cobra with the dog-face pose. Remember that when doing the cobra, your hips should rest firmly on the floor and your hands should bear only minimal weight.
- There are many other options for back arching, including wheel pose, bridge pose, camel pose, and more. Choose the pose that works best for you or try to incorporate all of them into your yoga session.
Incorporate a cobra into a vinyasa series of poses or sun salutations. Instead of practicing the cobra pose, you can do it in a variety of different poses. This is the practice in most yoga classes.
- The vinyasa sequence usually starts with a face-up dog or cobra, then chaturanga (push-up position in yoga) and finally a face-down dog pose. This sequence is repeated many times in a row or at different times throughout the lesson.
- There are many different sun-greeting exercises, but most are in a mountain pose and lean forward, followed by a vinyasa sequence. Warrior I, Warrior II, and Warrior III poses are also common in hello sun exercises.
Part 4 of 4: Get ready
Start slowly. You can perform cobra pose with many different levels depending on the flexibility of the spine. No matter how flexible you are, just start to gently bend your back to warm your body.
- Make sure not to go beyond your limits and try to avoid comparing yourself to others in order to get the most benefit from and avoid injury.
- If you are taking a yoga class then perhaps your instructor will give you a "low cobra" or "baby cobra" first, then allow you to practice "high cobra" if they find it appropriate. This slow progression is meant to warm up your spine.
Advice
- Never force yourself to bend your back to the point of discomfort. To avoid excessive bending, use only your hands that support your body, and not bend backwards.
- Be sure to push your hips to the floor in cobra. If your hips are lifted off the floor, you should be in the same position as your dog is facing up.
- Always try to keep your shoulders low and away from your ears.
- If done correctly, you will not feel any pressure in your lower back while bending your back. If you feel pressure in your lower back, reduce the curvature of your back immediately.


