Author:
Peter Berry
Date Of Creation:
19 February 2021
Update Date:
28 June 2024

Content
Through this article, you will learn how to give up your Facebook account. Before doing this, you should back up your Facebook information, such as photos and contact information of your friends. After saving your data, you can proceed to delete your account.
Steps
Part 1 of 3: Arranging before deleting Facebook
to the right of the blue menu bar above the Facebook window.
Click Settings (Settings) near the bottom of the list of options.

Click General (General) in the top-left corner of the page.
Click on the text Download a copy (Download your info) in blue below the General page.

Click the button Start my Archive (Start Archive) green in the middle of the page.
Enter your password when prompted. This is the password you use to log into Facebook.
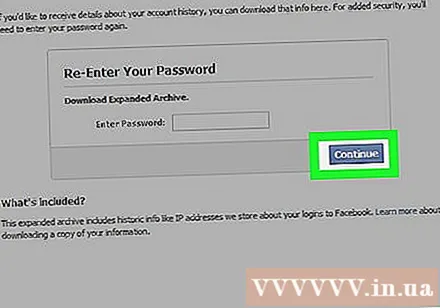
Click the button Submit (Continue) in blue at the bottom of the password window.
Click the button Start my Archive the blue color in the displayed window. Facebook will begin collecting your information after this.
Click OK when asked.
Go to the email address registered with Facebook. Open the inbox of the email address you use to log into Facebook.
- If you aren't logged in to your email account, you'll need to enter your email address and password before proceeding.
Open the email titled "Your Facebook download is ready" (your Facebook info is ready to download) sent from "Facebook".
- It will take a few minutes before you receive the email; Please wait patiently if you do not see the email on the first check.
- You may have to open a specific tab in your inbox (Gmail users, for example, will need to click on the card. Social (Society)).
Click on the download link. You will find the link near the bottom of the email, just above the words "This message was sent to" (this email was sent from).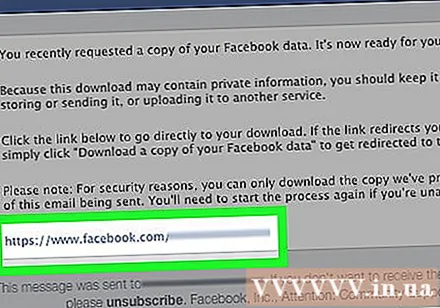
Click the button Download Archive (Load archived information) green at the top.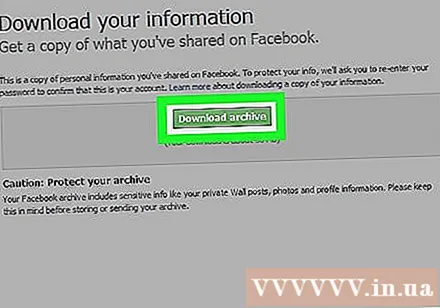
Enter your password when prompted, then click Submit (Continue) to download Facebook information to your computer.
- Downloaded data includes your contact information and photos.
Part 3 of 3: Delete Facebook account
Go to Facebook delete page. Visit https://www.facebook.com/help/delete_account/. Note that you cannot do this on the Facebook mobile app.
- If prompted, enter your email address in the "Email" field, enter your Facebook password in the "Password" field and click Log In (Log in).
Click Delete My Account (Delete the account). This option is below the warning message in the middle of the page. Once clicked, an additional window will appear.
Enter your password. Type your password in the "Password" field at the top of the window.
Enter the captcha code. This code appears in the middle of the page with mixed characters and numbers; You will retype that code and the field below.
- If you can't read the code, you can click on the link Try another text (Try a different code) or an audio captcha (audio code) just below to request a new code.
Click OK to send the code. If you entered it correctly, another window will appear.
- If you entered the wrong password or captcha code, you'll be asked to try again.
Click OK at the bottom of the window to delete the account. This deactivates your account for 14 days, after which it will be deleted. advertisement
Advice
- After choosing to delete your Facebook account, you have 14 days to change your mind. If you change your mind, simply log into Facebook with your email address (or phone number) and password, then select Cancel Deletion (Cancel account deletion).
Warning
- Once the Facebook account has been deleted, you cannot restore it.


