Author:
Robert Simon
Date Of Creation:
21 June 2021
Update Date:
1 July 2024

Content


Choose the material. There are a variety of materials to choose from, mostly brick or concrete in a variety of sizes, shapes and colors. You can find a suitable and affordable one online or at building materials stores.
- In general, if the building does not have a very special shape, you can calculate quite accurately the number of bricks needed just by measuring the area to be tiled and adding 5%. If your building design has a lot of curves, add 10% of the estimated area.
- You should buy a little more bricks, as you will most likely have to cut some tiles to fit the design. The more complex the design drawing, the more bricks must be cut.
- Remember that yard tiles are very heavy. Ideally, you should order it to your home. There may be an additional charge for brick cartons.

Mark the area with white paint markers. Paint markers help determine the exact location of the building. Another option is the line marking around the building area. You can use a rope or a garden hose to do this. Stake a stake to keep the boundary line in place and use a platform to create a straight angle.
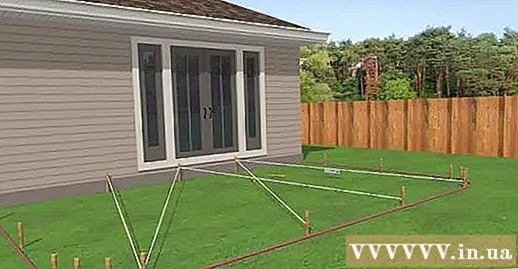
- Pile the pile at the highest point and mark the height at the place where the brick yard is adjacent to the entrance or building. Tie the rope around the pile right at that height.
- Pile on the opposite side (if not already available). This will be the lowest point. Attach the nivo water ruler to the rope and tie the other end of the line to the pole on the opposite side at the point where the tape indicates a balanced height. Starting at this height, measure down to at least 10 mm per meter (that is, if the distance from the door to the outer edge of the yard is 2.5 meters, you need to lower the height to 2.5 meters). cm) and mark this height. Lower the wire down to the point just marked. String the rope along the width of the yard to ensure the correct depth of the entire building is marked.
- If the course has a lot of slopes or a complex design you will have to do this at multiple points. Creating the correct slope is a very important step, so the more stakes you use, the better.
- You can hire someone who knows how to use laser rulers and measuring lines. They can produce the same result more quickly.
- Be sure to remove the wire before starting to dig to avoid tripping.
Part 2 of 3: Digging topsoil

Digging soil on the tiled area. In general, walk-only areas will require 10-15 cm thick base material, but if you are making vehicle walkways or building on soft ground (wet soil), the substrate should be thick. up to 30 cm. Consider how deep the substrate should be (ask the manufacturer or the building materials store), and add about 2.5 cm-4 cm for the sand layer, plus the thickness of the tiles. (The thickness of the tile will vary depending on the brand and type of brick, but usually around 6 cm or 8 cm.) The total thickness of the foundation, sand and tile is the depth you need to dig on the surface. work area. Remember to dig about 15-30 cm more outside the building boundary to leave space for curbing material. This is an important factor.- Also, you should flatten the soil at the contour of the yard. You can also spread the substrate slightly out of the edge, then flatten it with a compactor or hand compactor and contour it firmly.
- Measure the depth from the rope used to mark the slope instead of the ground.
Select the base material. The base material is usually crushed coarse rock, sharp edges, uneven. The two most important elements of the substrate are to maintain compactness (as a foundation for the tile layer) and to have good drainage. Poor structural integrity and poor drainage can damage the otherwise perfect tiled building.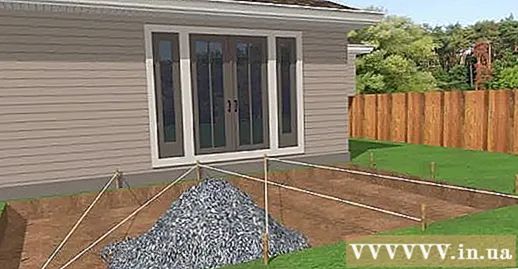
Fill the base layer. Pour base material no more than 15 cm thick at a time and use a hand compactor (for very small constructions) or compactor. It is important that the substrate be compacted. Repeat this process until the substrate has achieved the desired thickness. This is your last chance to adjust the height of the building when it is finished and ensure the yard does not protrude. Increase or decrease the thickness of the substrate slightly if necessary, regularly measuring the depth from the rope to the substrate.
- Remember to spread the base material on the outside of the building. Spread the foundation over the edges to make the building more sustainable.
- Continue to spread the substrate and compact in 5 cm thick layers each time until it is about 7.5 cm from the desired height. When compacting the substrate, make sure to maintain a slight slope - usually away from home.
Curb. Capping material has been shown to maintain the shape of the building over the years. This material is usually made of plastic, aluminum or steel, surrounds the building's perimeter and is fixed to the ground with nails 30 cm long. If the project has a special design, you will have to cut the curb material to fit the contour of the design.
Spread a layer of sand. Sand is the material that helps keep the tiles in place. Use coarse sand and level into a uniform layer, at least 2.5 cm thick, but not more than 4 cm thick. If the construction is large, you can place 25 mm diameter pipes on the ground, pour sand into the gaps between the pipes, flatten the sand in small areas (10-20 square meters per area). Remove the tubes and add sand to the gaps.
- Check if a weed-blocking mat is required first. Usually these materials are laid out on the ground before applying the substrate.
Part 3 of 3: Tiling
Start tiling along the longest edge. Fortunately, tiling is quite easy compared to all the steps you have done before. Begin tiling at a 90 degree angle, preferably on the side adjacent to the house or other construction, and continue paving along the longest straight edge. You need to remember to get tiles from many different barrels to mix the color of the tiles evenly. Yard tiles are usually natural materials so the color may differ slightly for colored tiles. You should use bricks from multiple buckets to blend slightly different colors on the surface of the court. Spread out from the first point, pay attention to align the tiles into straight lines. Paving tiles by placing them directly on the sand - do not push bricks in the sand or press against the tile placement and disturb the sand surface. Slide each brick along the edge of the adjacent brick. Keep the bricks as tight as possible. If there are wide gaps between the bricks, you will need more polymer sand to seal the gaps. Check from time to time to make sure the tile surface is flat, use a wire or a ruler to check the straightness of each row. Regularly use the water ruler on the tile surface to ensure correct slope and flatness on each row of bricks.
- Do not step onto flattened sand surface. Set foot on the paved bricks and continue paving out, Do not get too close to the edge of the paved bricks, otherwise you may disturb the sand in front of the brick.
Cut bricks if necessary. You will almost always need to cut several bricks to match the edges of the court. Do not try to contour the bricks. Instead, place all the bricks in the correct rows and cut them to size to fit the edge. Use a mason saw (you can rent it at a tool rental store) or a cutter for a neat cut. If you have prepared a lot of bricks before, you will have a lot of materials to deal with, even if you make a few mistakes!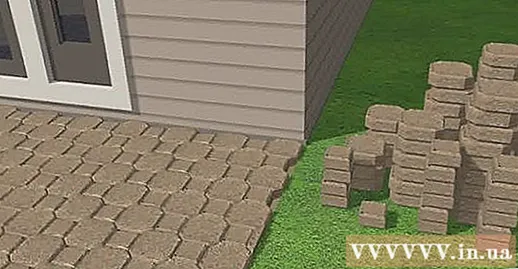
Press the tile into the sand. When you have finished paving the bricks in a pattern, use a table compactor to compress the tiles into the sand. Run the compactor on the brick surface at least three times to press the brick into the sand.
- If there are gaps between the bricks, you can sweep the polymer sand on all seams until half full. This will keep the tile from moving while compacting. If bricks are loose during compaction, the surface of the tiles may be uneven.
- When compacting objects and tiles, you need to try to work in many different directions or styles.
- Remember to cover the covering material such as a thick cover over the compactor when compacting the tile surface to avoid abrasion.
Sand into the slot. Fill the slot with the same coarse sand as used, or use slightly finer sand, such as packed silica sand (available at building materials stores). Fill the tile surface with sand and sweep into the crevices until all slots are filled. This sand will help to fix the brick. Make sure the sand is dry.
- Use a large brush to sweep large areas or small brushes over small areas. Scan in many different directions.
Seal the tile slot. For increased durability and less maintenance, seal the tile slots with the right sealing product. Look for non-toxic (plant-safe) types, and don't forget to clean the tile surface before applying.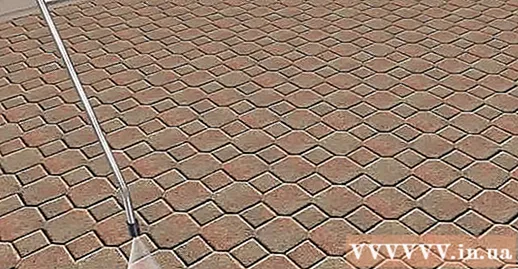
- Do not use too much water when washing tiles and make sure the tiles are completely dry before filling.
Advice
- The geotextile is optional but is also recommended to prevent soil movement below the tile surface, while also increasing the durability and strength of the tile system. Geotextile is especially useful in areas with a lot of traffic above.
- In non-frozen climates, you can replace the curb material with concrete, and for some constructions, such as access roads, curbing is not necessary. You can curb the pavement after paving the tiles.
- The above are general guidelines only. You need to check the manufacturer's instructions before paving the yard.
- If paving bricks on a sandy ground, you can mix one 42 kg bag of cement for every 3 square meters of soil for the foundation.Use this only if you have a walkway or yard with no traffic on it.
- To calculate the required amount of gravel and sand, you can use an online calculator like Calculator Soup. Remember to add 2.5 cm to the base material when calculating to reduce loss in compaction.
- Clay can become unstable over time. You need to increase the stability of the building by spreading the geotextile under the substrate and forming the ground you just trained to create a stable layer before pouring the foundation.
- Spray some water on the gravel to moisten. This will make the ground compaction process easier.
- Instead of using curbed concrete, you can mix wet Portland cement and spilled base material underneath the tile. Suppose you are using a 15cm x 20 cm brick as a contour for the road. You must peel off the substrate along the length of the contour, then pour in Portland cement and mix with water. Place the screed tile on the wet cement mixture and beat it. So you have built the concrete contour that no one can see. Even if the floor tile is cracked, the concrete pavement will not deteriorate.
Warning
- Always check with your local utility company before digging. Remember that you can be injured or even killed if you run into power lines.
- When sawing cementitious materials, the sawer and others nearby are exposed to dust containing silicon particles, which can have serious and long-term health effects, including pneumoconiosis.
- Be careful when using tools such as a bench compactor or saw. Follow the manufacturer's instructions and heed any safety precautions. Remember to wear safety glasses when cutting bricks.
What you need
- Paving stone (tile)
- Substrate materials - coarse gravel, etc.
- Sand
- Curb material or curb concrete
- The standard hydrographic machine
- Ropes, stakes and ruler
- Measure
- Olive paper and pencil
- Table compactor or manual compactor
- Plates or tubes
- Sawing mason or brick breaker
- Eye protection


