Author:
Monica Porter
Date Of Creation:
17 March 2021
Update Date:
1 July 2024

Content
Fairy Houses are a great home for fairies in your home, whether real or fantasy or pretty figurines. You can easily buy a fairy house in the store, but the home you make by yourself will definitely be special and more unique. All you need is a shoebox, scissors, glue and a little creativity!
Steps
Part 1 of 4: Building foundations and roofs
Find a usable shoebox. The size, shape and color of the box don't matter. A box with a lid is best, but if you don't have one that's okay. You only need to use one more piece of cardboard to make the roof and floor.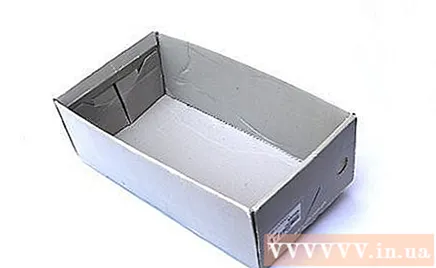
- Some shoe boxes have an attached lid on one side of the box. If your shoe box has a lid like this, cut off the lid first.
- Some craft shops sell "photo boxes" shaped like shoeboxes. These boxes are great for making fairies!
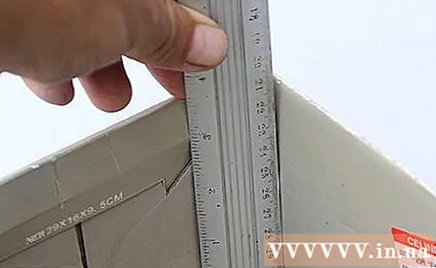
Measure the length, width and depth of the box. You need these measurements to build your roof, floor and walls. Use a ruler to measure and record the following measurements:- Length: the long edge of the box.
- Wide: short edge of the box.
- Depth: the height of the box; measure from the top of the box to the bottom of the box.

Cut the lid of the box lengthwise to form a piece of cardboard that matches the depth of the box. Take out the lid and cut the length in half based on the depth measurement of the box. You can cut the lid of the box with scissors, but a razor is fine.- For example, if your box is 10 cm deep, cut a piece of cardboard 10 cm wide.
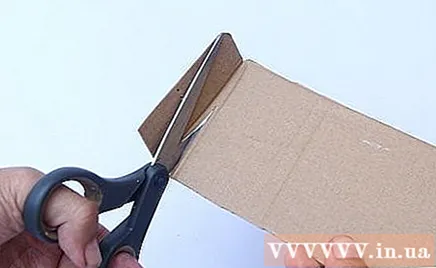
Cut off the long sides of the lid and leave the sides on. The shoebox lid has three dimensions similar to the box, with two short walls and two long walls. When cut out of the box, the piece of paper has one long wall and two short walls. Cut off the long walls of the piece of paper, but leave two short walls on the sides.- The two short walls will be two small flaps for you to fix the roof to the mouth of the box.
Fold the piece of paper in half horizontally to make a V-shape. Any side of the lid (inside or outside) facing out is fine. Be sure to fold the piece of paper so that the short sides overlap. After you fold the piece of paper and smooth it into folds, open the cover to a V-shape.
- This piece of cover will be the roof.
Attach the roof to either of the long walls of the box. Erect the box on the long wall. Place the roof on top of the box, then use tape to tape the sides of the roof to the sides of the box.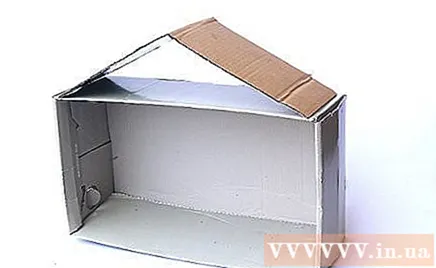
- You can glue the roof with glue if you like. Thermal glue works best by drying quickly. You can use transparent glue, but you must use tape to temporarily tape the sides of the cardboard to stick to the box while you wait for it to dry.
Use another piece of cardboard to make a wall behind the roof, if you like. Lay the house on top of the cardboard with the top of the box facing up. Draw the roof map, then cut out the triangle you just drew and stick to the back of the roof with tape or glue.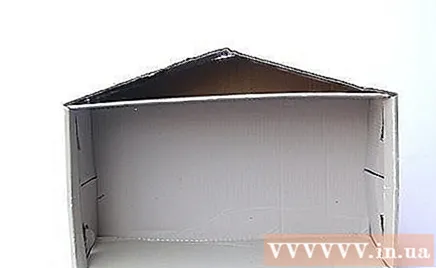
- The wall behind the roof will be on the same side as the bottom of the box. The front of the roof is on the same side as the top of the box.
Part 2 of 4: Layout of rooms, windows and doors
Cut off the rest of the lid to make the second floor of the house. Place the house on top of the rest of the lid of the box. Use a pen, pencil, or brush to plot the floor, then lift the house. Use scissors or a razor to cut the rectangle just drawn.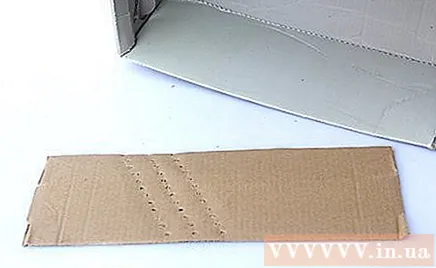
- Try to keep at least two sides of the lid. These walls will form two small flaps to help you attach the floor more easily.
- If the remainder of the lid is not large enough, use another piece of cardboard. Breakfast cereal containers are a very good material for this.
Use glue or tape to attach the floor plate to the center of the box. Attach the rectangular floor plate to the shoebox. Make sure the lower and upper floors are of the same height, then use glue or tape to tape the sides of the floor plate into the box.
- Fix the other side of the floor with duct tape to the box.
- If the side flaps are not left behind, you can attach the strips of adhesive tape along the two short and one long sides of the floor plate, then attach the floor plate to the box. Press the tape against the wall.
Use more cardboard to build more walls if you like. Draw a rectangle on the cardboard, based on the height and depth of the room. Cut out the rectangle, then attach the adhesive strips along the top, bottom, and sides. Attach the partition to the room, then apply the adhesive tapes to the floor, ceiling and back wall.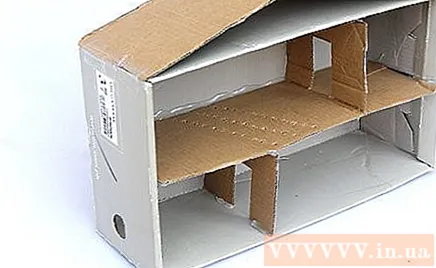
- The height of the rectangular baffle plate must match the height of the room. The width of the baffle must match the depth of the box.
- Do not make more than one partition for each floor, as that would make the rooms too cramped.
Draw windows and doors as you like. It is best to draw on the inside of the box, as that way you can avoid floor panels and partitions. If you find it difficult to draw, you can turn the box upside down, then draw windows and doors onto the back of the box.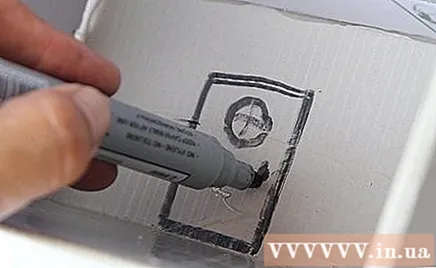
- Use a pen or a marker to clearly see the lines.
- To add more detail to the house, you can draw a cross-shaped decorative box on the window!
Use a razor to cut doors and windows. You can place on the cloth cutting mat to cut, or make holes in each corner of the windows and doors, flip the box and cut from hole to hole.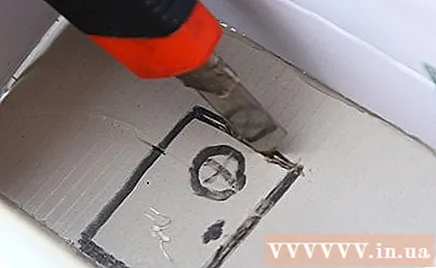
- Ask an adult for help with this step if you are a child.
- Leave a long, vertical edge of the doorway. That way, you will still be able to open and close the door!
- Don't worry if you miss a cross on the window frame. You can reattach it later with sticks.
Part 3 of 4: House decoration
If you like, stick paper coverings on the outside of the house. Scrapbook paper is best, but you can also use gift wrapping paper, tissue paper or even construction drawing paper. Cut paper to fit the sides of the box and stick with a dry paste.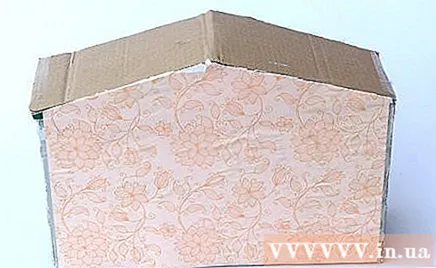
- If you bought a photo box at a craft store, the outside of the box may be pre-decorated. If you like the texture on the box, you don't need to do this step.
- If you don't have a dry paste, you can use a brush to apply a layer of liquid glue to the box to apply.
Paint on the exterior walls of your house if you don't want to stick with paper. Handmade acrylic paint is most suitable, but tempera paint or poster painting is also good. You can paint the whole house or just paint the textures.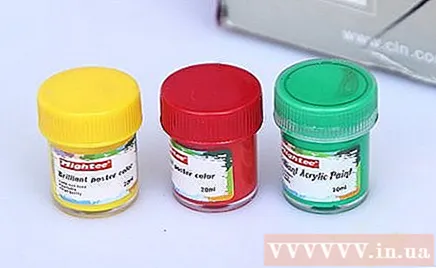
- A craft store photo box usually has its color. If you like the color of the box, you don't need to paint.
- Sprinkle a little glitter on the surface of the wall before painting dry for a sparkly effect!
Paint or paste paper inside the house to decorate it for a more beautiful look. Coloring paint is the easiest way to do this, but you can also stick scrapbook paper or gift wrapping paper over your house walls. If you want to stick paper, you need to measure the walls first, then cut the paper according to the measurements and stick with dry glue.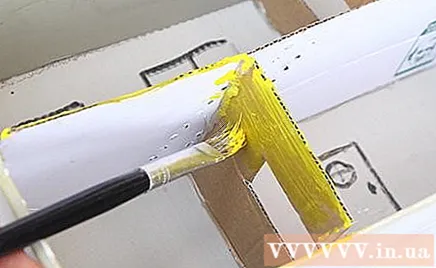
- You can use handmade milk glue to paste. Use a brush to apply glue to the walls and smooth the paper down.
Tiling the floor with handmade wooden sticks to look like real floor. Cut wooden sticks to the size of the house, and stick them on the floor with heat, milk, or clear glue.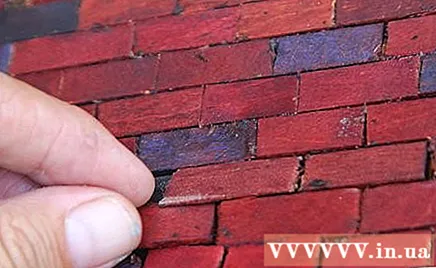
- Craft wooden sticks have two rounded ends. Remember to cut off both ends!
- You can also use wooden sticks to stir the coffee. Another option is to use scrapbook paper with the same texture as wood.
Add roofing or wooden sticks on the roof to look real. Collect a sufficient number of wooden sticks, moss or pine needles to cover the roof and stick with thermal glue. You should not use transparent glue or handmade milk glue, as these glues dry out too long and cause the materials to fall off.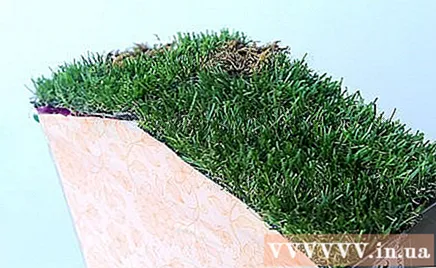
- To add a rustic look to the house, you can stick wooden sticks horizontally or vertically to cover both roofs.
- For a more natural touch, stick pieces of moss on the roof. You can find moss bags in the florist section of the craft store.
- If you want a traditional roof, you can stick the pines in rows that overlap like fish scales, starting from the bottom edge and gradually rising to the top of the roof.
Decorate windows with curtains, borders or pictures from magazines. First install the window with paper or cellophane, and then create a door frame. Here are a few ideas: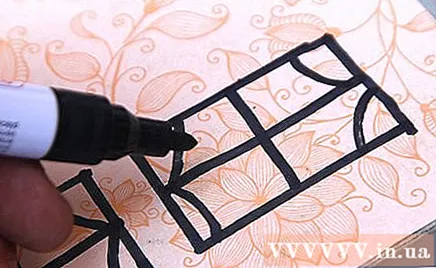
- Cut clear or cyan cellophane into squares and stick to behind windows to make glass.
- Stick pictures from the magazine behind the window to make the fairies happy.
- Stick wooden sticks around the windows to create a frame. Make additional cross-shaped boxes if you like.
- Replace with foam paper if you don't have a wooden stick. Alternatively, you can also paint or use decorative tape.
- Cut the rags into rectangles and stick them on either side of the window to make curtains.
Complete the doors with a paint finish and door handles. If you already have a door, you should also decorate it! Quickly sweep a layer of paint or stick scrapbook paper on the door. Once the paint or glue has dried, use the thermal glue attached to the side to make the door handle. advertisement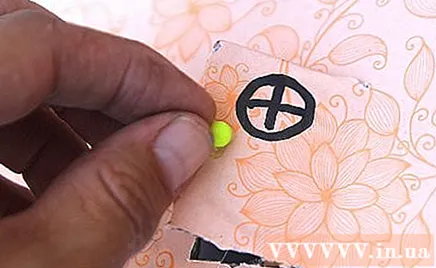
Part 4 of 4: Furniture in the house
Make stairs with handmade wooden sticks or small branches. Choose two wooden sticks a little bit longer than the height of the ground floor and a smaller bundle of sticks about 2.5 cm long. Place two parallel long rods, then stick small rods between two long rods to make stairs.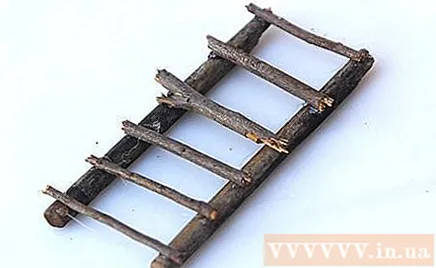
- Thermal glue is best for this, but you can also use transparent glue or a liquid manual glue.
Use shells or rocks to make paths. Place the fairy house in the garden or into a larger box lid. Use shells or small rocks to create a pathway to your home. You can also use other materials such as buttons or pebble decorations.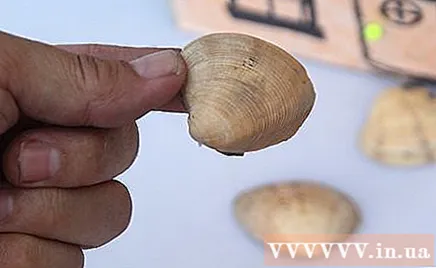
- If you want to place the house on a large tray, consider filling it in first.
Use a spool or cork to make furniture. You can make use of the used up items at home or buy them at craft stores. Here are the suggestions to decorate the furniture: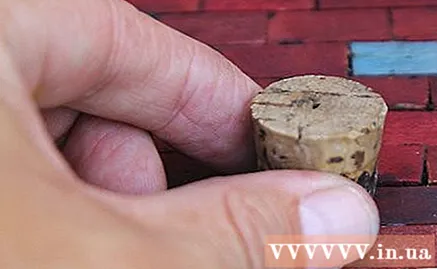
- Make tablecloths out of rags or paper.
- Use the button or the lid of the match to make a plate. Hand-stitched dykes are perfect for making cups.
- Paint the mushroom-shaped wine corks to resemble poisonous mushrooms!
- Use pieces of moss as a chair mattress.
Make use of match boxes or soap boxes to make other furniture. Look for some cardboard boxes, such as soap boxes or match boxes. Cover the box with paper or paint, then decorate it to look like a closet, oven, or other household electrical appliance.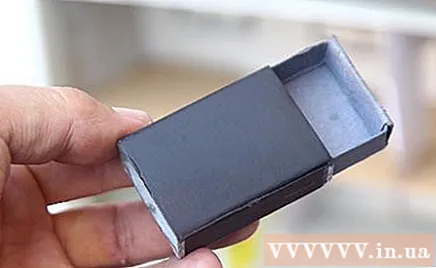
- Use a brush to draw details like the drawers or oven doors.
- Stick the beads to make handles and handles. You can replace the beads with table pins.
- The cuffs are a great addition to a kitchen counter.
- Stick the beads to the bottom of the matchbox to make a small bed.
Use household items to make bed sheets and blankets. Now is the time to put yourself as a fairy to see things in her tiny world. Imagine you are only a few centimeters tall and look around you. What can you use as a sink or bed sheet? Eg: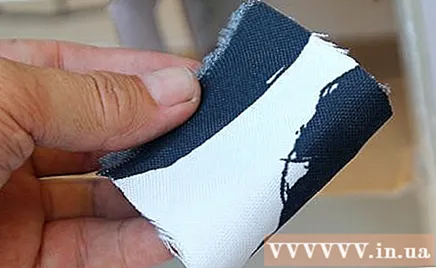
- Use pieces of moss to make pillows and mattresses.
- Cut old rags or t-shirts into rectangles to make blankets and sheets.
- Larger caps or clamshells can be used to make sinks or tanks.
Finish. advertisement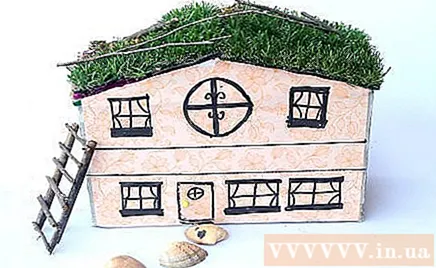
Advice
- Use small twigs or sticks to make furniture.
- Leave candy in the house to treat the fairies.
- Don't leave your fairy in your garden when it's wet or rainy.
- Don't be disappointed if you don't see fairies. Fairies are very shy and good at hiding!
What you need
- Shoe box
- Cardboard (extra)
- Drag
- Knives
- Ink pen, pencil or brush
- Thermal glue, transparent glue or manual milk glue
- Craft acrylic paint, tempera paint or poster painting
- Paint brush
- Fabric
- Wing of pine, ball cap, moss, small tree branch, etc.
- Beads, buttons, seashells, small stones, etc.


