Author:
Louise Ward
Date Of Creation:
10 February 2021
Update Date:
1 July 2024

Content
Silicone molds are generally preferred because they are easy to use and do not require a lot of anti-stick oil. While there are a variety of molds available on the market in a variety of sizes, shapes and designs, you cannot afford the perfect mold for your own models. In this case, you can make your own. Two-part silicone mold makers are available outside the store, but it's much cheaper to make your own at home!
Steps
Method 1 of 3: Use silicone and liquid soap
Fill the bowl with water. You need to use room temperature water - not too hot or too cold. The water level should be deep enough for you to immerse your hands.

Stir a little liquid soap into the water. You can use any type of liquid soap, including shower gel, dish soap and hand sanitizer. Continue stirring until the soap is completely dissolved and no residue is visible.- Mix in the ratio of 1 part soap to 10 parts water.
- You can also use liquid glycerin. Glycerin will react with silicone and help silicone stick together.

Squeeze some building-up silicone into the bowl of soapy water. Buy a pure silicone tube from a building materials store; Remember not to buy fast freezing silicone. Cover the specimen with sufficient amount of silicone.- Construction silicone is also known as silicone sealant.
- If silicone does not come with a syringe, you will need to purchase a glue spray gun. Attach the glue spray gun to the silicone tube, cut off the end of the tube and poke a hole in the top.

Kneading silicone in a bowl of water. Put on gloves and reach into the water, hold silicone in hand and knead. Knead until the silicone stops sticking while still submerged in water. Kneading time takes about 5 minutes.
Squeeze the kneaded plastic into a thick plate. Start by rolling the plastic ball-like member between your palms. Place the ball on a flat surface and press gently down. This flexible disc should be thicker than the workpiece object.
- If the silicone is still sticky, you can rub the soapy water onto your hands and squeeze the surface with a thin layer of liquid soap.
Press the specimen into the silicone plate. Remember the design face down. Gently press the edge of the mold against the specimen so that there is no gap between the silicone and the specimen.
Wait for the silicone to freeze. Silicones never harden like ice, but will always be flexible. You only need to wait a few hours for the silicone to harden just enough so that you can still bend without indenting the mold when pressed down.
Take the sample from the mold. Hold the edge of the mold bent backwards. The embryo will flake and pop out on its own. Tilt the top face down to slide out the workpiece.
Use the mold. Press the clay into the mold, then remove the clay and allow it to dry. You can also pour the sap into the mold, but wait for the sap to freeze and harden before removing it. advertisement
Method 2 of 3: Use silicone and corn starch
Squeeze some building-up silicone into the plate. Buy a pure silicone tube from a building materials store; This product usually comes in the form of a silicone pump inside. Squeeze some silicone into the disposable dish. You need to get enough silicone to cover the specimen you want to cast.
- Construction silicone is also sold as silicone sealant. Remember not to buy fast freeze.
- If the silicone tube does not come in the form of a syringe, you will have to buy a glue spray gun first. Attach the silicone tube to the glue spray gun, cut off the tip of the tube and poke a hole in the tip.
Pour twice as much cornstarch as the silicone into a dish. If you can't find cornstarch, try cornstarch or potato starch instead. Place the powder box next to it for convenience when you need to sprinkle more powder.
- If you want to make a color mold, you can add a few drops of acrylic color. This step will not affect the effectiveness of the mold.
Put on nylon gloves and knead the 2 ingredients together. Continue kneading until the silicone and cornstarch blend into a plastic mixture. This mixture may be a bit dry and sporadic at first, but keep kneading it. If it feels too sticky, you can add more cornstarch.
- Some cornstarch may be left on the plate, but never mind. Silicone will get enough corn starch needed.
Shape the silicone into a disc. Start by rolling the silicone mixture into a ball between palms, then place it on a smooth surface and press gently down to flatten but still be thicker than the specimen you want to mold.
Press the preform into the silicone plate just squeezed. Remember to press the design side of the specimen face down, the back side up. Use your finger to press the edge of the mold against the specimen; Leave no gaps between the specimen and the mold.
Wait for the silicone to freeze. This will only take about 20 minutes. Once the mold has hardened you can move on to the next step. The mold will still be flexible, but not prone to dents or distortions when pressed.
Separate the preform from the mold. Hold the edge of the mold and flex it gently backwards. Turn the mold over so that the specimen pops out. If necessary, use your finger to stretch it out.
Use the mold. Press the wet clay into the mold, then remove and allow to dry. You can also pour the sap into the mold, wait to dry, and remove. Separate the molded object using the same operation as you separating the workpiece. advertisement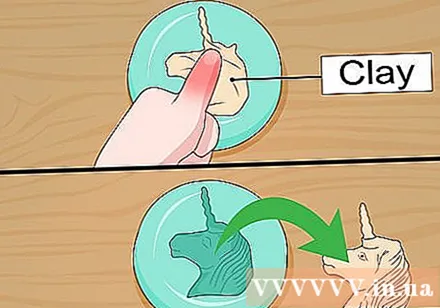
Method 3 of 3: Use 2 part silicone
Buy silicone mold making kit. You can find them in shops that specialize in molding materials. Sometimes this product is also available in large craft stores. Most kits come with two boxes labeled "Part A" and "Part B". You may also need to purchase these two ingredients separately.
- Don't mix silicone yet.
Cut off the bottom of a plastic food container. Find a thin, cheap plastic grocery and use a razor to cut the bottom of the box open. Don't worry if the cut is jagged; This piece of plastic will be the upper part of the mold.
- Select the box slightly wider than the object you want to mold.
Place multiple overlapping strips of tape over the top of the box. Remove the lid of the box. Cut multiple strips of packing tape across the top of the box. Stick the strips of adhesive tape on top of each other about 0.5 cm. Leave a piece of tape about a few centimeters long on all sides of the box.
- Place your finger along the top of the box tightly.
- Make sure there are no gaps for the silicone to spill out.
Fold any excess tape attached to the sides of the box. When you pour silicone into the box, the silicone can get through the gap under the tape and flow out. This step will help prevent silicone from spilling and damaging your work surface.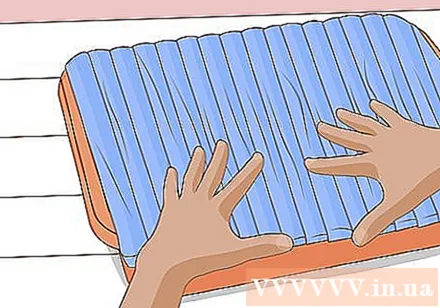
Place the object you want to mold into the box. Place the box on a sturdy flat surface with the cut bottom facing up. Place the workpiece in the box and press against the tape. Do not let the workpiece touch the sides of the box or if you use more than one sample. In addition, you should also remember to place the designed side of the specimen face up, the back pressed against the tape.
- Flat back samples are most suitable when using this method.
- If necessary, wipe the sample thoroughly before placing it in the can.
Measure the silicone according to the manufacturer's instructions. You will mix Part A and Part B together. Some types of silicone are measured by volume, others by weight. Carefully read the user manual that came with the product and follow along.
- Pour silicone into the cup included in the kit. If there is no cup in the kit, you can pour silicone into a disposable plastic cup.
- You need to use enough silicone to coat the top of the specimen in a layer about 0.5 cm thick.
Stir the two parts together until the mixture becomes a uniform color. You can use a wooden stick, popsicle stick or spoon, fork, or plastic knife to stir. Continue stirring until the color is uniform, with no residue left.
Pour silicone into the box. Use a stirrer to scrape silicone to avoid waste. Silicone should cover the specimen in a layer approximately 0.5 cm thick. The silicone can break if it is too thin.
Wait for the silicone to freeze. This time depends on the brand of the product. Some can be used after a few hours, others need to be left overnight. Read the instructions that come with the kit for a specific time. Do not touch or move the mold during this time.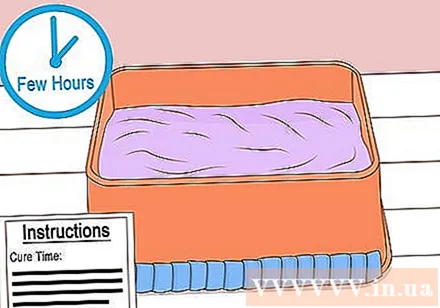
Mold. Peel off the tape once the silicon has hardened and hardened. Gently slide out the silicon mold. You can see thin silicone "hairs" around the mold. If it doesn't look good, you can use a scissors or a razor to cut it.
Separate the workpiece from the mold. The samples placed in the box will stick inside the silicone. Gently bend the silicone backwards so the specimens pop out, like you take the ice cube out of the ice tray.
Use the mold. Now you can pour sap, clay or chocolate (if it's a food silicone mold) into the mold. If you use clay, you can remove it while it is still wet. If you are using sap, wait for the sap to freeze before removing it. advertisement
Advice
- Although silicone is less sticky, you may want to spray some anti-stick oil in the mold before you pour the sap.
- Molds made of silicone construction and dish soap or cornstarch are not suitable for confectionery. This type of silicone are not safe for food.
- If you want to make a candy mold, you have to buy a silicone set to make a 2 part mold. Read the labels carefully to make sure you buy the right food-grade silicone.
- Two-part silcone molds are more durable than construction silicone molds because they are made from professional mold materials.
- Silicone mold is not permanent; After a while they will be damaged.
- A 2-part silicone mold is best used to pour the sap.
Warning
- Avoid getting the building silicone to stick to your hands. Silicone can irritate the skin.
- Construction silicone can produce toxic gases, so you should work in a well-ventilated area.
What you need
Use silicone and liquid soaps
- Country
- Liquid soap
- Bowl
- Country
- Sample embryo
- Plastic gloves
- Construction silicone, silicone sealant
Use silicone and corn starch
- Disposable container
- Corn starch or cornstarch
- Sample embryo
- Plastic gloves
- Construction silicone, silicone sealant
Use 2 part silicone
- 2 part silicone set
- Disposable cup
- Stirring rod
- Plastic food containers
- Knives
- Packing tape
- Sample embryo
")


