Author:
John Stephens
Date Of Creation:
26 January 2021
Update Date:
2 July 2024
Content
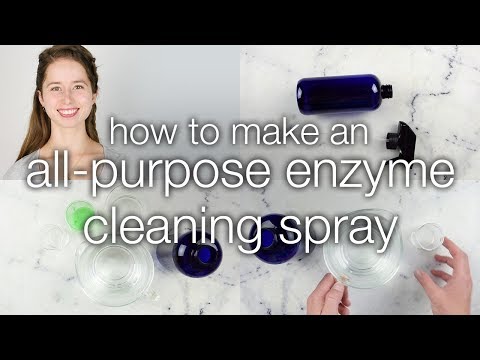
Enzyme cleaner is a very effective, versatile and safe cleaning product for almost any surface, including metal and glass. This eco-friendly detergent contains enzymes and bacteria capable of decomposing organic matter, so they are ideal for removing stains and unpleasant odors caused by blood, plants, sweat, etc. urine and other organic substances caused. You can make your own at-home enzyme cleaner using a few simple ingredients, but it will take several weeks for the fermentation mixture to work.
Resources
- ½ cup (100 g) brown or white sugar
- 1 teaspoon (3 g) of yeast
- 4¼ cups (1 liter) of warm water
- 2 cups (300 g) of fresh citrus peel
Steps
Part 1 of 3: Mix the ingredients
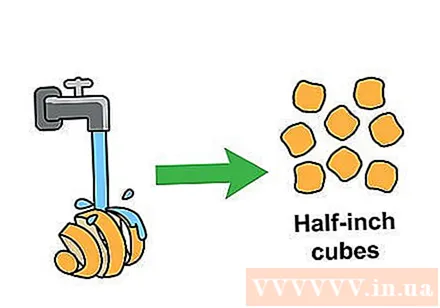
Wash and chop citrus peels. Wash citrus peels under running water and use a vegetable wash brush to brush off dirt and impurities. Blot dry with a clean towel and carefully cut the pieces of the shell into squares of approximately 1.3 cm edges. Pieces of shell should be small enough to fit into the top of the soft drink bottle.- You can use one or more citrus peels as an enzyme cleaner, including lemons, grapefruits, and oranges.
- It is important to use fresh pods that do not dry out or rot. Dry bark doesn't have enough oil to wash it off, and rotting peels will cause the mixture to become moldy.
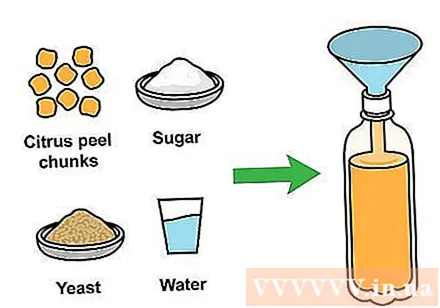
Combine the ingredients. Place a wide-mouthed funnel into a clean 2-liter soft drink bottle. Pick up each handful of shredded shells and put them in the bottle until all are gone.Add sugar, yeast and water to the bottle. Remove the funnel and screw the bottle cap tightly. Shake the bottle vigorously for a few minutes until the sugar dissolves.- It is important to use a soft drink bottle here, as these are designed to withstand pressure.
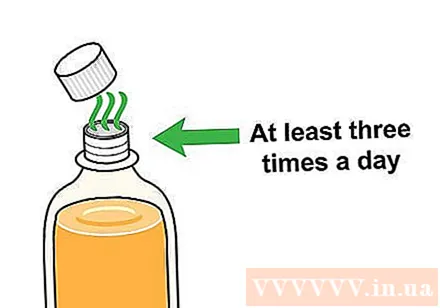
Drain the bottle several times a day. Once the sugar has dissolved, open the bottle cap to release the accumulated pressure and turn the cap back on. Do this at least 3 times a day for 2 weeks to prevent bottles from exploding.- After 2 weeks, you can reduce the number of air exposures to once a day, because most of the sugar is converted, the carbon dioxide production will decrease.
- When the yeast breaks down the sugar in the mixture, it converts the sugar into alcohol and carbon dioxide. This gas will accumulate inside while the bottle is tightly capped.
- It is important to keep the bottle tightly capped during the entire process, as the mix requires an oxygen-free medium to ferment well. The oxygen will also allow bacteria and mold to multiply in the mixture.
Part 2 of 3: Mixed fermentation
Place the bottle of the mixture in a warm place for fermentation. The optimal temperature for fermentation is 35 degrees Celsius, so you must put the mixture in a warm place during the fermentation. The top of the refrigerator is a good place to put mixed bottles.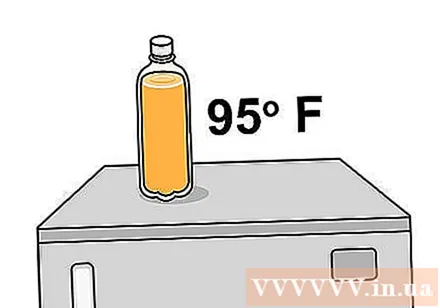
- The fermentation will take about 2 weeks, but you can let the ingredients ferment for up to 3 months if you want a stronger solution.
Shake the bottle daily as the mixture ferments. Over time, the solids in the mixture will sink to the bottom of the bottle. Every day you need to vent, then cap and shake the bottle gently to stir the ingredients inside the bottle. Drain the air again and screw the cap back on.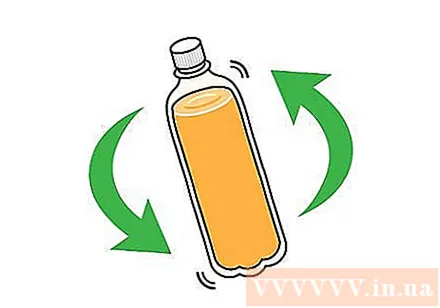
- Continue shaking daily until the solution is usable.
Filter the mixture. After 2 weeks, the mixture will turn cloudy, and this means that it can be filtered and used. You can also leave the mixture for another two and a half months if you have time or want a stronger detergent. Once the mixture has fermented for enough time, pour it through a sieve into a bowl to remove any solids.
- Throw away the citrus peel when the filter is finished.
Store the detergent in a tightly closed jar. Pour the filtered solution into the vial and cover tightly for storage. The mixture loses its potency when exposed to oxygen and will decrease cleaning efficiency.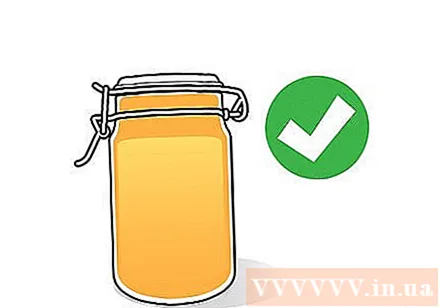
- For convenience, pour a small amount of detergent into a spray bottle and store the rest in a sealed jar.
Part 3 of 3: Using enzyme cleaner
Dilute enzyme water for use with mild cleaning. Mix 1 part enzyme water with 20 parts water in a spray bottle or other container. Shake or stir the mixture well. This solution can be used to wash cars, wash floors and for applications that do not require harsh detergents.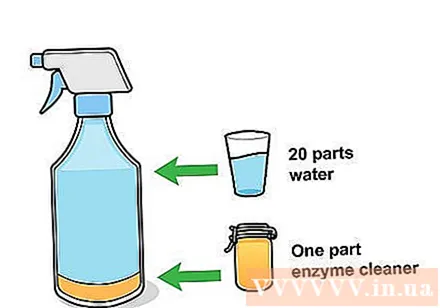
Making all-purpose detergent. Measure out ½ cup (120 ml) of enzyme cleaner and pour into a clean spray bottle, then add 4¼ cups (1 liter) of water. Tighten the cap of the spray bottle and shake to dissolve the detergent with water. Shake well before using.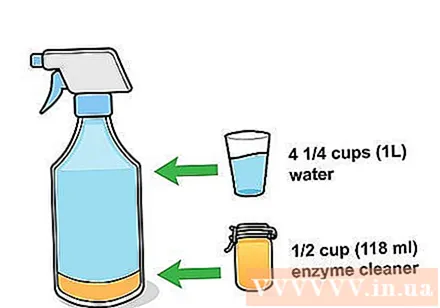
- This versatile cleaner can be used on any surface to clean bathrooms, carpets, kitchens, remove small stains and other cleaning items.
Mix with vinegar for a stronger cleanser. For a stronger all-purpose cleanser, you can mix 1 part apple cider vinegar with 4 parts homemade enzyme cleaner. Pour the solution into a spray bottle and use it to clean kitchen, bathroom and stubborn stains.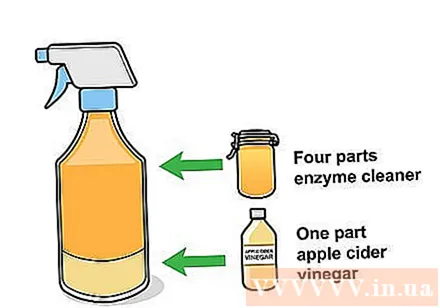
Use undiluted enzyme cleaner for more difficult cleaning jobs. For stubborn, gritty, heavy-smelling stains and scale deposits, you can spray the enzyme cleaner directly on the surface to be cleaned. Let the solution soak for a few minutes, then wipe with a rag or sponge.
- Enzyme cleaner is very effective in degreasing and can be used for kitchen and garage cleaning in its undiluted form.
- You can also try this method to remove residue and lime that builds up on items like dishwashers, kettles, showers and other household appliances.
Use enzyme cleaner to wash clothes. You can use an enzyme cleaner to replace or supplement your regular laundry soap. Pour ¼ cup (60 ml) of enzyme detergent into the washing machine drum or detergent drawer, then run the washing machine as usual. advertisement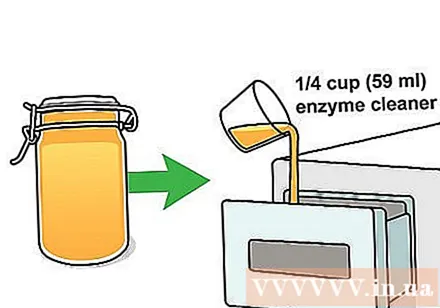
What you need
- Vegetable brush
- Knife
- Wide mouth funnel
- Soft drink bottle
- Sieve
- Closed vial
- Aerosol


