Author:
Lewis Jackson
Date Of Creation:
9 May 2021
Update Date:
1 July 2024

Content
Do you want to go for a ride outside? Or are you going to teach someone to ride a bike? Many adults never have the opportunity to practice, and children almost all want to learn to ride a bike. This is nothing to be ashamed of. Get excited and start practicing cycling right away, as this vehicle is fun and healthy. Cycling requires preparation, technique and possibly a few falls, but anyone can learn it.
Steps
Part 1 of 3: Riding a bicycle safely
Find a suitable location. When you practice cycling, you need to find a place that is comfortable and away from heavy traffic. It is best to find a long, level pavement, such as a path leading to your home or a sidewalk. If you don't have a place to practice at home, you can go to places like the parking lot or the park.
- Small lawn or gravel walkways will help relieve pain if you fall. However, balancing and cycling on such surfaces will be difficult.
- If you plan to practice balance and ride a bike on a hill, look for gentle slopes.
- Check local regulations to see if cycling is allowed on sidewalks or other pathways.

Wear suitable clothing for cycling. Knee and elbow pads protect joints and prevent scratches and are often recommended. Long sleeves and pants also help protect the skin from falls and can also be combined with pads.- Avoid loose pants and skirts, as these may get caught on your trunk and wheels.
- Avoid wearing open-toed shoes. Your feet can be swept into the car or the ground if you wear open toes.

Wear helmet. Helmets are essential for both beginners and proficient cyclists. Accidents happened very suddenly and you cannot know in advance. Broken bones can usually heal, but head injuries, a common bicycle accident, have lasting consequences. In addition, many regions also require cyclists to wear helmets.- Measure the helmet so that it fits the head. A suitable helmet should fit over the head and cover the forehead at a distance of 2.5 cm above the brow.The strap has a chin guard to hold the hat in place but still allows the mouth to move.
- Daily commuter helmets are popular. The hat comes in a round shape, has a foam and plastic material, and can be found online or at retail and bicycle stores.
- Race bicycle helmets have an elongated shape and often have a vent. They are also made of foam and plastic, but are often used on the road or in racing. You can find them online or at retail stores.
- Helmets for teenagers (10-15 years), children (5-10 years), and preschoolers (under 5 years old) include regular helmets or racing bike helmets but less. Helmets for preschoolers are made of foam only.
- Professional mountain bike helmets and sports helmets often have a face shield and neck guard to suit the conditions in the wilderness.

Go bike riding outdoors during the day. Although it is still possible to ride a bicycle at night, it is not recommended for a beginner. It will take a long time to practice balance. As you get acquainted with your bike, you may turn the steering wheel and crash into vehicles or other dangerous objects that you can hardly see. Also, it is difficult for drivers to see you at night.- If you must go out at night, wear light-colored clothing and use reflective stickers and bike lights.
Part 2 of 3: Sitting on a bicycle
Start working on flat ground. Flat surfaces such as walkways, sidewalks, deserted streets or park paths are usually safe. The flat, non-steep road surface will prevent you from rolling if you fall, and it will be easier for you to balance in time to stop.
- You can also practice on low-grass ground and small gravel paths. Falling on these surfaces will be less painful, but you will also need to step harder for the bike to roll.
Adjust the saddle. Lower the saddle so that the cyclist can rest both feet on the ground while sitting on the saddle. The low saddle will allow you to rest your feet on the ground and stop to avoid falling. Adults do not need extra wheels when exercising, but young children can use them or special balance vehicles.
- You can remove the pedal to keep it out of the way, but this is also unnecessary.
Check the brake. Find out how the bike's brakes work. Get off the bus and walk the bike beside. Squeeze the brakes to get used to the position of the brake, how the bike feels and how the bike responds to the brake. Once you have learned this, you will feel more secure because you can stop quickly when necessary.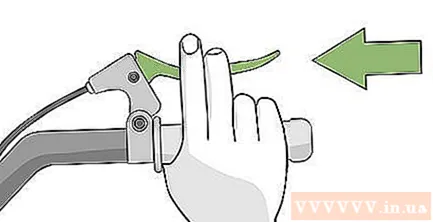
- With a bicycle with brake on the steering wheel, you need to test each side to see which brake controls the front wheel, which brake controls the rear wheel. Experts can change these brakes.
- Pay attention to how to squeeze the brake to stop the rear wheel. When you press the brake on the front wheel, the bike will plug its head forward.
- If you don't see the brake on the steering wheel, your bike may use reverse brake. To brake, you will have to press on the back of the pedal as if you were stepping back.
- Non-modified, fixed gear bicycles will not have brakes. Instead of braking, you will have to slow down or stop by leaning forward and holding both pedals horizontally with your feet.
Put one foot on the ground. You can support it with any leg, but it feels more natural to use your dominant leg. For example, a right-footed person can stand on the left side of the bicycle. Lift your right leg up, step over the body of the car, and lean against the ground on the other side. Keep the vehicle upright between your legs.
- Feel the weight of the bike between your legs and try to keep your balance as you lower yourself. Keep your feet on the ground to prevent the car from falling over while you are getting used to it.
- Place your gravity in the center of the vehicle, distributing it evenly to the left and right sides. Sit upright, not leaning.
Start surfing in the car. Instead of stepping on a pedal, press your foot to push yourself up. Lift your foot onto the pedal. When in motion, keep the vehicle in balance for as long as possible. When you feel your bike starting to tilt, put one foot on the ground and push it up again.
Look straight ahead. If you see an obstacle ahead, your bike will be approaching. Focus on the direction you want to step on. It may take some practice to avoid distractions and the dangers of the road.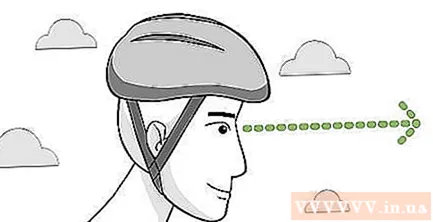
- Before you can fully control your vehicle, follow the direction of the vehicle's movement. When you first start learning to ride a bike, you often run sideways or spin around. Instead of stopping, let your vehicle run and try to balance while on the bike.
- If you are helping a child or a friend practice a bicycle, you can keep the occupant's waist level to keep them steady while exercising.
Start cycling. Start with one foot on the ground. The other foot is placed close to the high pedal. Press down and place your other foot on the pedal on the other side and step forward! Continue pedaling while you maintain your balance.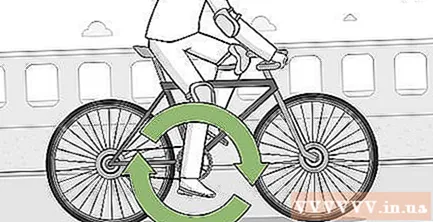
- It will be easier to keep your balance if you pedal faster, but not too fast to lose control.
Stop the car. Do not use your feet to stop. Using bicycle brakes is a better practice. Stop pedaling, transfer your gravity to the lower pedal and squeeze both brakes on the handlebars if you have one. Once the car has stopped, lift yourself up a bit and get out.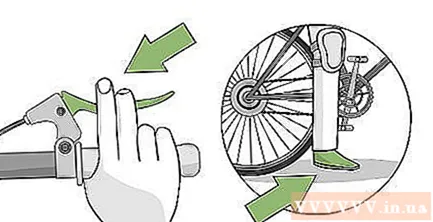
- If you put your foot on the ground too soon when braking, the vehicle will stop suddenly. Following inertia, you will dash forward and hit the steering wheel.
Part 3 of 3: Practice cycling on a slope
Practice gliding down a gentle slope. Drive your bike up the slope, get on the bike and slide down, allowing the bike to slow down naturally on level ground at the bottom of the slope. Get off the bus and repeat until you get used to balance and control the vehicle.
- Put your weight on your feet. Sit close to the saddle, bend your elbows, and relax.
- Once you are confident in sliding downhill, try putting your foot on the pedal and riding downhill.
Brakes while sliding downhill. Once you can keep your foot on the pedal easily, you can try it again. This time, gently squeeze the brake when going downhill. You will learn how to slow down without distraction and loss of control.
Try hitting the steering wheel. Once you know how to go downhill, cycle and brake again when going straight, try going downhill again. Hit the steering wheel until you can change direction without losing control. Note how the slope changes the movement of the bike and balance it accordingly.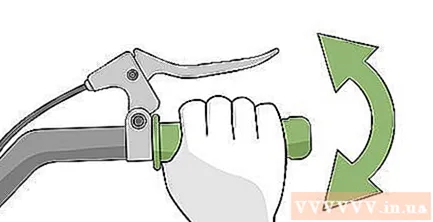
Cycling over a slope. Use newly learned techniques to cycle and drive downhill without stopping at the bottom of a hill. Move to a level road surface and practice sharp turns, then brake to stop.
Cycling up the slope. Start riding uphill from the plane at the bottom of the slope. You will have to work harder when stepping uphill. Lean forward, even stand up to get more power. Cycle up and down hills many times until you are proficient.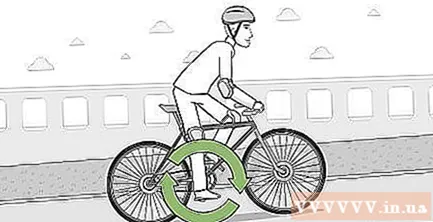
- Once you feel confident, you can cycle up to half a slope, stop for a moment and keep stepping on.
Advice
- It will be more fun to practice cycling with others. Children or people who are afraid of falling will enjoy and feel encouraged when watching other people practice.
- Don't guess the reaction of the passersby; always remember to be on the lookout for cars and other two-wheelers.
- Look straight ahead and stay alert. Looking down at your feet is distracting and can lead to injury.
- Go faster on flat ground, and cycling may not be necessary when going downhill.
- Gear bicycles are often more difficult for the beginner. If you must use a geared bike, increase your gear when moving onto a steeper road.
- Remember to focus on the road ahead. If you look to the sides, the car also tends to drift to the side.
- Once you have mastered your bike ride, you can lift the saddle up so that only your toes touch the ground.
- Children need parent or adult supervision. No matter how old you are, an adult can help you.
- Always wear protective gear, including helmets and gaskets.
- If you don't have a helmet and pads, practice on the grass and avoid walking on the road.
- Believe that you can do it and get up after every fall.
Warning
- Pay attention to local regulations. Some regions require bicyclists to wear helmets, and others do not allow cycling on sidewalks.
- Once you've learned to ride a bike, be sure to learn how to stay safe on the road, such as the dangers of accelerating, how to deal with a car, and remember to obey traffic signs.
- Bicycle accidents are common and dangerous. Always wear a helmet to avoid head injuries. Wear gaskets to avoid scratches and fractures.
What you need
- Bike
- Bicycle pump
- Helmet
- Knee cushion (optional)
- Elbow padding (optional)
- Flat road surface


