Author:
Laura McKinney
Date Of Creation:
10 August 2021
Update Date:
1 July 2024

Content
This article shows you how to capture what's on your HP computer monitor. By default, all HP computers run Windows, so you'll use the Windows method to do this.
Steps
Method 1 of 3: Use keyboard on Windows 8 and 10
.
- Click on folder Pictures on the left side of the window.
- Double-click the "Screenshots" folder in the "Pictures" window.
- Double-click the screenshot. advertisement
Method 2 of 3: Use keyboard on any version of Windows

. Click the Windows logo in the lower left corner of the screen.
. Click the Windows logo in the lower left corner of the screen.
Open the Snipping Tool. Type snipping tool search bar, then click Snipping Tool at the top of the Start menu.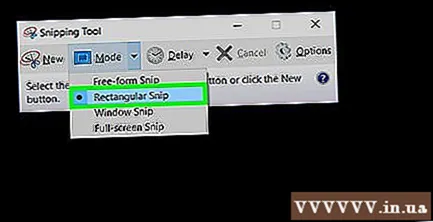
Set the mode to "Rectangular Snip". Click Mode at the top of the Snipping Tool window, then click Rectangular Snip in the drop-down menu that appears. Here is how to set up the Snipping Tool to use the "Rectangular Snip" feature, while switching to screenshot mode.- In the new version, since "Rectangular Snip" is the default mode you can just click new on the left side of the Snipping Tool window to create a new screenshot.

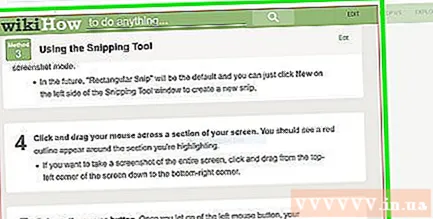
Click and release the mouse in the desired part of the screen. You will see a red border around the dragging part.- If you want to capture the entire screen, you need to click and drop from the top left corner of the screen to the lower right corner.
Release the mouse. After you release your left mouse button, the selected portion of the screen will be captured. You should see the screenshot appear in the Snipping Tool.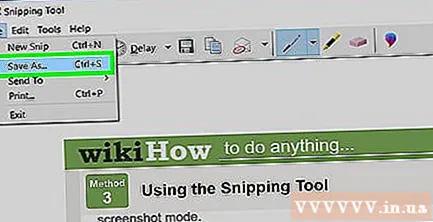
Save the screenshot. You can save the screenshot as an image file on your computer by following these steps:
- Click the "Save" icon with a floppy disk image at the top of the Snipping Tool window.
- Enter the name of the file in the "File name" text box.
- Select the folder that will save the screenshot on the left side of the window.
- Click Save.
Try using a variety of other screenshots. When clicked Mode At the top of the Snipping Tool window, you'll see a drop-down menu that includes many of the options below, each of which can be used for a different type of screen capture:
- Free-form snip - Allows you to choose the part of the screen you want to capture by clicking and drawing freely. Release the mouse button when you have finished circling the part of the screen you want to capture.
- Window snip Allows you to capture an open window (such as a browser window) without mixing anything else. Click the window you want to take a screenshot of.


