Author:
Peter Berry
Date Of Creation:
17 February 2021
Update Date:
1 July 2024

Content
Currently there are so many different photo editing devices and programs that make you confused when choosing reliable tools to refresh your photos. This article will go over some basic photo editing techniques and those that can be used on both phones and computers. Let's start with step 1!
Steps
Part 1 of 5: Editing like a pro
Invest in some software. You can do basic photo editing with programs like Picasa and Instagram, but if you want your photos to look great, you should use a program designed specifically for professional photo editing. These don't always cost money! GIMP software is completely free. Although you will have to learn how to use it, it will make a big difference to your photos.

Crop photos and add details. When you start editing photos, consider how to crop your photos. Just a small change can affect the image. Follow the rule of thirds, that is, the subject or area captured in an image is divided into 3 equal parts, both horizontally and vertically.
Adjust contrast. This is a common setting for any photo editing process. This step makes the light partition clear, making the image more impressive and clear. Be careful, as you can lose a lot of small details if you increase the contrast. Don't overdo it!
Adjust saturation. Saturation is the degree of color intensity in an image, and adjusting saturation is also a common function in photo editing software. You can sometimes improve an image by reducing the saturation (to almost black and white) or increasing it. Experience it!
Vivid level adjustment. This is a common setting found in Photoshop and other editing software. This function is quite similar to adjusting saturation, however it is more suitable for skin color adjustment. Basically, if it's a portrait you can use vivid level correction. If you're shooting landscapes, use saturation.

Be careful when using blur and sharpening tools. Instead of using filters to blur or sharpen the entire image, using a brush gives you more precise control. This is important because the photo only needs to be blurred or sharp. Sharpen a small area so important details are in focus, and blur the face to conceal blemishes.
Keep as many originals as possible. Large edits can make an image look unreal. Just like applying too much makeup to an already pretty woman makes her look like a clown. If you're going to make someone thinner, don't overdo it. If you want to cut out the unnecessary out of the image, make sure you don't make it too obvious. You don't want your photos to turn into a Photoshop disaster!
Avoid stereotypes. The cliché is an artistic stand and it can turn a beautiful photo into boring and unprofessional. For example, a black and white background photo with striking red lips is now overexposed and cheesy. If you want your photos to be considered authentic art, avoid stereotypes, as is the case above. advertisement
Part 2 of 5: On mobile devices
Download a photo editing app. There are plenty of free photo editing apps available on the App Store and Google Store, or one for under $ 5. If you want to experience new styles, download a few apps and try out a few effects. You can try the following:
- Instagram (Free)
- Adobe Photoshop Touch ($ 4.99)
- Apple iPhoto ($ 4.99)
- Aviary (Free)
- BeFunky (Free)
- EyeEm (Free)
- Wood Camera (Free)
Take a new photo or choose one from the gallery. For best results, choose a well-lit photo with a clear view of your subject: people, animals, plants, or buildings. The clearer the photo, the better the results when edited.
Upload photos to the app. Most apps let you take a new photo (look for the camera icon) or choose an existing photo from the gallery.
Select a filter. The apps are not the same, but most of them offer a lot of Instagram-like "filters" or "lenses" for you to choose from. Some applications allow you to adjust the intensity of the filter, giving you greater control over edits until the final result.
Exposure adjustment. In photography, exposure refers to the amount of light a lens receives. If the photo is dark, you will need to increase the exposure. If you want the photo to be darker, decrease the exposure.
Adjust saturation. Some applications allow you to adjust the saturation, or intensity of the color, of an image. Increasing saturation results in more vivid and eye-catching colors. But overkill can make the image look unsightly and cartoon-like ..
Add blurs, highlights, and other effects. The blur effect makes the photo look more dreamy and dreamy, with the exposure light giving a more vintage look.
- Exposure was once considered a fault in photography, which occurs when light (usually sunlight) enters the film chamber and ignites the film, but today exposure has become a trendy effect. loved by many people.
Crop photos. If you want to change the shape or size of your photo, select the "crop" button (usually the square icon) and adjust it until you like it.
Try out filters and effects. Each app offers different filters, so if this is your first time using it, you may want to try all the different options for editing photos. advertisement
Part 3 of 5: Using iPhoto
Import photos into the program. You can do this by dragging and dropping images onto the program or importing them from the camera. To do this, you need a cable that connects the camera and computer.
- Remember to turn on the camera, then open iPhoto. You can import all pictures in the camera by selecting "Import All", or importing images one by one by marking each image then pressing the "Import Selected" button.
Double-click an image to begin editing. The photo will be enlarged when you double click.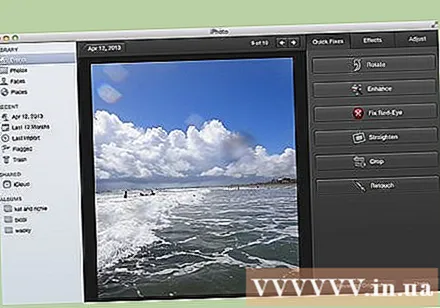
Select the "Edit" button at the bottom of the screen. You will see several editing options in the lower part of the screen, including "Rotate", "Crop", "Straighten" (Straighten), "Enhance", "Red-Eye" (Red-Eye), "Retouch", "Effects" (Effects) and "Adjust" (Adjust).
- To apply the effect, click on the corresponding icon. When done, press the "Apply" button to save the changes or "Cancel" to cancel the changes and start over.
Rotate the image if needed. To do this, click on the "Rotate" button. The picture will rotate each time you click it until it returns to its original position.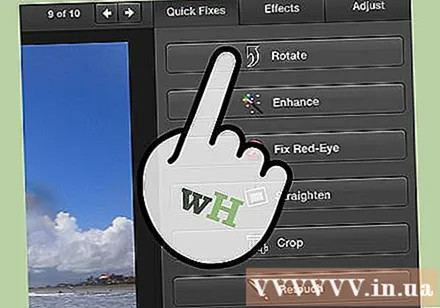
Crop photos. Cropping is a basic editing tool that allows you to adjust the size and shape of an image, as well as remove unwanted parts in an image. When you click the "Crop" button, an aligned rectangle will appear on the image. Just drag and drop the rectangle to adjust until you like it. You can also align the position by clicking inside the picture, then dragging and dropping the cursor.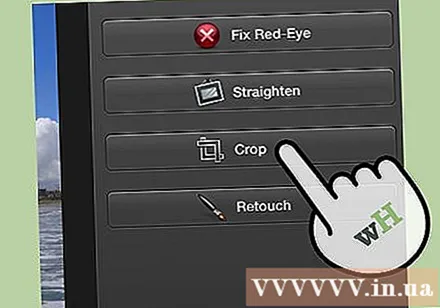
Choose an effect. When you click the "Effects" button, a small screen will appear with a lot of filters to choose from, including "Black and White", "Sepia", "Classic", " Light "," Dark "and many other filters.
- Some effects allow you to adjust the strength of the filter. To do this, simply click on the effect and adjust the numbers that appear below according to the left and right arrows.
Extensive adjustments. To make complex edits click on the "Adjust" button below the image. A new screen will appear with options for exposure, saturation, contrast, sharpness, color temperature, or shade.
Save changes. When you are finished editing, click the "Done" button on the right side of the screen. advertisement
Part 4 of 5: Using Adobe Photoshop
Import photos into the program. You can drag and drop images directly from outside into the program or open Photoshop, then select "File" (File), "Open" and select the photos you want to edit.
Duplicate the background image layer. Before you start editing, make a copy of the original photo in case you make a mistake while editing. To do this, select "Layer" then choose "Duplicate Layer". This will help you make an extra copy of the original photo.
Crop photos. Image cropping is a basic photo editing technique that allows you to resize and shape your photos and remove unwanted parts. To crop an image, click on the "Crop" icon in the toolbar on the left side of the screen. Now click on the image and drag until you reach the desired size and shape. Once done, click on the "Crop" icon again, a dialog will appear asking you to choose between save changes or cancel the operation and go back to the original image.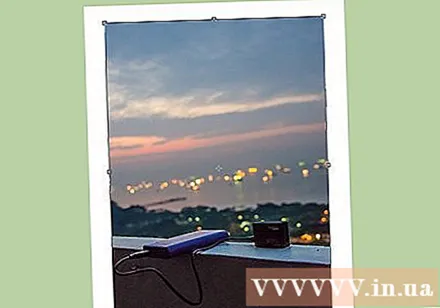
- If you have trouble finding "Snipping Tool", hover your mouse over each tool in the left sidebar and see the description.
Find the "Adjustment Layer" button. Layers are powerful tools used in Photoshop because they allow you to edit the image without interfering with the original image. You can also "enable" and "turn off" layers while editing, so nothing is permanent (unless you save the final draft).
- The "Adjustment Layer" button is located at the bottom of the Navigation Panel on the right side of the screen. The main icon is a black and white circle with a diagonal line inside. When you mouse over this icon, the description will appear "Create a layer or adjustment layer" (Create new fill or adjustment layer).
- When you click on this icon, a list of editing options will pop up including: Exposure, Brightness / Contrast, Selective Color. and many other options. When you click on one of the above options, you will create a new layer of effects that can be adjusted or turned off as desired.
- To "enable" or "disable" the adjustment layer, click on the eye icon located just to the right of the layer's name.
Exposure adjustment. First, click on the "Adjustment Layer" button, then choose "Exposure" from the drop-down menu. This will create a new layer called "Exposure 1" on the Navigation Panel. A small dialog box will appear with options to adjust the exposure, exposure compensation, and gamma of the image. You just need to adjust the slider left or right to change this effect.
- Exposure is basically the brightness of the image. When you drag the slider to the right, the photo is brighter, and when you drag it to the left, it gets darker.
- The exposure compensation and gamma options let you adjust the dark and mid tones of the image. This can help balance, or "compensate" for detailed blowout as you increase the exposure of your photo.
Color adjustment. Do this by selecting the "Selective Color" layer. A small panel will appear allowing you to adjust the red, yellow, blue, cyan, green, magenta, black, white, and neutral tones of the image.
Adjust the level. The Levels tool allows you to change the overall tone and contrast of the image. To do this, create a "Levels" layer on the Navigator Panel. A chart with three sliders will appear: the black tone slider (left side), the white tone slider (the right side), and the medium tone slider, or the gamma (right side).
- The position of the black and white tone slider makes up the original color range of the photo. Initially the black tone will be 0, and the white tone will be 255. To adjust the range, simply move the slider.
- Drag the middle tone slider to the left for darker colors, and to the right to make it lighter.
Part 5 of 5: Practice skills
You can refer to more articles to use Photoshop more proficient. Photoshop is difficult software to use: it will take a long time to master! But once you get used to it, your photos will look like the ones from the exhibition!
You can refer to the articles to learn how to adjust colors. Sometimes, just one color that doesn't match can ruin an entire photo. A basic color adjustment can also change an image!
Create a photo like a sketch! You may have come across malware or a website that promises to turn your photo into a canvas. Did you know that it is possible to do this effect in a simple way, without worrying about malware? This is a fun edit for your photos. advertisement
Advice
- Since every photo editing software is not the same, you should see more tips and instructions. While most editing apps are fairly straightforward for beginners, advanced software like Photoshop are complex, and it can take months to master.
- Some popular image editing software for computers: Aperture, PaintShop Pro, and Pro Tools.


