Author:
Lewis Jackson
Date Of Creation:
5 May 2021
Update Date:
1 July 2024

Content
Canvas loafers or soft-soled sneakers are very comfortable, but the truth is they are not suitable for wet weather. But exchange them for a pair of amphibious boots. With a water repellent spray, a little wax and a hairdryer, you can layer any fabric shoe in minutes. This way you can use your favorite shoes more often while protecting your feet from rain and puddles on the road.
Steps
Method 1 of 3: Waterproofing shoes with wax
Take a piece of colorless beeswax or candle wax. With this kind of upgrade project, you definitely won't go wrong when using natural beeswax. Beeswax is available at most hardware stores as a lubricant. If you can't find beeswax, buy colorless, colorless paraffin candle wax (like tealight candles).
- Regardless of the wax, choose a colorless wax, or the shoes will be stained.
- If the shoes you want to waterproof are expensive or unique, you should choose the safest one.
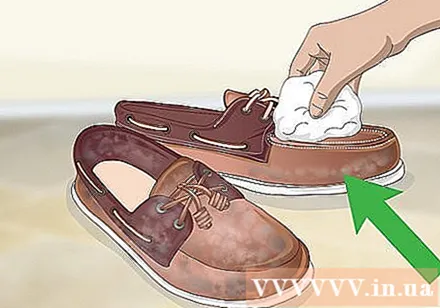
Clean shoes with a damp cloth or wash them if they are too dirty. To ensure the wax adheres to the shoe, clean the surface of the shoe completely. A quick cleaning will help remove dust and dirt if the shoe is not too dirty. For shoes that are quite old and used a lot, you may need to wash and dry them before waxing.- Waxing shoes without cleaning first will cause dirt to get stuck under the wax. After that, the shoes will be waterproof so you can no longer clean.
- Make sure the shoes are completely dry before you start waterproofing. If you anticipate bad weather, wash your old shoes a few days before you plan to use them.

Check for wax in a hidden location on the shoe. Before waxing the entire shoe, make a small spot on the heel or the side near the sole and see what it looks like. This way you can make sure the wax doesn't stain the color. Remember that most of the contrast in color will be gone after the wax has melted.- Colorless or off-white wax will have the least amount of contrast, and will blend perfectly with the color of the shoe material.
- If you're using colored wax, make sure the color of the wax is as close to the color of the shoe as possible.

Wax the entire outer surface of the shoe. Brush back and forth vigorously to cover any part of the shoe that you want to waterproof. Rub your hands vigorously so that the wax gets deep into the fabric. Imagine you are painting with crayons. Pay close attention to the areas around the toe, heels, side cheeks, and shoelaces where there is a tendency to absorb water.- Double-check to make sure the wax has been covered all over the shoe. Any point missing will lead to a leak.
- Any place with accumulated wax will discolor clearly. Don't worry, this problem will disappear after you dry your shoes.
Set your hairdryer on a high temperature. Turn on the dryer to warm up before spraying on shoes. The higher the temperature, the faster and more thoroughly the wax flows.
- Keep the hair dryer tip close to the shoe surface for better concentration of the heat.
Move the dryer back and forth on the shoe. Slowly move the dryer, rotate or tilt it as needed. You should see the wax quickly blend into the surface of the shoe. After drying one piece, continue to dry the other one.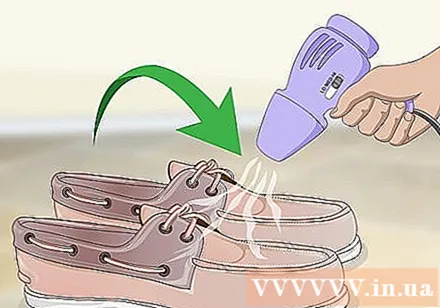
- The coil inside the dryer needs to be heated for about half a minute in order to melt the wax.
- Only one shoe dried at a time. After the first one has been dried, you will have experience to know when the wax has completely saturated the shoe.
Continue drying until the wax is gone. When it is liquefied, the wax will seep into the shoe fabric, sealing tiny holes and creating a barrier against water. The wax then hardens and forms a transparent protective layer. A finished waterproof shoe will look like it had not been waxed.
- Observe closely for any unlawed wax spots that you missed before storing the dryer.
- Wax is a natural water repellent, even on very porous materials, so it will not harm the shoe when incorporated into the shoe's texture.
Check for water resistance. All that's left to do is check the water resistance of the shoes. Try pouring a glass of water on top of the shoe. The water will slide away immediately. Congratulation! Now you can go out onto the streets without fear of rain or flooding.
- If your shoes are absorbent, add a more perfect layer of wax. Be sure to wait for the shoe to dry completely before applying a second coat of wax.
- You won't be able to swim in these newly upgraded shoes, but if it only rains lightly or walks in snow fields it shouldn't be a problem.
Method 2 of 3: Treat shoes with waterproof spray
Choose a pair of canvas shoes for waterproofing. While you can waterproof any type of shoe, you'll get the best results on canvas shoes with good absorbency. The wax will penetrate evenly into the fabric of the shoe. On materials like leather or synthetic resin, the wax forms a layer on the surface and wears off very quickly.
- Burlap, hemp, suede, and other roughness materials would be the best candidate for waterproofing.
Buy a good quality waterproof spray. There are many different brands and styles to choose from, but their purpose is the same. The most important ingredients you need to look for are silicon or acrylic polymers, which help prevent water, mold, moisture, and any damage caused by water.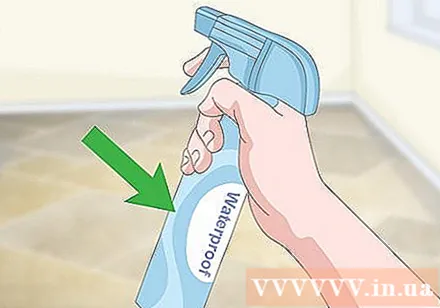
- Waterproof sprays are sold at shoe stores, as well as stores that specialize in outdoor clothing and equipment.
Spray on the entire upper part of the shoe. Hold the spray bottle 15-20cm from the shoe and spray in a thin, even layer. Make sure to cover all areas where water can attack the shoe, including the seam between the top and the sole. Do not wet spray. Instead, you should just spray a layer that looks sparkling on the surface.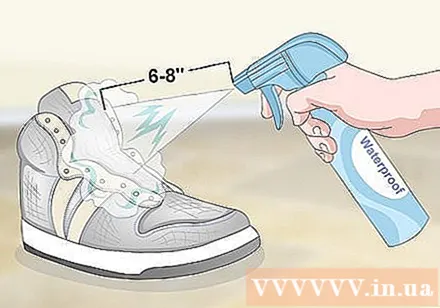
- Hang up your shoes if possible. This way you can aim accurately at the top half of the shoe without accidentally spraying your hand.
- To limit your exposure to toxic vapors, you should work in a well-ventilated area. It is best to work outdoors, otherwise you can turn on the ceiling fan.
- You need to apply two or more coats of rough surface materials such as suede or nubuck leather to completely waterproof.
Use a soft cloth or handkerchief to wipe off excess waterproofing on the shoe. Gently wipe the entire shoe. Don't wipe your hands so hard that all the waterproofing is absorbed - just a few gentle dips.
- Avoid using paper towels. Exposed paper fibers can become trapped in the waterproofing agent and become part of the material.
- Be sure to wipe off the waterproof adhesive around the sole, as well as shoe accessories such as zippers, laces, and rubberized parts.
Let shoes dry overnight. Most waterproofing agents will dry within 20-30 minutes, but to be safe, let dry 24-48 hours before using. If you want to apply multiple coats, wait a few minutes after each coat before applying the next one.
- Do not try to speed up the drying process by using an external heat source, like a dryer or open flame. This can interfere with a chemical reaction that creates bond, damage the shoe or even cause a fire.
Reapply the waterproofing agent after several uses. The waterproofing agent is not as durable as wax in principle, so you must spray it on more often to keep your feet dry and healthy. In winter or rainy season, you should repeat the waterproofing after 7-8 times of use. In areas with dry climates, you can do less frequency waterproofing treatment, and use water repellent spray if necessary.
- The frequency of shoe waterproofing treatments depends primarily on usage.
- If you plan to go hiking in inclement weather, spray the waterproofing agent 2-3 times.
Method 3 of 3: Maintain waterproof shoes
Soften shoes. The waterproofing and wax can make the shoe significantly stiffer. After the waterproofing treatment is done, walk in your feet and walk back and forth for a while. Doing some gentle exercise for a while will help soften your shoes. After 3-4 uses, you won't see the difference from waterproofing.
- Twist the foot in all directions to soften hard areas.
Cover the waterproofing product as often as needed. You need to take good care of your shoes when the rainy season begins to arrive. Under normal conditions, you only need to waterproof once after a few months of use. Of course, the more you use it, the faster the waterproof coating will wear out.
- If you live in an area with a hot climate, take extra care of your shoes. Exposure to high temperatures can melt the waterproofing layer, causing it to wear off very quickly.
- Don't forget to apply the waterproofing treatment again after washing your shoes, otherwise the shoes will absorb the water when you walk out on the street!
Wash to remove the waterproofing layer if desired. Anytime you want to remove the waterproofing, just wash your shoes in hot water with detergent or laundry detergent. The temperature of the water melts the waterproofing agent or the wax, while the soap's surfactant melts the oil. Wait for the shoes to dry and everything seems to be back.
- After washing shoes, rinse shoes until the water is clear. If not, the remaining waterproofing agent and soap will coagulate into a slippery residue.
Advice
- Waterproof spray should be stored in a cool, dry place so that the bonding components do not decompose.
- Wear gloves while using the wax so that your hands don't get sticky and it's easier to get the wax done.
- When your shoes get dirty, use a damp cloth to clean them. Periodic shoe cleaning will help protect and prolong the life of the waterproof layer.
Warning
- Although some people recommend pure petroleum-distilled wax or flaxseed oil, these often leave dark spots and spoil the beauty of the shoe.
- Attempting to waterproof materials such as glossy leather, plastic and nylon could cause permanent damage or discoloration.
What you need
- Beeswax
- Paraffin candle wax colorless, odorless (optional)
- Hairdryer
- Gentle detergent (for shoe washing)


