Author:
Roger Morrison
Date Of Creation:
22 September 2021
Update Date:
19 June 2024

Content
- To step
- Method 1 of 4: Growing seedlings for planting
- Method 2 of 4: Planting the sweet potato
- Method 3 of 4: Take care of the plants
- Method 4 of 4: Harvesting the sweet potato
Sweet potato is delicious, healthy, and fairly easy to grow. Although this crop grows best in a tropical climate, it is still easy to grow sweet sweet potato in a colder climate if you plan properly and take the right precautions. You can grow your own cuttings and seedlings, then grow, harvest, and dry the sweet potato.
To step
Method 1 of 4: Growing seedlings for planting
 Start growing the sprouts. Sweet sweet potato does not grow from a seed like most vegetables - they grow from cuttings, which grow from the sprouts of mature sweet sweet potato. If you want to grow the sprouts, cut a sweet potato in half and place it partially submerged in a cold glass of water. Stick three toothpicks in the center of the sweet potato and let the sweet potato stand half submerged in the water.
 - Make sure the sweet potato you chose looks healthy. If you see discoloration or damaged spots on the skin, the sweet potato could have a disease, which means that its germs could also be diseased.
- Choose a type of sweet potato such as TDA 291 or TDA 297, because they are resistant to fungi, which can cause spots and other damage to your sweet potato.
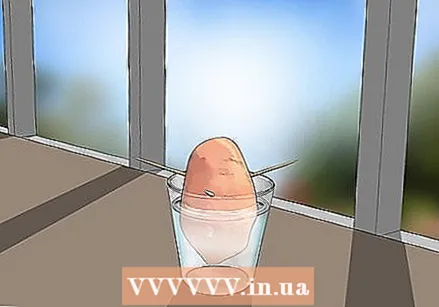 Keep the seedlings warm. The growing process requires heat, so place the glass close to a heat source. If possible, place the glass near a window so that the sprouting sweet potato also gets sunlight. You can also place the glass near a stove so that it can absorb the heat.
  Let the germs grow. Top up the glass with a pitcher or other glass, if necessary to keep the sweet potato at the same level under water. Wait until sprouts grow on the sweet potato; this will take a few weeks. Once the sprouts have leaves, hold them and gently twist them off the sweet potato.
 - Each sweet potato can produce up to 50 sprouts.
 Let the cuttings take root. Place each cutting in an empty pot, with the bottom half of the stem submerged. Let the leaves hang over the edge of the pot. After a few days, you should see the roots emerging from the bottom of each cutting. When the cuttings are about an inch long, your cuttings are ready to be planted.
 - The cuttings can also be bought online.
Method 2 of 4: Planting the sweet potato
 Loosen the soil. To ensure that the roots do not get too much resistance during the growth, it is best to make the soil very loose and moist in the place where you want to plant the sweet potato. If the soil starts to get dry in the spring, you can hoe the soil about 10 - 30 cm deep, and plant waste (such as stones, roots, etc.). Sprinkle some compost or manure over the soil and scoop the soil about 10 cm, so that the structure of the soil becomes finer. Hoe the area, water it, and let the water soak in for 2 to 3 days before planting.
  Make room. Make sure you have enough space for the cuttings you are going to plant. Large tubers need a lot of space to grow, just like the tendrils of the plant, which grow lush. It is best if you leave about a meter between each plant.
 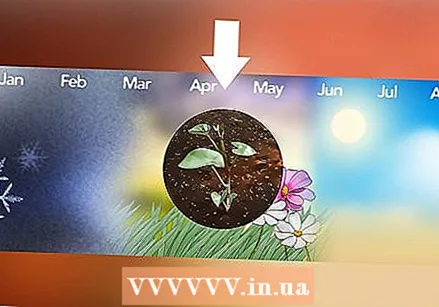 Wait until the temperature is right. Sweet sweet potato does not grow well in cold temperatures, so it is best to wait a few weeks after the last frost before planting the seedlings. May is the ideal time to plant them. Sweet yams take a long time to ripen, so don't wait too long to plant them. EXPERT TIP
  Cover the cuttings with soil. Dig holes that are about 10 cm deep and 8 cm wide. Place the seedlings in the holes (leaving 12 to 25 cm between), placing the roots down in the soil, leaving the tops of the leaves above the soil. Fill the holes carefully with soil, being careful not to move or damage the seedlings too much.
 - Press the soil gently so that you push the air out.
Method 3 of 4: Take care of the plants
 Water the plants generously. Newly planted cuttings should be watered every day during the first week in the soil; every two days during the second week, then less and less as they grow. Be generous with watering, but make sure the crop does not become drowning. Sweet potato is a sun-loving plant, so if the soil gets dry, adjust your watering schedule accordingly.
  Feed the plants. Use a fertilizer during the growing period to ensure that the harvest will be good. Buy fertilizer that is low in nitrogen as it can affect root growth and is high in phosphorus. It is best to fertilize the crop every 2 to 4 weeks.
  Let the plants climb. Sweet sweet potato vines are not very firm and need support to produce a large yield. Keep a close eye on the plants and support them with stakes about 4 weeks after the tendrils start to show. Use tonkin sticks to support the vines of the sweet potato, as they can grow up to 3 m in height.
  Be careful that the crop does not get sick. The sweet potato can become susceptible to various diseases and pests. Pay attention to the following characteristics when you are going to grow the sweet potato and when you are going to select the seedlings:
 - Sweet potato can fall prey to various viruses, and it is not always possible to tell if the sweet potato is sick. If you see that the sweet potato looks damaged or discolored, remove it immediately.
- Fungal diseases. If the sweet potato has mold, you will see light yellow spots on the skin, eventually turning the whole sweet potato black. Use the healthy cuttings so that the plant does not go moldy once it is planted. If the sweet sweet potato you have planted has mold, soak it in hot water for an hour after harvesting so the mold will reduce and stay away.
- The wheat beetle. This insect looks oval, white and cotton-like. The wheat beetle can stunt growth and attract ants. You can control the wheat beetle by removing the infected plants and using an insecticide if you have an infestation.
- The white aphid. These insects produce small white spots on the skin of the sweet potato and can slow down growth. Treat the infected plants with an insecticide.
Method 4 of 4: Harvesting the sweet potato
 Keep a close eye on the plants. Sweet sweet potato usually needs 14 weeks to ripen properly. You can harvest the sweet potato when the top leaves turn yellow and die. Harvesting usually takes place in the fall, usually in October.
  Remove the sweet potato from the soil. Use a fork or similar garden tool to gently hoe it into the soil to loosen and remove the tubers. Start digging a short distance from the stem. Be careful not to damage the skin of the sweet potato when you remove it from the soil.
 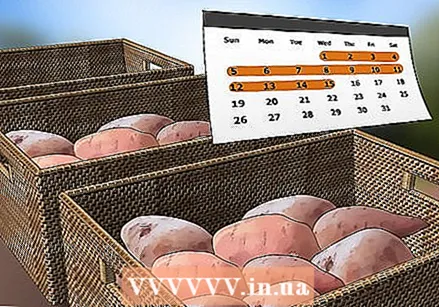 Dry the sweet potato. Do not wash the sweet potato after harvesting. Sort the sweet potatoes and put them in boxes or baskets so that they can be stored dry. The sweet potato dries in about 2 weeks. You do this by placing the sweet potato in a warm, dark, ventilated place and leaving it there undisturbed. This ensures that spots and damage can heal, and that fungal bacteria die.
  Keep the sweet potato. Once the sweet potato has been harvested, you can keep it for months. Keep the sweet potato in a cool, dry place, such as in a kitchen cupboard. There are several ways in which you can process the sweet potato: so look for sweet potato recipes and enjoy the delicious fruits (actually tubers) from your own vegetable garden.


