Author:
Christy White
Date Of Creation:
9 May 2021
Update Date:
1 July 2024

Content
- To step
- Method 1 of 3: Prepare the glass
- Method 2 of 3: Design your glass
- Method 3 of 3: Dry the paint
- Tips
- Warnings
- Necessities
It seems like hand painted wine and martini glasses are all the rage! And it is absolutely possible to do it yourself at home. In fact, it's a fun way to make unique, personalized, inexpensive gifts for friends and family. Or keep the glasses yourself!
To step
Method 1 of 3: Prepare the glass
 Wash the glass thoroughly in warm water with washing-up liquid. A glass that has not been used for a long time can become dusty and greasy. Make sure the glass is spotless, wash it under running warm water with washing-up liquid.
 - Let it dry well. You cannot paint the glass while it is still damp or wet.
 Clean the surface of the wine or martini glass with alcohol and kitchen paper. Remove any grease, dirt or fingerprints that could ruin your paint job. Then let the glass stand for 7-10 minutes.
 - Use cleaning vinegar if you don't have alcohol available; vinegar has the same properties.
 Stick masking tape on the edge of the glass. The top 2 cm, just below the edge, should remain free of paint. Paint can be toxic, so it's important not to paint where your mouth touches the glass. In addition, the paint will quickly turn ugly if you keep touching it with your lips.
 - Make sure you stick the tape symmetrically on the edge of the glass. If it doesn't go well right away, you can easily peel it off and stick it again. Painter's tape works best.
Method 2 of 3: Design your glass
 First sketch your design on a piece of paper (not mandatory, but recommended). If you first put the design on paper, you can put it in the glass, attach it and trace it. Blotting paper bends more easily so that you can also trace it on the bottom.
 - Of course you don't have to make a sketch of your design first. Geometric and abstract patterns can be just as beautiful. You can also make a pattern on the glass with tape and paint around it. This also applies to the stem and the base.
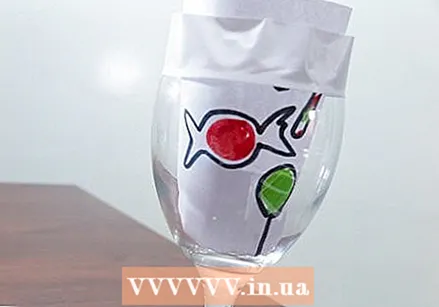 Attach your sketch to the glass. There are several products available, so it is difficult to prescribe generally applicable instructions. The easiest way is to sketch your design and attach it to the inside of the glass with tape. However, there are a number of other options:
 - Put the sketch in the glass and fill the glass with, for example, a sock or filling from a blanket. The soft filling keeps the sketch in place and intact.
- Buy sketch paper on a sticker sheet. Nowadays you can buy sketch paper that you can stick on immediately after sketching. Stick it on the inside of the glass and you are ready to paint.
 Draw your design on the glass. Use a waterproof marker with a sharp point to draw the design on the glass. If you don't like your design, use a cotton swab or cotton ball with alcohol or nail polish remover to erase the lines.
 - This outline will likely remain visible. If you don't want that, it is better not to make an outline and just paint according to the sketch on the inside of the glass.
 Choose your paint. If you go to the hobby store you can easily be overwhelmed by the huge range of types of paint. There are several options for painting glass, the differences are only minor - with all types of paint you can achieve a satisfactory result. Your choice is mainly determined by your mood and your taste.
 - Glass paint is water-based and is specially intended for painting glass. The paint can withstand the dishwasher (but usually not the microwave), but in some cases you will need to apply a base coat and top coat. Read the instructions.
- You can also use acrylic paint, but it depends on the quality of the paint - some paints will peel more quickly than others. So if you choose acrylic-based paint, always use a high-quality coat of varnish to make sure that the paint stays properly fixed to the glass.
- See if you can find acrylic-based paints that are suitable for painting glass.
- Regarding the drying process, there are two types of paint: paint that dries in the air and paint that needs to be heated to dry. Paint that has to be baked in the oven generally stays beautiful for longer.
- And to make it even more difficult, you also have to choose between transparent paint (light can pass through) and opaque paint (light cannot pass through).
- There are even felt-tip pens with glass paint. It is easy to work with and the paint usually needs to be baked when you have finished your design.
 Prepare your work area. It may speak for itself, but protect your clothes and your table when painting. Put on some old clothes and cover the table with several layers of newspaper or baking paper. Temporarily banish the dog to the yard or another room.
 - And while you're at it, open your windows right away. Good ventilation ensures that the paint fumes do not end up in your lungs.
 Color it in. As with painting on canvas, there are countless possibilities, you can determine this part yourself. But if you're looking for inspiration, here are some ideas:
 - Create a marble effect by running the paint over your glass from top to bottom. Pour a thin even layer over the glass while rotating the glass in an even motion. Alternate the colors if desired.
- Use only one color and cover the glass completely to make a beautifully painted glass.
- Use tape to make stripes. Remove the tape when you have painted between the stripes; removing the tape before the paint dries will prevent the paint from peeling off at the edges. And if the stripes aren't quite perfect, you can touch it up a bit with a craft knife.
- Make dots. The blunt end of your brush is great for making dots, but you can also use a sponge brush. Always apply the paint perpendicular, never at an angle.
- Use sponges. Whether you're using a cleaning sponge or a sponge brush, a sponge allows you to create interesting layered designs with just a little bit of paint - and it requires little skill.
- Overlay colors to create shadows and highlights.
- Don't forget the stem and base! Half of your "canvas" is under the part where the wine is about to go. Don't forget this piece!
- The type of brushes you use is not that important, they deliver about the same result. In general you could say that synthetic brushes are a bit sweeper, brushes with real hair give a more even result.
- Create a marble effect by running the paint over your glass from top to bottom. Pour a thin even layer over the glass while rotating the glass in an even motion. Alternate the colors if desired.
 Remove paint with nail polish remover if you need to touch up. Paint to be baked can even be removed with warm water before baking. If you want to remove paint, you have to do it quickly.
Method 3 of 3: Dry the paint
 Let it dry. Let the glass dry for at least 24 hours before moving on to the next step. Place the glass upside down on a soft surface such as a folded tea towel and let it dry thoroughly. Do not put it in the kitchen or bathroom, it is too humid there.
 - If you let the paint dry in the air, you have to leave it alone for a long time three weeks. Always follow the manufacturer's instructions.
 Heat the glass. If you have chosen a type of paint that needs to be baked to dry, now is the time to start baking. The process is very simple, don't worry, your glass won't melt!
 - Cover a baking tray with aluminum foil.
- Set your oven to 180ºC. You need not preheat. You should already put the glass in the oven when the oven is not yet warm - if the glass heats up slowly, you prevent the glass from breaking.
- So immediately put / put the glasses on the baking tray and slide the baking tray into the oven.
- Set a timer for 30 minutes. Turn off the oven after 20 minutes, and leave the glasses in the oven for another 10 minutes. You can then remove the glasses.
- Or do it as directed by the paint manufacturer.
 Decorate your creation. Since you may want to give some glasses away as a birthday present or for any other occasion, you can fill them with candy, confetti, party bells, etc. You can use them at parties and take it home with you.
 - Consider putting your name or the name of the person you are giving it to on the bottom of the glass. Or put some glue on the glass and stick a bow on it. This gift is going to be too good to wrap!
Tips
- Provide adequate ventilation in your room. The paint smells are not very pleasant.
Warnings
- Be careful - some glass paints contain dangerous chemicals. However, there is also non-toxic paint, so buy it better.
- Follow the instructions on the paint bottle. Usually a minimum space is prescribed between the edge of the glass and the paint. This requirement MUST be followed.
Necessities
- A wine or martini glass
- Paper and pen for sketching
- Newspaper / baking paper (to protect your work surface)
- Alcohol
- Paper towel
- Cotton swabs
- Glass paint
- Varnish
- Paint thinner (optional)
- Paint brushes
- Oven
- Foil-covered baking tray


