Author:
Morris Wright
Date Of Creation:
2 April 2021
Update Date:
1 July 2024

Content
- To step
- Method 1 of 2: Using a carpet repair kit with adhesive disks
- Method 2 of 2: Using heat with a carpet repair kit
- Tips
- Necessities
It is always useful to know how to repair your floor covering yourself. Spills, burns and other stains and damage are almost impossible to prevent in the long run and can ruin your carpet to such an extent that you have to take a piece out so that you can repair the damage. Fortunately, repairing damaged carpeting is relatively easy and takes no more than a little time and a few simple supplies.
To step
Method 1 of 2: Using a carpet repair kit with adhesive disks
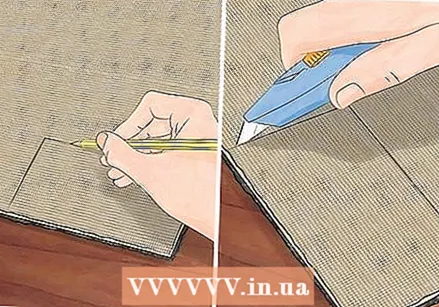
 Measure the damaged area of the carpet. Use a tape measure to determine the size of the area you want to remove from the carpet. This makes it easier to cut a replacement piece of carpet to size.
  Mark the part you want to remove. Use duct tape to tape off a square section that needs to be removed. Compare the placement of the tape with the measurements previously taken to make sure the inner edge of the tape matches those measurements.
 - Try to find an inconspicuous place to get the replacement carpet, such as under a closet or under your bed. Most importantly, don't show the place where you get the replacement rug piece from.
- It's helpful if you keep some extra carpet in the attic, or elsewhere, for repairing damaged areas.
 Remove the damaged part of the carpet. Use a utility knife or carpet cutter to carefully cut along the inside edge of the duct tape. Go just deep enough to cut through both the surface of the carpet and the back, but not so deep that you damage the underlying (insulation) floor. After you have cut all the edges loose, remove the carpet piece.
 - When you work with a carpet cutter, you first use it to make an impression with it. Once you've made that impression, attach the cutting blade and pivot screw and make the notches, then rotate the patch of carpet two or three times to remove it.
 Measure and cut the replacement rug piece. Lay the piece of carpet you will be using upside down and mark the correct size, using the measurements obtained previously as a guide. Mark the cut lines with a felt-tip pen, then use a Stanley knife or carpet cutter to cut out the carpet piece.
  Prepare the carpet to properly insert the missing piece. Temporarily neutralize the adhesive disk by wetting it slightly. Lift the edges of the carpet around the hole and slide the adhesive disk underneath, adhesive side up.
 - Make sure the adhesive disk is a lot bigger than the hole: you want the disk to hold the entire replacement carpet piece, especially the corners, as well as some of the surrounding carpet.
- When after a few minutes the adhesive disk becomes tacky again, press the edges around the hole firmly so that everything is properly in place.
 Place the new carpet piece. Make sure the carpet fibers are neatly arranged along the edge of the hole. Check the fit again before applying glue. Then spread a thin layer of carpet glue around the edges of the adhesive disk. Place the carpet piece in the hole and make sure it is just right. Press it lightly so that the backing is well against the underlying adhesive disk and the glue and everything will adhere well.
 - Align the carpet piece so that the direction of the fibers in the piece of carpet matches the direction of the fibers in the rest of the carpet.
- You have about 15 minutes to perfectly position and align the rug piece before the glue dries and the rug piece is permanently anchored in place. Work fast.
 Smooth the pile of the carpet to hide the edges of the carpet piece. Depending on the type of pile, this can be achieved by rubbing your fingers around the circumference of the carpet piece, or brushing the pile of the carpet piece in the same direction as the rest of the carpet with a carpet brush.
 - You can also vacuum the repaired area and the surrounding carpet with a special nozzle to work up the carpet threads.
Method 2 of 2: Using heat with a carpet repair kit
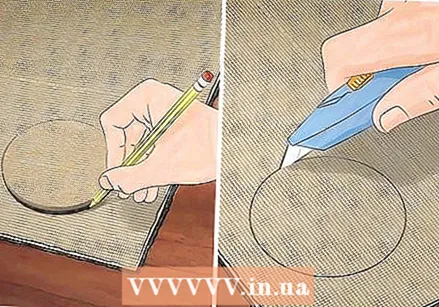
 Measure the damaged area of the carpet. Determine the size of the carpet piece to be cut and whether you want to cut a rectangular or round replacement patch to repair the area.
 - Rectangular pieces can be cut using a Stanley knife, round pieces can be cut using a circular carpet cutter.
 Remove the damaged part of the carpet. Use a utility knife or carpet cutter to carefully cut away the damaged area of carpet. Apply just enough pressure to cut both the surface of the carpet and the backing, without damaging the underlying (insulation) floor. Once you have completely cut the edges off, remove the carpet piece.
 - You may be able to keep the damaged section in case you need to fix a smaller area that can be cut out of this section.
 Measure and cut the replacement piece of carpet. Turn over a piece of carpet you had left over and measure out the required piece, using the measurements obtained previously as a guide. Or cut a piece of carpet from an inconspicuous place, such as under your bed. Mark the cut lines of the carpet piece with a felt-tip pen, then use a utility knife or carpet cutter to cut it out.
  Wet the carpet patch. Carpet plasters can be ironed down with special adhesive discs that are activated by heat. The adhesive disc probably has an aluminum layer on the top and dust on the bottom. Wet your carpet plaster under the tap and gently squeeze out the excess water; the patch should be damp, but not soaking wet.
  Slide the piece of carpet plaster under the hole in the carpet and center it. Make sure the patch is bigger than the hole. It is specially designed to be activated by heat, so center it well for even distribution. If necessary, smooth out any wrinkles with your hands.
  Place the replacement carpet piece on top of the carpet patch. Brush the carpet piece with a carpet brush to remove loose fibers. Make sure that the direction of the fibers on the carpet piece matches the direction of the fibers on the carpet.
  Place the adhesive disk on the carpet piece, aluminum side up. Make sure the carpet piece is properly centered and that you know exactly where it is.
  Set your iron on the highest setting and heat the carpet piece for one minute. Apply pressure to the iron so that the heat travels through the carpet to the adhesive plaster underneath. After all, the carpet plaster is activated when it is exposed to heat.
 - When you put the iron on the adhesive disk, you can hear it hissing a little. That's the moisture that reacts to the heat, not the carpet that burns.
- If the adhesive disk is a bit on the large side, you can run over it with your iron to get to all the important places so that the entire carpet plaster is properly heated.
 Remove the iron and the adhesive disk and let the carpet cool. The adhesive on the carpet plaster is not completely dry until the carpet has cooled down properly. Brush the repaired area of carpet with a carpet brush, removing the loose fibers from the edges.
Tips
- If carpet plaster does not suffice, you can also use carpet glue to glue the piece of carpet. Two stripes of glue on the bottom of the carpet piece will often be enough. Keep in mind that if you plan to replace your carpet, the glued-on patch will bond to the sub-floor, making it difficult to remove the carpet patch unscathed.
- Put a new blade in your utility knife or carpet cutter before working with it. This will make it easier to create even edges that fit together well, rather than creating small gaps between the rug piece and the hole in the rug.
- Use both hands when cutting the carpet to avoid slipping your hand with the knife and injuring your other hand. You can also hold one hand above the blade while cutting, so that it is not in front of the blade when you slip.
- You can use a metal ruler for weight and for a straight edge when cutting.
Necessities
- Piece of carpet
- Felt tip pen
- Duct tape
- Carpet adhesive
- Adhesive disk and / or carpet plaster
- Utility knife or carpet cutter
- Measuring tape


