Author:
Frank Hunt
Date Of Creation:
15 March 2021
Update Date:
1 July 2024
Content
- To step
- Method 1 of 4: Braiding a rope with three ropes
- Method 2 of 4: Make a braid with four ropes
- Method 3 of 4: Make a standard braid with one string
- Method 4 of 4: Make a monkey braid
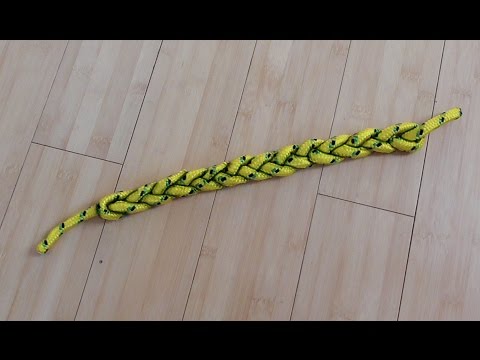
Braiding rope makes the material extra durable and more versatile for use in a variety of applications. There are a few different ways to braid rope if you only have a single rope, or you can weave multiple ropes to make an even stronger rope.
To step
Method 1 of 4: Braiding a rope with three ropes
 Find a rope of your choice. A three-rope braid is a very common way of braiding, and is perhaps most associated with the classic schoolgirl braid. You can use this technique to make a strong braided rope. Braided ropes are suitable for use in high friction situations. You can use more or less any type of rope for this method, including synthetic rope, natural rope, and plastic rope. However, it must be flexible enough to work with it. If the ends of your ropes are frayed, you will need to tie or melt them together first.
 - With a synthetic rope, you can secure the end by holding it over a candle so that it fuses together a bit.
- You can tie thread (floss works well) around the end of the string to hold it together. This is also called "whipping".
- You can also use tape to secure the ends of the ropes and prevent fraying.
 Tie the three ends together. Use a knot or some tape to tie the ends of the three ropes tightly. Electric tape and gaffertape are good choices, depending on the thickness of the wires you are using. Once you've tied the ropes together on the left, extend the rest of the rope to the end on the right.
 - The three ropes must be next to each other and must not overlap for a good starting position.
- It may be helpful to label the three ropes A, B and C.
- You can also color-code the ropes, or use different colors if you want to create a pattern.
 Bring the outer ropes over the middle one. Start by crossing rope A over the middle rope B. The order of the ropes is now B, A, C. Next you cross the other outer rope over the new middle rope, C over A. Now the order is B, C , A. This is a basic repeat of the three rope braid pattern.
  Repeat this pattern. Continue to repeat this pattern (crossing one outer rope over the middle rope and then crossing the other outer rope over the new middle rope).
 - In this example, you pass B over C, so that B is the middle rope.
- Then you pass A over B, so that A is the middle rope.
- You can continue this pattern until you reach the end of the length of the rope.
 Tie off the rope. Once you've reached the end of the rope, you can secure the braid by tying the ropes together. You can do this by tying the ends together with electrical tape or gaffertape, or by tying a strong knot in the end.
Method 2 of 4: Make a braid with four ropes
 Start with a flexible rope. This technique requires four lengths of rope with good flexibility, as you will be braiding multiple ropes together, so you need to make sure that any type of rope you use is flexible enough to work with. It will be difficult to get a tight braid with something that is too stiff.
 - A four rope braid is a good choice for a high degree of friction, such as those used in winches and pulleys.
- Make sure each rope is locked at the end, either by fusing the end of a synthetic rope or by knotting or taping a natural rope.
- The extra twine compared to a three-twine braid will make the twine thicker and stronger.
 Join the ends together. This braiding technique requires you to tie or fuse four ropes together. There are a few different ways to do this, but the easiest way is to tie a knot that connects four pieces of string on one side. You can also secure them with some electrical tape or gaffertape.
 - You can braid four loose pieces of string, or bend two pieces of string in half and treat the two ends of one piece like two ropes, giving you four ropes in total.
- You can also use eight ropes as long as you're working in bundles of two, basically treating two wires as one.
- In this explanation, the four ropes are labeled A, B, C and D. The ropes B and C are the middle two ropes.
 Cross the middle ropes. Cross rope C over rope B. Wrap C around B so that it passes over B first, before finally getting it under B and back to its original position in the cluster.
 - Once you have completed this step, the ends of all four ropes should still be in the same order as they were at the beginning.
- The order should be A, B, C, D.
 Cross one end over the center. Pass rope A over rope B. Do not cross A C. At the end of this step, the order of the ends of the rope should be B, A, C, D.
  Braid in the remaining end. Bring it up from the other side of C and over rope A. D must not intersect with B.
 - At the end of this step, the end order of the rope should be B, D, A, C.
- You have completed one braid block at the end of this step.
 Repeat this pattern along the entire length of the rope. Follow the same pattern used to complete the first braid block running the length of the rope, until the braid is as long as needed, or until there is almost no rope left.
 - At the start of each round, label the ropes again as A, B, C, D according to the order they are now in.
- Wrap C around B.
- Transfer A B.
- Cross D under C and over A.
 Tie the ropes together on the other side. When the braid is done, you will need to join the four ropes at the end of the rope. You can melt them together or tie them in a knot to hold them in place.
Method 3 of 4: Make a standard braid with one string
 Start with a flexible single rope. A single braided rope offers the strength of a braided rope, but is lighter because it is only one rope. A synthetic or natural rope could work, but it must have a high degree of flexibility so that you can work with it. A stiffer rope will not really work with this method. The rope can be of any length, depending on the application.
 - Single braided ropes are often used for rigging and pulling and climbing.
- Do not use a rope that you have made yourself for climbing unless you have it checked by an expert who can vouch for its suitability and safety.
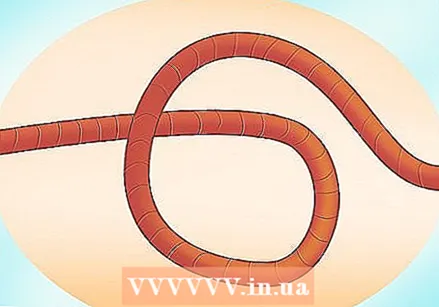
 Make a loop with the rope. If you braid a single rope, you braid part of the rope. When you know how long you want the braided section to be, make a loop in the rope that's about the size of that length.
 - You can do this by sliding the two ends of the rope towards the center.
- In this example, the right side of the rope is above the left side.
 Pass a free end through the loop. Once you have made your loop, bring the end of the rope from the right side up and through the left side of the loop in a longitudinal and downward motion. Your main loop should now have a smaller loop on the left and the right end of the rope should be under the loop.
  Twist the loop. Bend the top of the loop down so that it runs over the bottom of the original loop. Make this intersection near the first braid of the rope and not towards the open end of the loop. This forms the start of a braid-like pattern and creates the opening that you then pass the right end of the rope through.
 - When you cross the rope with itself, the original top part of the loop should cross back to the original bottom part of the loop, just a short distance from the new intersection you created.
- As a result, a new, smaller loop or opening should have formed just beyond the original link of your braid.
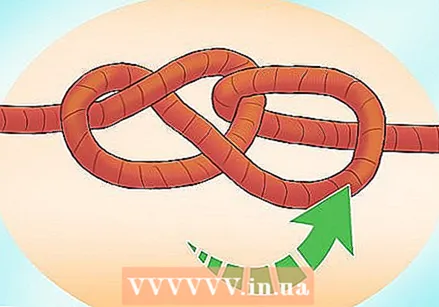
 Pass the end through the newly created opening. Thread the right end of the rope through the opening you just made in the previous step. This action is another link in the braid.
 - The right end of the rope goes through the opening, going over the bottom part of the loop and under the top part of the loop.
- The right side should now be tilted up, above the rest of the rope.
 Repeat this along the entire length of the rope. You should continue to make new, small loops from the larger loop, twisting the rope and then weaving the right end of the rope through the holes that are created. The braid is complete when there isn't enough of the large loop left to work with and use for making new smaller loops.
  Pull the braid tight. When you have twisted the loop for the last time, thread the right end of the rope through the last small loop. Gently pull on both ends of the rope to tighten the braid.
Method 4 of 4: Make a monkey braid
 Start with a flexible single rope. To make a monkey braid (also called chain braid) you only need one rope. A monkey braid can add some bulk or shorten a rope. They are often used as a way to store rope without getting tangled. You can use synthetic or natural rope, but make sure the material is flexible so you can work with it. Plastic ropes tend to be quite stiff, which can hinder making a tight braid with a single rope.
 - You can use a monkey braid to make a nice looking necklace, which you can make into a straight rope by pulling on it.
- You often see these braids on clothing uniforms.
 Make a loop. For this technique, start by making a loop in the rope by pushing the right end of the rope to the left until it forms a loop. The point where this loop starts is where the braid starts, so make sure the loops start near the left end of the rope.
  Push the long side through the loop. Once you have a loop, take the rope from the long side (the right side) and push it through the loop. You push the part of the rope closest to the loop on the right. Only use a small portion of the rope.
 - You have to pull a small U-shaped section of the rope through the first loop to make a second loop.
- Pull it down through the loop and out to the side of the rope you are working on to tighten it a bit.
- Note that this way of braiding makes it easier to pull each loop tight as you braid. If you try to pull the loops tight after you are done with the entire braid, the braid can be generally loose and uneven.
 Twist the U-shaped part into a new loop. Once you have pulled the U-shaped part of the rope through the loop, pull it to the right side so that it lines up with the braid and the loop you just pulled it through.
  Make another loop. Pull another length of string from the end where you braid (the right side), making sure it is right next to the loop just made. Push it under, through and out of the loop at the end of the braid and gently pull to secure it.
  Repeat this along the entire length of the rope. The rest of the braid is completed by simply creating new loops from the side of the rope you are working on and pulling those loops through the larger loops. Pull another section of the rope from the working side. Push this part under and through the previous loop you made in the rope.
 - If necessary, repeat this along the entire length of the rope.
 Pass the end through the last loop. When you have enough braids in the rope, make a special last loop to pull through the end of the rope. To make a closing loop at the end, pass the end you are working on (the right end) over the top of the last loop and then through again. Pull on both loose ends of the rope to secure the braid.
")


