Author:
Frank Hunt
Date Of Creation:
20 March 2021
Update Date:
1 July 2024

Content
- To step
- Part 1 of 4: Soak and germinate wheatgrass seeds
- Part 2 of 4: Planting the seeds
- Part 3 of 4: Harvesting wheatgrass
- Part 4 of 4: Pressing wheatgrass
- Tips
Wheatgrass is packed with essential vitamins and nutrients that keep the body and mind healthy and vital. A "shot" of wheatgrass juice as part of your breakfast routine is considered a healthy way to start the day, but it can be expensive. If you want to make wheatgrass a daily part of your diet, try growing it at home instead of buying it already as juice. This article provides information on how to grow wheatgrass from seed and how to get the most of it when it is fully grown.
To step
Part 1 of 4: Soak and germinate wheatgrass seeds
 Buy wheatgrass seeds. Wheatgrass seeds are also called hard winter wheat seeds or wheat berries. You can buy a bag of seeds online or at a health store. Look for organic seeds from a reputable producer that have not been treated with pesticides and will grow into healthy, vibrant grass.
  Prepare the seeds for soaking. Before they can be soaked and germinated, the seeds must be measured and rinsed.
 - Measure out enough seeds to put a light layer on top of the seed tray for the grass to grow. For a 40 cm² container, use about two cups of seed.
- Rinse the seeds in cold, clean water using a colander with very small holes or a strainer. Drain well and put them in a bowl.
 Soak the seeds. This puts germination into action. By the end of the process, the seeds will have developed small roots.
 - Pour cold, preferably filtered, water into the seeded bowl. Add about three times as much water as there are seeds. Cover the bowl with a lid or foil and place it in a cupboard to soak for about 10 hours or overnight.
- Drain the water from the seeds and replace it with more cold, filtered water - again about three times as much water as there are seeds. Let it soak for about 10 more hours.
- Repeat the process one more time until it has soaked three times.
- By the end of the last time, the seeds should have formed roots. This means they are ready to be planted. Drain the water and set the seeds aside until you are ready to plant them.
Part 2 of 4: Planting the seeds
 Prepare the seed tray for planting. Place paper towels around the seed tray so that the wheatgrass roots cannot grow through the holes at the bottom of the tray. Place an even 1 inch high layer of organic compost or potting soil in the seed tray.
 - If possible, use paper towels that have not been treated with chemicals or dyes. Recycled, non-chemical kitchen towels can be found at health food stores.
- Use pre-moistened compost or potting soil that is free of pesticides and other chemicals. It is important to use organic soil to get the most benefits from the wheatgrass.
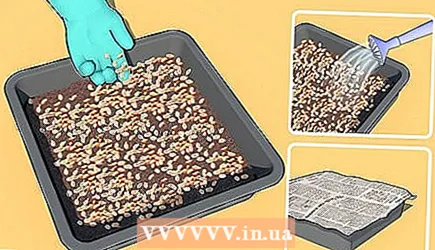 Plant the seeds. Spread the seeds evenly on top of the compost or potting soil. Push the seeds gently into the soil without burying them completely.
 - It is okay if the seeds touch each other, but make sure that there is no accumulation of seeds in one place. Each seed needs a little space to grow.
- Water the tray lightly, making sure to sprinkle each seed.
- Cover the tray with a few moistened pages of newspaper to protect the seedlings.
 Keep the seeds moist. It is important that the seeds do not dry out during the first few days after planting. Keep them moist while they root themselves in the seed tray.
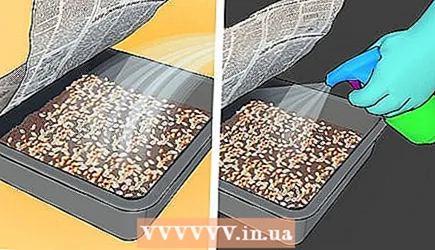
 - In the morning, lift the newspaper and water the tray thoroughly so that the soil is wet, but not completely soaked.
- Use a spray bottle filled with water to lightly sprinkle the soil at night before going to sleep to keep the seedlings from drying out at night. Also spray the newspaper so that it also keeps them wet.
- On the fourth day after planting, remove the newspaper to prevent grass from growing against it. Continue to water the sprouted grass once a day.
 Keep the grass partially in the sunlight. Direct sunlight will damage the grass, so always keep it in a shady place at home.
Part 3 of 4: Harvesting wheatgrass
 Wait for the wheatgrass to split. Once the shoots are mature, a second generation of blades of grass will begin to grow from the first. This is called splitting and means the grass is ready to be harvested.
 - Now the grass should be about 6 inches high.
- Grass is usually ready for harvest after 9 or 10 days of growing.
 Cut off the wheatgrass above the root. Use scissors to harvest the grass by cutting it just above the root and collect it in a bowl. The harvested grass is ready to be juiced.
 - Harvested wheatgrass will keep for about a week in the refrigerator, but it tastes best and provides the most health benefits when harvested just before juicing.
- Continue to water the wheatgrass to produce a second crop. Harvest it when it is fully grown.
- Sometimes a third crop follows, but it is usually not as tender and sweet as the first. Empty the seed tray and prepare it for another batch of seedlings.
 Restart the process. It requires a lot of wheatgrass to produce just a few shots of wheatgrass juice. If you want to make wheatgrass a daily part of your diet, you will need more than one bowl of seedlings growing at the same time.
 - Record the time of the growing and harvesting cycle so that you can soak a new batch of seeds while the previous batch takes root. When you have seeds in rotation at two or three different stages, it should be possible to produce enough wheatgrass to drink a shot every day.
- Wheatgrass has a beautiful bright green color and adds a lot to a kitchen or conservatory, wherever you want to grow it. Consider growing wheatgrass in a decorative container and surround it with other plants to enjoy both its beauty and health benefits.
Part 4 of 4: Pressing wheatgrass
 Rinse the wheatgrass. Wheatgrass does not need intense rinsing because it was grown from organic seed and in organic soil or compost. Give it a light rinse to wash away any dirt or dust it may have accumulated through the air.
  Put the wheatgrass in a juicer. There are special fruit presses for wheatgrass to get the most out of this fiber-rich plant.
 - Avoid normal juicers, as wheatgrass can clog them and cause malfunctions.
- If you don't have a juicer, you can use a blender. Once the wheatgrass is fully mixed, use a sieve to remove the solids.
 Enjoy a shot of wheatgrass juice. You only need a few centiliters to experience the benefits of the powerful blend of vitamins and minerals.
Tips
- Wheatgrass is said to remove toxins from our body. Drink wheatgrass juice to relieve stress and replenish your energy.
- If the wheatgrass containers show signs of mold, improve the air circulation in the grow room by installing a fan. Harvest the wheatgrass above the mold; this is healthy to consume.
- Go to a local garden center and ask for the plastic bowls that the plants come in - they usually have piles of these that they should throw away. These are the perfect size for growing wheatgrass.


