Author:
Christy White
Date Of Creation:
6 May 2021
Update Date:
1 July 2024

Content
- To step
- Part 1 of 4: Research
- Part 2 of 4: Preparation
- Part 3 of 4: Piercing
- Part 4 of 4: Aftercare
- Tips
Piercing the penis can be a great way to spice up your sex life, feel cool about yourself, and have a piercing that no one knows about. It is not for everyone, but read on if you think you are interested in a penis piercing.
To step
Part 1 of 4: Research
 Do some research. There are different types of piercings that you can have in, on and around your penis. You have the Prince Albert piercing, the ampallang, the frenum piercing, and much more. Look them up to see which one suits you best. Google Images can usually help you with the basics.
  Read about blood-borne pathogens and the potential risks of piercing yourself. Putting on a penis piercing at home can lead to all kinds of illnesses that are harmful to your health - as well as harmful to the health of your business. If you still want to use that thing, then you have to be extremely, but also extremely careful. Penile damage is no laughing matter. You only have one body, so don't screw it up.
 - Also read about national legislation. In the Netherlands, people from the age of sixteen are allowed to decide for themselves whether to have a piercing.
 Determine what size (usually indicated in gauge or millimeters) the piercing should be. Piercings usually follow the American Wire Gauge standard, where a higher number represents a smaller size. Genital piercings usually range from size 16 to size 12, although there are always exceptions, of course. A 14 gauge is about 1.5 millimeters.
  Order your surgical steel piercing needles. Make sure to order the correct size of needles for your piercing. Due to liability issues, most tattoo / piercing shops will not sell needles themselves, but you can easily find them online. Make sure you buy the needles from a reputable retailer and that the packages are completely sealed as you can contract serious illness from the use of unsanitary needles. As mentioned, damage or infection to the penis is no laughing matter.
 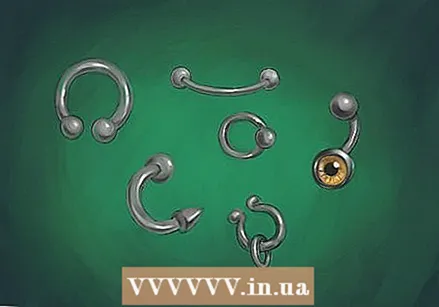 Get your titanium or surgical steel jewelry. Make sure your jewelry is the right size for your new piercing. Bars or rings for a frenum piercing, a curved bar for a Prince Albert piercing, etc. Also consider the correct length for the jewelry. If your jewelry is too small, it can cause major problems in recovery. Therefore, if in doubt, always prefer a larger one, so that you have some extra space in case of swelling (and the chance of swelling is very likely).
  Get your other instruments. Depending on the piercing, you may also need to purchase a clip. It can sometimes be very difficult to hold the skin the way you want, especially in places like the scrotum or the shaft of the penis. These clamps allow you to mark the area and then grip the skin exactly as you want. This way you will not have to worry about the skin slipping or moving during the piercing. Piercing the wrong spot can cause heavy bleeding or even permanent injury, so it might be wise to use a clamp.
 - This is a good reason to get your piercing done by a professional. The placement of the piercing is extremely important, and a wealth of experience greatly increases the chance that the piercing will get where it should be.
 Grab gloves and other safety equipment. You can probably also buy gloves from the websites where you buy your needles. These are extremely important. Take necessary precautions to prevent the spread of blood-borne pathogens and other infectious diseases. Alcohol wipes are also good for sterilizing and cleaning the skin around the potential piercing area. Use a good ointment as a lubricant for the needle. This makes it a lot easier to push the needle through the skin.
 - Know that sometimes all the alcohol wipes in the world are not enough. In fact, the alcohol wipes themselves can also become contaminated. Professional equipment is therefore preferred.
Part 2 of 4: Preparation
 First, determine the location where you will put the piercing. Choose a spot that has a fairly flat area and a suitable surface that you can work on. The bathroom is a good place. You also want to choose a place that is easy to sterilize and easy to clean when you're done.
  Sanitize everything. First make a solution of 1 part bleach and 4 parts water. Clean the bathroom thoroughly. Scrub any areas you think you will touch while piercing. Clean every square inch of the work surface. The cleaner this place is, the safer the piercing.
  Don't neglect your jewelry. If you bought a sterile clamp and jewelry, great. If you don't, it is probably a good idea to boil it in a pot of water first. Then wipe them with some bleach solution. It is probably wise to sterilize these items anyway, as you have no idea what they have come into contact with since you got them.
  Prepare your supplies. When everything is clean, put on your gloves and put down all the supplies. Extra gloves, sterile needle, sterile clamp, sterile jewelry, alcohol wipes, a marker and a dollop of ointment. Take off your gloves and throw them away.
  Clean the surrounding skin. Now put on a pair of clean rubber gloves. Use an alcohol swab to clean the area where you want to pierce yourself.
  Mark where the needle goes in and out. Use a marker to put two dots: one where the needle should go in, and one where the needle should come out. Make sure that these dots are at an appropriate distance from each other so that the jewelry can fit properly in between. Step back and imagine what the area will look like with a piece of jewelry in it. Make sure your marking is straight, because it is quite annoying to take the jewelry out and put the piercing again.
 - Note that these dots do not guarantee the location of the jewelry. If you move (because of the pain, for example), the needle can shift. If that happens you will get a crooked piercing. This is also a good reason to have your piercing done by someone else.
 Take off your gloves and throw them away when everything looks fine. Put on a new pair of gloves.
  Install the clamp. Now grab your clamp (if you have one) and stretch the skin you marked with dots. Align the dots so that they are on each side of the skin and gently squeeze the clip onto the skin. You should see one dot now if you look through one eye of the clamp, and the other if you look through the other eye - now if you put a needle through the eyes, it would line both dots in a straight line must pierce.
 - This method is only better suited for some types of penis piercing. You will have to try a different method for the Prince Albert piercing. These piercings are a lot more difficult and must absolutely be done by a professional.
 Otherwise, choose to stretch the skin. If you don't have a clamp, this will be a bit trickier. You need to use one hand to stretch and align the skin as shown above so that a straight line could poke through both sides. It can be very difficult to hold the skin like this with a needle in your other hand (another good reason to get your piercing professionally done).
Part 3 of 4: Piercing
 Remove your needle from the packaging. Once you have attached the clamp, it is time to take your needle out of the package. You bought a sterile piercing needle that fits exactly the size of the jewelry, right? If not, Stop then immediately. Get a needle of the correct size. MAKE SURE YOU BUY A STERILE NEEDLE. Purchase a new needle if the package is damaged. You CAN'T afford to be lazy right now.
  Apply ointment. When you have removed the needle from the package, rub some ointment on the needle. This will make the next step easier.
  Align the needle. Okay! Double check now that both dots are still firmly in place in the clamp. If so, grasp the clamp with one hand so you can see the mark clearly. Grab the needle with your other hand and push it against the dot. You can hold the sides of the needle between your thumb and middle finger, and use your index finger to push through the back of the needle - however, hold the needle in whatever way works best for you.
  Pierce the skin. Take a few deep breaths, check again to make sure the dots line up, and quickly push the needle through the skin until it sticks out at least an inch or two on the other side. Do not pass the entire needle through the hole, as we will be using the needle to insert the jewelry.
 - It will hurt if you push the needle through the skin! Even super-muscled men cry with these types of piercings. You will have to push the needle all the way through the skin. It is quite difficult to keep going when you feel the first pain, but it will not get more intense than that first pain. It is therefore better to push on instead of putting all this effort in for nothing.
- If it hurts, just push a little harder. The pain will diminish quickly once you reach the other side.
 Insert the jewelry. Top! Now that the needle is through, the hardest part is done! Now all you have to do is do it jewelry to put in. The needle is still sticking out of both sides of the hole, right? It probably looks pretty cool, but now it is really time to insert the jewelry. Unscrew the ball from one end of the piercing. Don't lose that ball! Now take the piece with screw thread (which does not have a ball on it) and insert it into the back of the hollow needle. The jewelry should fit in there just fine. Now you can use the jewelry to push the rest of the needle all the way through the hole, and the jewelry will fall right into the hole.
  Attach the jewelry. If you have done everything correctly, you will now see a piece of threaded jewelry sticking out of your new piercing. Screw the ball back on and it's done! Take the time to thoroughly clean the area with a new alcohol wipe.
  Dispose of the needle properly. If you take the used needle to a piercing studio or hospital, they will be happy to dispose of the needle for you. If there is no piercing studio or hospital near you, you can put the piercing in a sturdy plastic container and throw it away - special sharps containers / boxes are also available at pharmacies. Don't think too lightly about this. Needles are considered medical waste, and it is unfair to endanger the garbage men and women.
Part 4 of 4: Aftercare
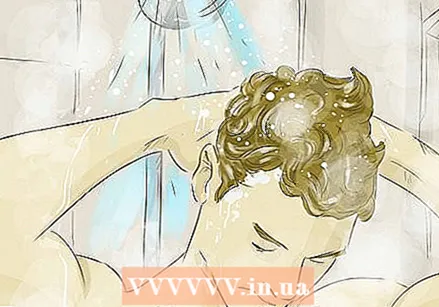 Take care of yourself. Congratulations, you have a piercing! Now you only serve it to take good care of. Soak the piercing in a solution of warm water and sea salt for the first few weeks. When taking a shower, it's a good idea to use antimicrobial soap just in case.
  Be careful with water. Showering is fine, but try to avoid bathing and swimming during the recovery process. The chance of infection is greater with stagnant water.
  Slow down with sex, tiger! If you are having a genital piercing, you should not have sex for the first four weeks. You essentially have an open wound on your penis, don't forget that. You are much more susceptible to STIs during recovery, and unsafe sex puts you at an increased risk of infection. So always wear a condom during sex for two months, regardless of whether you are in a serious relationship where you use contraception or not. This is for your safety. Also keep in mind that you have metal underneath, so it is probably not wise to use extra thin or extra “sensitive” condoms as they tear faster.
  Ask if you have anything to ask. Enjoy your new piercing and ask your local piercer for advice if you need it. He / she will be more than happy to provide you with advice. He / she also wants everyone to stay safe and healthy.
Tips
- Visit a professional piercer. The advice given above is dubious in some places, especially when it comes to sterilization. Alcohol wipes cannot kill all viruses and bacteria.
- If at any time you become insecure about something, Stop then immediately. Ask a professional piercer.
- Piercing yourself can be extremely dangerous. You do this at your own risk and you are solely responsible for any injury, infection, death or otherwise unfortunate events that may occur.


