Author:
Charles Brown
Date Of Creation:
3 February 2021
Update Date:
1 July 2024

Content
- To step
- Method 1 of 4: Using mail-to-web services
- Method 2 of 4: Check an IMAP account
- Method 3 of 4: Access email from POP3 account via Gmail
- Method 4 of 4: Access your POP3 account in Outlook
- Tips
When you retrieve your email, access is through the server hosting that message. Therefore, for most webmail such as Yahoo or Gmail, accessing your email messages from a computer other than your own is often a very simple process that can be accomplished simply by logging into the homepage website. However, accessing your email messages becomes a bit more difficult when working with IMAP or the more popular POP3 (Post Office Protocol) accounts. There are a few ways to access your unread messages with these accounts. Unfortunately, because POP3 doesn't save the messages you've already downloaded, only IMAP accounts will allow you to retrieve all your emails from a computer other than your own.
To step
Method 1 of 4: Using mail-to-web services
 Go to a mail-to-web service, such as mail2web.com. This is by far the easiest way to access your email account from another computer. Mail-to-web services, such as mail2web.com, are different from webmail accounts. Instead, they send the not received messages from your server to a computer other than your own, so you can get your email from anywhere in the world. Other popular options are hightail.com, myemail.com, and mail.com. Some services require the name of your server, but that is not necessary with mail2web.com.
  Type your chosen mail service in your toolbar. This will take you to the main page of the website.
  Enter your username and password. From time to time you may be asked for more information, such as your name, but never more than that. These services should always be free and not ask for more than your basic information. If this is the case, look for another service.
 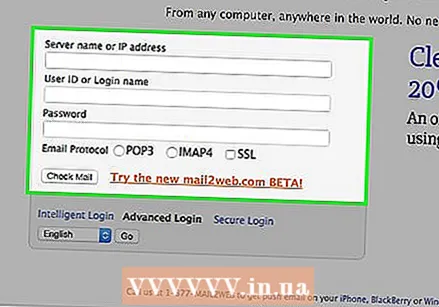 Log out of your account when you leave. The Logout option can be found in the top right corner of the screen. If this is not your computer, other users can access your account if you do not delete your username and password.
  Close your browser. Your email-to-web service will most likely prompt you to close your browser and clear the cache after logging out of your account.
  Press Ctrl + Shift + Delete on Windows or Command + Shift + Delete on Mac. This will clear your cache and ensure the security of your email account.
  Know the limitations. Remember, using this method with your POP account will only allow you to access the messages you have received since the last time you checked your account. You can also access your messages via POP-compatible programs such as Mozilla Thunderbird, Outlook Express, Outlook or Eudora.
Method 2 of 4: Check an IMAP account
 Collect your account information. You will need your IMAP server name, SMTP server name, username, password and all ports and SSL requirements. IMAP accounts (Internet Message Access Protocols) store all your emails on the server so that you can retrieve them with an IMAP-compatible program. These are programs such as Mozilla Thunderbird, Outlook Express, Outlook and Eudora.
  Create a new account. Simply enter the above names and details into one of the IMAP compatible programs as indicated in step 1. The following steps will guide you through the process of setting up your account in Outlook 2010.
  Go to Account Settings. Start Outlook and then click Info on the File menu.
  Go to the E-mail tab. Click New and then select Email Account. Once this is done, click Next.
  Check the box "Manually configure server settings" or "Additional server types".
 Select "Internet email". Then click Next.
  Set IMAP as the account type. You can find this in the Server Information group.
  Enter your details. You need to enter your name, email address, username, password, the name of your IMAP4 server and the name of your SMTP server.
 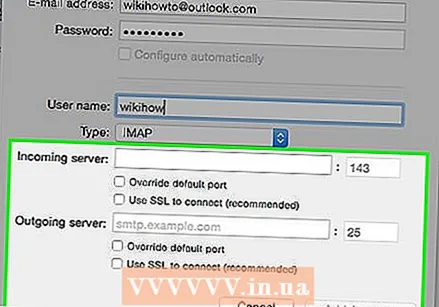 Complete the process. After clicking Next and then Finish, you can access your messages in Outlook.
  Remove the account from the program when you leave. Since this is not your computer, you should delete your account information so that others cannot access your email.
Method 3 of 4: Access email from POP3 account via Gmail
 Log in to your Gmail account. If you don't already have one, you can set it up easily, quickly and for free.
  Open the Account Settings menu. Look in the top left corner of your Gmail account and click on the gear icon. Click on Settings. Click on the Accounts tab.
  Select the option to add one of your POP3 email accounts. A new window will appear where you can enter your account information.
  Enter your email address. This must be the email address of your POP3 account and not your Gmail account. Once you've entered your email address, click the next step.
  Enter your username. Your username will usually contain the domain. For example: [email protected] instead of just "joe".
  Enter your password. This is the password for your POP3 account and not the password for your Gmail account.
  Set up the POP server. This will usually look like something like mail.yourdomain.nl or the like.
  Check that the port is set to 110. This is the default port for unencrypted POP3.
  Click Add Account. You will see this item at the bottom of the screen.
  Open your messages. You can now access the email messages from your POP3 account.
Method 4 of 4: Access your POP3 account in Outlook
 Click on Account Settings. This can be found under the Tools menu.
 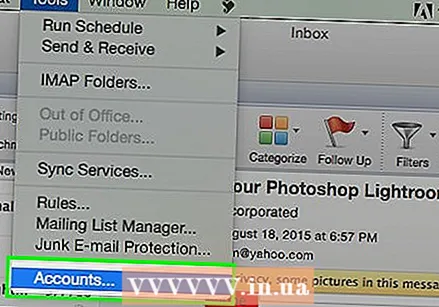 Look at the name. Select the POP3 account you want to open.
  Decide on your settings. Choose whether you want to keep mails on the server or delete them after they have been opened. If you want to keep them, click Change, choose "More Settings" and go to Delivery under the Advanced tab. If you want to delete the messages from the mail server, continue with the next step.
  Select the "Leave a copy of messages on the server" check box.
 Make a decision about your settings. Choose whether you want to receive messages automatically or manually. If you want to receive them manually, follow steps 9-11. If you want to receive messages automatically, skip to step 12.
  Hover over the Send / Receive option in the Tools Menu. This will display a drop-down menu.
  Go to the POP3 email account option. This creates yet another drop-down menu.
  Click on your inbox. Here you will see new e-mail messages.
 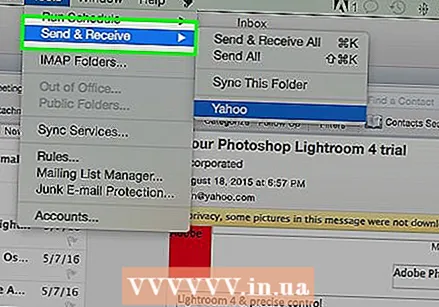 Hover over the Send / Receive option in the Tools menu. This will display a drop-down menu.
  Go to the option "Send / Receive Settings". Another box will appear. Click "Define Send / Receive Groups".
  Go to "Group Name". Click on a group that contains your POP3 email account. Select "Group Name Setting".
  Confirm your settings. Select the check box entitled "Automatically send / receive every n minutes". You will be presented with the option to enter a number between 1 and 1440 indicating how much time you want to pass in minutes between receiving emails. 1440 means receiving emails every 24 hours and 1 indicates you want to receive emails every 60 seconds.
Tips
- On another computer, do not click the "Remember password" button, as everyone will get access to your email!
- Always ask before installing programs or attachments on someone else's computer.
- If available, use the option "This is not a private computer" or "This is a public computer" during login. This ensures that the cookies are deleted at the end of the session, which means that once the browser window is closed, you are logged out.


