Author:
Roger Morrison
Date Of Creation:
28 September 2021
Update Date:
1 July 2024

Content
- To step
- Part 1 of 3: Preparations for bleaching
- Part 2 of 3: Bleach your hair
- Part 3 of 3: Color your hair white with toner
- Tips
- Warnings
- Necessities
If you want to do something beautiful and unique with your hair, consider dyeing it white. Bleaching can dry out the hair, but with the right technique you can prevent long-term damage. Learn how to use bleaches and repair products to get your hair shiny and snow-white.
To step
Part 1 of 3: Preparations for bleaching
 First of all, your hair must be healthy. Bleaching works better on healthy hair, and it does less damage. During the bleaching months, make sure your hair is as healthy as possible by following these instructions: the night before bleaching, coat your hair with coconut oil, wrap it, and go to sleep with it. It is important that you specifically use coconut oil for this, because it absorbs well into the hair structure and prevents damage like no other oil. If you don't apply it until the day of bleaching, leave it on for 3 hours first, and don't rinse before bleaching. It greatly benefits the hair as well as the bleaching, especially if you color from dark to white.
 - Do not dye, perm, or otherwise chemically treat your hair.
- Use natural shampoos and conditioners that contain oil and other ingredients that are beneficial to your hair. You can buy these at health food stores or beauty supply stores. Avoid products that contain sulfates, as these strip your hair of natural oils.
- Do not use a blow dryer, straightener, or curling iron on your hair. The heat damages and weakens the hair follicles. After shampooing, pat hair with a towel and let it air dry.
- Only use natural styling products. Avoid hairspray, gels, and other chemical hair products.
 Buy the supplies for bleaching your hair. If you want to make your hair look like you just came from the salon, go to a beauty supply store and buy quality items. For beautiful white hair you need the following products:
 - Bleaching powder (bleaching powder) that you can find in bags or jars. If you plan to bleach your hair more often, a jar is usually cheaper in the long term.
- Cream developer reacts with the bleach powder. There are different volumes, ranging from 20 to 40; the higher the volume, the stronger the developer.
- If you already have fairly light colored hair, use the 20 to 30 volume developer.
- If you have dark hair you will need the 40 volume developer.
- Developers higher than 40 volume can cause hair loss; don't use them. If you're using 40 volume, don't let it get on or near your scalp. Chances are you will end up with chemical burns.
- Toner is the ingredient that transforms your hair from bleached to snow white. There are different colors with names like Virgin Snow to Ionian White. Choose the color you like, whether it has undertones of yellow, silver or blue.
- Add red gold corrector to the bleach powder and toner to increase the effectiveness of these products. If you don't add it, you risk bleaching your hair twice, especially if it has been dyed in the past. Buy two bottles of the corrector if you have long hair.
- Purple Shampoo is specially formulated to keep your white hair looking refreshed. There are several brands available especially for bleached hair.
- You'll also need a paint brush, mixing bowl, plastic wrap, gloves, hair clips, and towels.
Part 2 of 3: Bleach your hair
 Prepare. Put on old clothes that can be stained. Drape a towel around your shoulder, and keep spare towels handy in case you need to wipe off splashes of bleach. Put on your gloves for protection, and you're good to go.
  Mix the bleach. Follow the directions on the bleaching powder pack, and place as much bleach in the mixing bowl as needed.
 - Add the appropriate amount of developer and mix it in with a spoon.
- Mix in the correct amount of red-gold corrector.
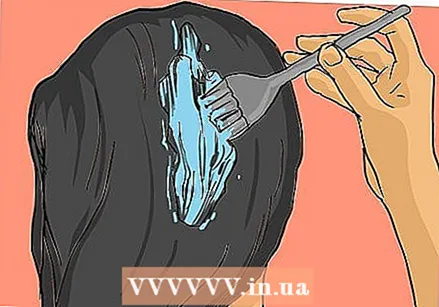 Apply the bleach. Paint some bleach into part of your hair with a brush. Start with the center section to the root, then the ends, covering each strand completely.
 - With hair clips you can clip parts of your hair so that you can work on one part of the hair at a time.
- Gradually apply the bleach to each section of your hair, in the order mid-section-root-tips, until your hair is completely covered with the bleach mixture. Check in the mirror that you also covered the back.
 Wrap your hair in plastic wrap. Let the bleach soak into your hair for 30 minutes.
 - While the bleach is doing its job, your scalp may start to itch or burn. This is normal, but as soon as it gets very painful you should remove the plastic wrap and wash out the bleach. This will have an effect on your final hair color, by the way. Always follow the manufacturer's directions for use.
- After 15 minutes, examine a hair strand to see how the bleaching is doing. Wipe off some of the bleach with a towel. If your hair is still dark, apply more bleach to the hair strand, reseal the plastic wrap, and leave it on for another 10 minutes.
- Continue to observe the hair every 10 minutes until it has turned completely blonde.
- Do not leave the bleach in your hair for more than 50 minutes or it can cause hair loss.
 Wash out the bleach. Remove the plastic wrap and run cold water over your head until all traces of the bleach have been washed out. Use the special shampoo to wash and rinse the hair, then the conditioner, and let hair dry.
 - Your hair should now be a yellow blonde color. If it is a bright yellow color, read on under the instructions for using the toner.
- On the other hand, if your hair has turned orange, or is still dark in color, you will need to bleach it again before using the toner. Wait one or more days and repeat the bleaching before you start with the toner.
Part 3 of 3: Color your hair white with toner
 Prepare for coloring. As with bleaching, wear old clothes and gloves. Have a stack of towels handy and make sure your hair is bone dry before you start.
  Mix the toner. Mix the toner and developer in a clean mixing bowl according to the manufacturer's directions. The ratio is usually one part toner to two parts developer. Read in the instructions how much of the red-gold corrector you should use and add it to the mixture.
  Apply the toner. Use your brush to spread the toner over the hair, following the same method you used for bleaching. Apply from the ends to the root, using hairclips to divide the hair as needed.
 - Pay special attention to the area around the roots, as this is the darkest part of your hair and you will get outgrowth here first.
- Keep applying the toner until your hair is completely covered.
 Cover your hair with plastic wrap. Let the toner soak into your hair for about 30 minutes, or else as long as the toner directions for use recommends.
 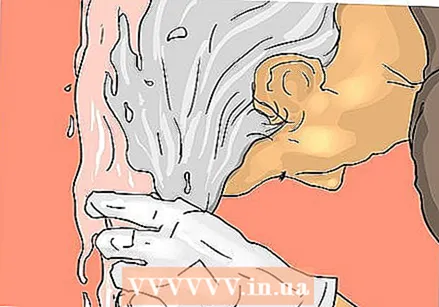 Wash out the toner. Rinse your hair under running cold water until all traces of the toner are gone. Use the special shampoo to wash your hair, add conditioner and rinse again.
  Watch your hair. Now that the bleaching and coloring is complete, the hair should be a radiant, sparkling shade of white. If you miss a spot, wait a few days and repeat the procedure for that spot.
Tips
- Wash your hair less often than usual. Shampoo removes natural oils from your hair, which is not good for hair that has already been damaged by bleaching.
- White hair is unsuitable for those who are unwilling to spend time on their hair. It involves a lot of maintenance and care to keep it looking good. Before dyeing, consider carefully whether or not you are willing to invest so much effort in your hair color.
- It is a good idea to let your hair get as oily as possible before bleaching it as this will cause the least damage. Do not wash it at least 24 hours in advance.
- White hair is damaged hair, even if it is in the best possible condition. Take care of your hair, do not use shampoo if it feels dry and do not overdo brushing, modeling or curling.
- Toner is NOT permanent. You will need to color your hair on a weekly or weekly basis, or else use a color shampoo or conditioner.
- Prefer not to use 40 volume, it will bring a lot of trouble. For dark hair, use 20 or 30 - it will take longer, but it will keep your hair healthier.
- Outgrowth can be a problem if you don't like it. It is best to go to the hairdresser if you are not an expert in bleaching the hair roots. Otherwise, wait for the hair to grow at least an inch before bleaching it or you risk damaging the rest of your hair.
- Treat your hair regularly with conditioner to keep it from drying out after bleaching.
- To restore the hair as good as possible, it is advisable to purchase a good recovery mask from a hair salon. The masks for sale in supermarkets and drugstores are of inferior quality. They just give your hair a coat of wax, making it appear artificially healthier. A good salon can restore your hair and make it permanently healthier. Brands like Kerastase and Redken will probably do your hair good, but consult the hairdresser to find out which choice is best for you.
- The temporary and slightly more expensive toners (such as Manic Panic or La Riche) work best initially, but if you do not wash your hair daily with color shampoos or conditioners you will need to reapply the toner monthly.
- Don't do it yourself. Most hairdressers do not even dare to color dark hair white themselves! It's not something you are an expert at after the first or second time. Often times, good hairdressers who care about your hair's health will not immediately bleach all of your hair - the more hair is bleached, the more damage it does! It is best to bleach it in stages with bleach foil.
Warnings
- If you don't use gloves, the bleach will burn every wound, give it an ugly white color, and make it feel extremely dry and itchy.
- Wear a swimming cap in the pool or you risk turning your hair green.
- Don't bleach your hair right after you wash it. Washing removes oils that protect your scalp, so your scalp and hair will look a lot worse off right after you wash than if you wait at least 24 hours.
- If you ultimately want something different, wait at least three weeks before coloring the hair with permanent paint.
- Hair dye does not always take on the color you see on the packaging. If you have brown hair, use a gold paint. Ash or natural give your hair a green-gray color. If your hair does turn green-gray, use a red or flax blonde toner.
- If you start bleaching with hair that is already damaged or splits easily, you run the risk of it becoming even more damaged or brittle. Avoid styling your hair with heat products, and use as little shampoo as possible before bleaching it.
- If you plan on using 40 volume, get it done by a hairdresser! Even 30 full is very risky. If you do it yourself on dark hair you can get a kind of blue-yellow color instead of white.
Necessities
- Hair bleaching powder
- Developer
- Red-gold corrector
- Hair dye (toner)
- Purple shampoo
- Paintbrush
- Mixing bowl
- Gloves
- Towels
- Plastic foil


