Author:
John Pratt
Date Of Creation:
9 April 2021
Update Date:
26 June 2024

Content
- To step
- Part 1 of 4: Making the wheel
- Part 2 of 4: Making the stand
- Part 3 of 4: Making the flipper
- Part 4 of 4: Come up with game rules
- Warnings
- Necessities
A prize wheel, as in the popular game show Wheel of Fortune is a circular wheel that you turn to determine what to win or lose. You can use a prize wheel at a fair, fair, festival or party. Assembling a prize wheel requires some basic woodworking knowledge as well as some specialty tools and materials. So you may need to learn some skills and buy some supplies before you can start.
To step
Part 1 of 4: Making the wheel
 Make or buy a circle from plywood. You can cut a circle from a 2-centimeter thick piece of plywood or buy one at a hardware store. You need a circle with a diameter of 90 centimeters and a thickness of 2 to 2.5 centimeters.The circle should be large enough to keep spinning for some time and at the same time small enough to be easy to carry.
 - If you decide to make the circle yourself, draw a line from one corner to the other corner of the piece of plywood. Then draw a line between the other two corners. You can use the "X" that was created by drawing the lines in the middle as the center when cutting out the wheel.
- You can cut out the wheel with a straight router bit and a portable router that you attach to the center of the piece of plywood. Make sure to cut out the circle slowly.
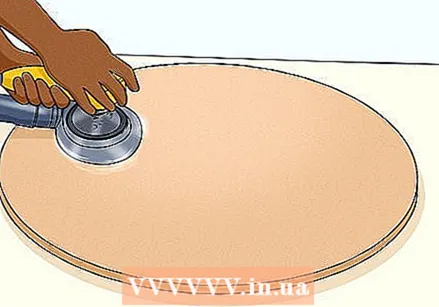 Sand the circle. After you have made or bought a circle of plywood, sand the wood well so that there are no rough spots on the surface you will be painting and the outer edge of the wheel is not rough. You can use a sander or sand the wood manually.
 - When sanding wood, it is best to start with coarser sandpaper and then use sandpaper with a finer grit to remove small imperfections.
 Measure and mark the "pie slices". After you have sanded the wheel you can start dividing the wheel into several triangular parts, or pie wedges. Draw a small line with your pencil to mark the location of each slice of cake. Then draw a small circle between the lines at a distance of about two inches from the outer edge of each slice of cake. At the spot of the circles you will drill holes for the nails that stop the flipper of the wheel.
 - Use a protractor to measure everything more accurately.
- If you want, you can give the cake slices a different shape and make some points larger and others smaller. It is more likely that the wheel will end up on a larger pie slice and the wheel will be less likely to stop at one of the smaller pie slices.
 Drill holes for the nails. You will not be driving the nails into the wood just yet, but you will need to pre-drill the holes. That way you know where to hit the nails in the wood when you are ready. Drill holes in the spots you marked, but don't drill all the way through the wood. Drill a hole in only one-third of the wood.
  Create a template. Before attaching the wheel to the stand with the turntable you will need to use the turntable to make a template. The template will help you determine where to drill holes in the wheel and stand.
 - Take a sheet of plain white paper and place the turntable on top of the paper.
- Then turn the turntable so it looks like you have two squares overlapping at different angles. You should see eight points instead of four.
- Trace the outer edges of the turntable and draw a dot for each of the holes, as well as the center of the inner circle.
 Use the template to drill holes. After you have made the template, use it as a tool to drill holes in the places you marked on the wheel and the large piece of wood for the stand. You can screw the wheel to the stand now to see if it works or do this later. Remember you will need to remove the screws to paint the wheel and stand.
  Decorate the wheel. Paint the cake slices in different colors, give them the same colors alternately or choose a color scheme that you like. You can use a large sheet of butcher paper and some masking tape to make it easier to paint the pie slices.
 - Cut a slice of cake from the butcher paper to the correct size and stick the paper on the wheel with masking tape. Spray paint on the wheel or brush paint on it with a brush. Let each slice dry before starting the next.
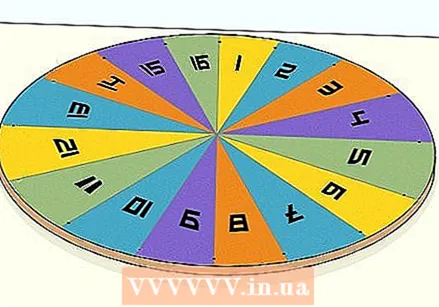 Assign a certain price or number to each slice of pie. Depending on how you want to use the wheel, you will have to assign a price or number to each slice. If you want to use the wheel to raffle prizes, you could give each slice of pie a different number. If you want to give away certain prizes, you can stick pictures of the prizes on the cake slices.
 - You can glue the numbers or the pictures of the prizes to the wheel or draw or paint them on it. You can know that for yourself.
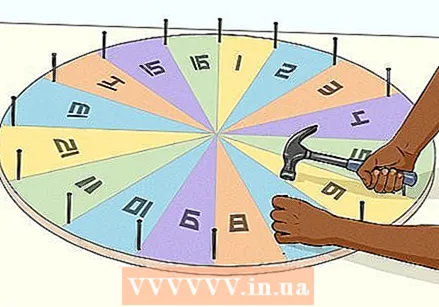 Add the nails. Now drive a nail into each slice of cake. The flipper of the wheel gets caught behind the nails and the wheel stops that way. Do not drive the nails all the way through the wood. Make sure that most of the nails are sticking out of the wheel. However, make sure they are tight.
 - After you have driven the nails into the wood, you can paint the heads if you wish. Try painting the heads of the nails with white or gold paint so that they contrast with the wheel.
Part 2 of 4: Making the stand
 Measure out a piece of wood to make the stand. The stand should be about an inch thick and just as wide or wider than the wheel. So for the 90 centimeter wheel described in this article you need a stand that is 90 to 120 centimeters wide. Make sure the stand is deep enough to support the weight of the wheel and the force of the spinning wheel. 50 to 90 centimeters is fine.
  Measure the support for the wheel. The support should be 1 to 2 inches thick and at least 12 inches longer than the diameter of the wheel. For a wheel with a diameter of 90 centimeters, you therefore need a support that is at least 120 centimeters high and the same width as the standard.
  Assemble the stand. Draw a straight line along the bottom of the stand. The line should be perpendicular to the long side and be about two-thirds of the way down the piece of wood. Draw a similar line along the top. This way the spinning wheel will not fall over when you spin it hard.
 - Drill four pilot holes along that line with a 1.5mm bit. Measure the distance between the edge of the stand and the first and last hole. Measure the same distances at the bottom of the support and drill pilot holes there as well.
- Draw a line of glue along the top line and place the mount perpendicular to the stand. Use a wood screw that is at least twice the thickness of the stand to screw the two pieces together.
- Use the bit to drill pilot holes in the stand for the center two holes and use the last two screws. Tighten all screws and let the stand dry for 24 hours.
 Decorate the background. When everything has dried and hardened, decorate the background in any way you like. You can paint everything the same color, such as black or brown, so that the wheel is clearly the centerpiece. Make sure the paint is completely dry before attaching the wheel to the stand.
 - Try to make only primary colors or use the colors of the rainbow: blue, green, yellow, orange, red and purple.
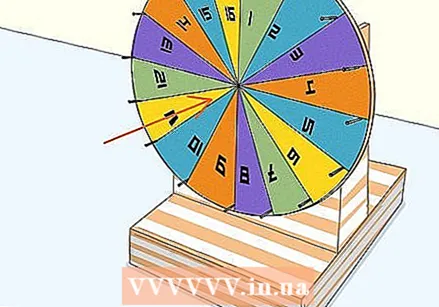 Attach the wheel to the stand using the turntable. After you have finished the wheel and the stand you can attach them together using the turntable. Drill through the holes you have already made to attach the two pieces of wood together.
 - Make sure the bearings are well lubricated before attaching the wheel or else the wheel will not spin properly. Spray a little WD-40 on it if necessary.
Part 3 of 4: Making the flipper
 Make an arrowhead and two square pieces of wood. To finish your wheel you will have to make a flipper. When the wheel is spinning, the flipper causes the wheel to slow down until it stops. You can make a flipper with a piece of wood in the shape of an arrowhead and two square pieces of wood that are about twice the size of the arrowhead.
 - You can use a piece of plywood that is the same thickness as the wheel for these pieces of wood.
- Make three notches in the arrowhead. Cut two notches on either side of the arrowhead and one notch in the bottom of it. Cut the wood about 1.5 to 2.5 centimeters. Also make a 1.5 to 2.5 centimeter notch in the side of one of the square pieces of wood.
- Paint the pieces of wood in any way you like. You can paint the pieces of wood all the same color, such as black, brown, or white. Let the pieces dry completely before moving on to the next step.
 Cut a soda bottle into pieces. Rinse an empty two-liter bottle and cut out two strips about 1 inch wide and 4 inches long. Insert one strip into the notch on either side of the arrowhead to cover the tip. You can now attach this piece.
 - Insert the other strip into the bottom of the arrowhead to attach it to the stand. Wait a little longer before attaching.
 Attach the flipper to the stand. Now you will have to assemble everything and attach the flipper to the stand. Start by drilling a hole in the square without a notch and attaching it to the top left corner of the stand. Then fix the square with a notch on the other square. Make sure the notch points down towards the wheel.
 - Then insert the plastic piece of the soda bottle into the notch in the square and tuck the other end into the bottom of the arrowhead.
 Try to spin the wheel. After you have attached the flipper you can test the wheel to see how it works. Spin it gently the first few times to see if it is firm. Stop the wheel if it seems to wobble and is not sturdy. You may have to check the screws and reinforce the wheel in certain places.
Part 4 of 4: Come up with game rules
Rules make the game more exciting and ensure that there is no disagreement about who wins what.
 Determine how much it costs to spin the wheel. You can calculate this by looking at the costs of making the wheel and the prizes, the number of people who will participate (this can be an estimate) and the chance that someone will win the main prize.
  Think about how many times someone can spin the wheel. Sometimes people get into a certain rhythm, so that they suddenly win a lot of prizes. To prevent this, you determine in advance how often someone can spin the wheel.
Warnings
- Take proper precautions when using the drill and other tools. Keep power tools out of the reach of small children.
Necessities
- Pieces of plywood 2 inches thick and 90 to 120 inches long
- Screws and nails
- Pencil
- Butcher's paper
- Painter's tape
- Drill
- Various tools for working with wood, such as a saw, sandpaper and wood glue
- Empty soda bottle with a volume of two liters
- Paint


