Author:
John Pratt
Date Of Creation:
15 April 2021
Update Date:
1 July 2024
Content
- To step
- Method 1 of 3: Creating the basic structure
- Method 2 of 3: Work out the different stages
- Method 3 of 3: Be prepared
- Tips
Planning effective lessons takes time, dedication and an understanding of your students' goals and capabilities. The goal, as with all education, is to motivate the students to absorb what you teach them and to remember as much as possible. Here are some ideas to help you get the most out of your classroom.
To step
Method 1 of 3: Creating the basic structure
 Know your goals. At the beginning of each lesson plan, write the goal at the top. That must be very simple. For example "The students can distinguish different body structures of animals that allow them to eat, breathe and move". Basically, you describe what your students can do when you have finished the lesson. If you want to do a little extra, add "how" they should do this (using a movie, game, flash cards, etc.).
 - If you are working with very young children, you can formulate basic goals such as "improve reading or writing skills". You can base it on skills or on understanding.
 Make your overview. Use broad lines to outline the main ideas for the lesson. For example, if your lesson is about Shakespeares Hamlet, your outline may include the information where Hamlet in the Shakepearean canon, how factual the described history could be, and how themes of desire and subterfuge can relate to current events.
 - This depends on the length of the lesson. Here are some basic steps that can be applied to any lesson that you should include in your outline. But if you want to add more steps, you can.
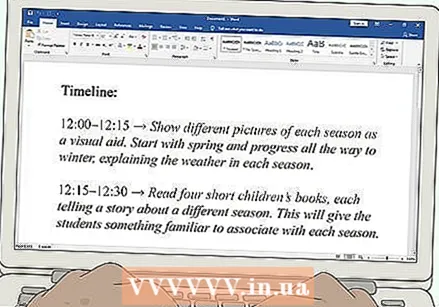 Make a time schedule. If there is a lot to describe within a set time frame, break your plan into sections that you can speed up or slow down to support possible changes. We will use a 1-hour lesson as an example.
 - 1:00-1:10: Warm up. Concentrate the class and summarize yesterday's discussion of great tragedies and relate it to Hamlet.
- 1:10-1:25: Provide information. Briefly discuss Shakespeare's history with an emphasis on his 2-year creative period before and after Hamlet.
- 1:25-1:40: Guided exercise. Have a class discussion on the main themes in the play.
- 1:40-1:55: Free exercise. Have the class write a simple paragraph about current events in Shakespearean style. Individually encourage intelligent learners to write two paragraphs, and coach slower learners.
- 1:55-2:00: Closing. Collect the papers, inform the students about the homework, and let the students go.
 Get to know your students. Clearly identify who you will be teaching. What is their learning style (visual, auditory, tactile or a combination)? What would they already know and where might they fall short? Tailor your plan to the total group of students in your class, then make changes as needed for the students with a disability, those who are struggling or unmotivated, and those who are a little further.
 - Chances are there are a lot of extroverts and being introverted children. Some students prefer to work alone, while others do better if they are allowed to work together. Knowing this allows you to tailor the activities to different interaction preferences.
- There may be some students who know as much as you do about the subject, and others, although smart, will look at you as if they saw water burning. If you know who those children are, you can divide them or group them.
 Use different interaction patterns. Some students work best alone, others in pairs or groups. As long as you let them work together to learn from each other, you are doing well. But because every student is different, you have to provide different possibilities for interaction. Your students (and the class as a whole) will benefit!
 - In fact, any activity can be done alone, in pairs or in groups. If you've already worked out ideas, see if you can change it. Often you just need a few more scissors!
 Address different learning styles. There are students who cannot manage to watch a movie for 25 minutes, while others cannot read two pages of a book. One is no more stupid than the other, so do them a favor by varying your teaching methods so that each student has the opportunity to use their capabilities.
 - Every student learns differently. Some need to see the information in front of them, others need to hear it, and still others need to literally master it. If you've been talking for a while, stop and let them talk about it. After they have read, do an activity afterwards where they can work with their hands to put the knowledge into practice. That way they get bored less quickly!
Method 2 of 3: Work out the different stages
 Warm them up. At the beginning of each lesson, the students' brains are not yet prepared for the content. If someone was going to tell you about open heart surgery out of the blue, you would probably shout, "Ho, ho, ho! Slow down! Go back to" Get the scalpel "". Start slow. That's what the warm-up is for - it not only gauges the starting level, but it also gets them in the right mood.
 - The warm-up can be a simple game (maybe about words related to the subject, so you can estimate the initial situation or see what they remembered from the last time!) Or it can be questions, or you let some see pictures. As long as you can get them talking. Get them to think about the topic (even if you don't say it that explicitly).
 Transfer the information. That is clear, right? Whatever your work method, you have to convey the information. It can be a movie, a song, a text or even a concept. It is the core of your lesson. Without this core, your students will get nowhere.
 - Depending on the level of your students, you may have to go all the way back to basics. Think how far back you have to go. The phrase "He hangs the coat on the coat rack" makes no sense if you don't know the words "coat" and "coat rack". Give them the basic concept and let it develop during the next lesson (or two).
- You may find it helpful to simply tell the students what they are going to learn. You tell them the lesson objectives. You can't make it any clearer! That way they walk out of your class and know them what they learned that day.
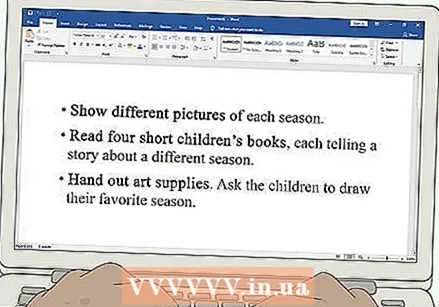
 Do a guided exercise. Now that the students have received the information, you need to organize an activity where they can put it into practice. It's still new to them, so start with a guided activity. Think of worksheets, something with pictures or where they have to find things together. Don't get them to write an essay right away before they get to fill in the blanks!
 - If you have time for two activities, that's even better. It is good to test their knowledge on two different levels - for example writing and speaking (two very different skills). Try to schedule different activities for students of different levels.
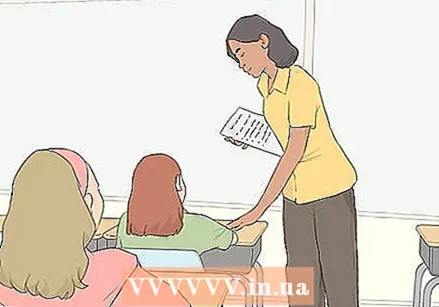
 Check their work and track progress. After the guided exercise, you assess your students. Have they understood what you have taught them so far? If so, great. Then you can move on, and maybe add some more difficult elements to the concept, or practice some more difficult skills. If they haven't quite understood it yet, get back to the information. How can you convey it in a different way?
 - If you've been teaching the same group for some time, chances are you already know which students will struggle with certain concepts. In that case, you can pair them with the stronger students to keep the lesson going. You don't want certain students to be left behind, but you also don't want to have to stop the whole lesson until everyone is at the same level.
 Do a free exercise. Now that the students have acquired the basic knowledge, you can let them work independently. That does not mean that you leave the class! It just means giving them a more creative challenge that will force their brains to really get to work with the information you've given. How can you let their brains blossom?
 - It all depends on the subject and the skills you want to use. It could be anything from putting together a puppet show in 20 minutes, to a two-week project romping around with the Supreme Soul in a heated debate about transcendentalism.
 Allow time to ask questions. If you have enough class time, allow the last ten minutes to ask questions. This can start as a discussion and develop into more pressing questions about the topic. Or it may be time to clarify things - both are good for your students.
 - If you have a group of students who never want to raise their hands, let them talk together. Give them an aspect of the topic to discuss in groups for 5 minutes. Then keep it central again and have a discussion about it with the whole group. Interesting things can come up!
 Concretely conclude the lesson. A lesson is actually just like a conversation. You can't just stop like it is hanging in the air somewhere. That's not bad ... but a little weird and awkward. If you have the time, just summarize the day or class. It's a good idea to leave it literally see what they learned today!
 - Take five minutes to discuss the concept of the day. Ask questions about the topic (no new information) to reiterate what you have done and what has been learned. This way you complete the circle and close it off nicely.
Method 3 of 3: Be prepared
 If you are nervous, write it out. New teachers can benefit greatly from writing out their lessons. It does take more time, but if it helps, then do it. You are more at ease because you know exactly what questions you are going to ask and because you know where you want the conversation to go.
 - As you get more experience you will do this less and less. In the end, you hardly write anything down anymore. You shouldn't spend more time planning and writing than teaching your lessons! Only do this in the initial phase.
 Allow a little slack. You have prepared your timetable to the minute, right? That's great, but it's just for reference. You're not going to say, "Guys, it's 1:15 PM! Stop what you're doing!" That's not how it works when you teach. You do have to stick to your lesson plan, but there should be a little room for leeway.
 - If you run out of time, know what you can and cannot cut. In any case, what should be done so that the pupils learn the most? What is more for fun or to fill the time? On the other hand, if you have time to spare, have another fun activity on hand.
 Schedule a little too much. Knowing that you have enough to do is better than not knowing what to do. Even if you have a schedule, plan it a bit too tight. If you think something will take 20 minutes, write down 15 minutes. You never know what your students will suddenly go through very quickly.
 - The easiest way is to have a nice closing game or conversation. Put the students together and let them express their opinion about something or ask each other questions.
 Make your schedule so that a replacement understands. Suppose you have to report sick, it is useful if someone else understands your lesson plan. It can also be useful for yourself, if you write it well in advance and forget things, you can refresh your memory more easily.
 - You can find all kinds of sample lessons on the internet - or ask colleagues what kind of lesson plans they use. It is useful to stick to a certain format.
 Have a backup plan. You will have days when your students go through the material like a rocket, leaving you suddenly empty-handed. There will also be days when a test has been rescheduled, when you only have half a class in front of you, the TV is not working, etc. If that happens you must have a backup plan.
 - Most experienced teachers have a handful of lesson plans up their sleeve that they can easily shake up their sleeves. If you've ever given a really fun lesson about Rembrandt or Beyoncé, save your material for later. Maybe it will come in handy again, you never know.
Tips
- After class, evaluate your lesson plan and see how it actually turned out. What are you going to do differently next time?
- Always first look at material that you hand out to your students.
- Make sure that what you teach your students is in line with the learning goals of the school where you work.
- Be willing to deviate from the lesson plan. Think about how you can direct the class's attention back to you when it strays.
- Make it clear that you expect students to answer your questions.


