Author:
Tamara Smith
Date Of Creation:
21 January 2021
Update Date:
1 July 2024

Content
- To step
- Method 1 of 5: Label faces in the mobile app
- Method 2 of 5: Label faces on the website
- Method 3 of 5: Remove photos from a label
- Method 4 of 5: Rename or delete a label
- Method 5 of 5: Hide faces from the search results
- Tips
To label a face in Google Photos, click or press the search bar and then select a face. Then type a name so that you can easily find photos of this person in Google Photos. You can change the labels at any time and give similar faces the same label. You will also be able to remove certain faces from the search results. Learn how to use this face grouping feature to improve your Google Photos searches.
To step
Method 1 of 5: Label faces in the mobile app
 Tap the Google Photos icon. When you open the Google Photos app you will see a list of your photos.
  Make sure the "Face Grouping" feature is turned on. Otherwise, you will not be able to create groups based on faces.
 - Press the menu ☰ and select "Settings".
- Make sure the "Face Grouping" switch is turned on. (You can turn it off at any time)
- Press the backward arrow to return to Photos.
 Press inside the search bar. The search menu will expand to include a row of different thumbnail images of photos.
 - This function is not available in your country if you do not see faces.
 Press the right arrow to view all faces. Now you will see all the faces that Google has identified in your photos.
 - Don't worry if you see two photos of the same person in the list - you will be able to group them later.
 Press on a face to label. A new screen will appear with the person's face at the top and the words "Who is this?" Below.
 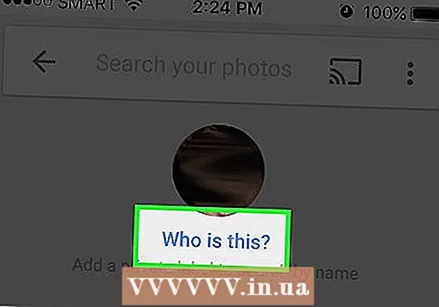 Press "Who is this?". A text field will appear with a "New Name" field and contacts to choose from.
  Enter or select a name. Since tags are only there to help you find your photos, no one except you will see this name.
  Press the check mark or "Enter" on the keyboard. The name will now be set as the label of that face.
  Press the search bar. If you saw more than one face icon for this person, you can group them all by assigning them the same label. You will see the face icon reappear.
  Tap another photo of the person's face. You will see the "Who is this?" Field reappear in the top left corner of the screen.
  Type the same label as you typed before. The label and an icon of the person's face will be displayed in the search results.
  In the search results, tap the label. A popup will appear asking "Are these two the same person?" Both faces (of the same person) will be displayed just below these words.
  Press "Yes". Now that both faces are assigned the same label, it means that Google will display the photos associated with both face icons in the search results when you enter that label.
 - You may have to repeat this procedure several times for the same person.
Method 2 of 5: Label faces on the website
 Go to http://photos.google.com. You can use Google's "Face Group" feature to label similar faces, making it possible to find photos by searching by name of people. If you are not already signed in to Google Photos, you should do so now.
 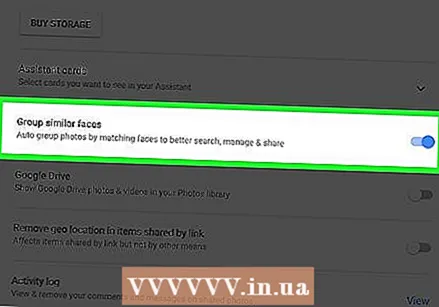 Make sure Face Grouping is turned on. Before you can label and group similar faces, you need to make sure the feature is turned on (and available where you live).
 - Click the "..." menu on the left side of the screen.
- Click on "Settings".
- Make sure the "Group Similar Faces" switch is turned on. If you don't see this choice, the feature is not available in your country.
- Click the Back button in your browser to return to your photos.
 Click in the search bar. A list of face icons will be displayed at the top of the enlarged menu. If you don't see a picture of the face you want to label, click the right arrow to view more faces.
  Click on the photo of a face to give it a tag. Don't worry if you see the same person in different photos. You will be able to group them later.
  Click on "Who is this?"In the top left corner of the screen. You will now see the option to type in the field or select a name from the list.
  Enter or select a name. No one but you will see this name - even if you choose a full name from the contact list.
 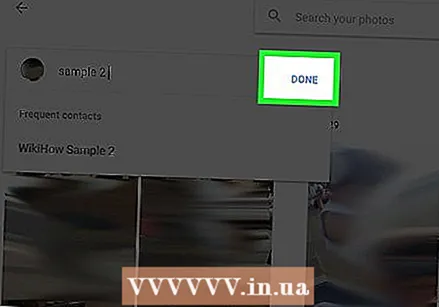 Click on "Done". When you now enter that name in the search bar, photos of this person will be displayed in the results.
  Click in the search bar. If you saw more than one face icon for a person, you can group them all by assigning them the same label. You will see the face icons reappear.
 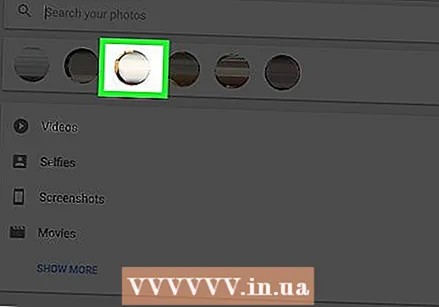 Click on another photo of the person's face. You will see the "Who is this?" Field reappear in the top left corner of the screen.
  Type the same label you typed earlier. The label and icon of the person's face will be displayed in the search results.
 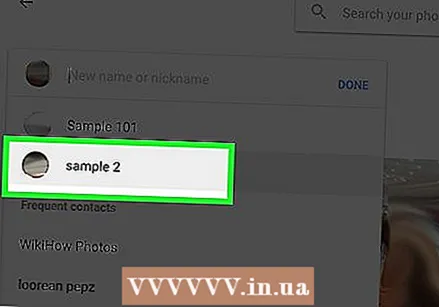 Click the label in the search results. A popup will appear asking "Are these the same person?". Both faces (of the same person) will be displayed below these words.
  Click on "Yes". Now that both faces are assigned the same label, it means that Google will display the photos associated with both face icons in the search results when you enter that label.
 - You may have to repeat this procedure several times for the same person.
Method 3 of 5: Remove photos from a label
 Open Google Photos on your device. Start by opening Google Photos on your mobile device or by going to http://photos.google.com in your browser.
  Type the label in the search field. The label should now appear at the top of the search results.
  Select the label from the search results. Now you will see the label's page with all the photos associated with that face label - including those that don't belong there.
  Click the menu ⁝ in the top right corner of the page. A short menu will appear.
  Select "Delete Results". A circle will appear in the top left corner of each photo. This way you can select multiple photos at the same time if you want.
  Click or press the circle to select the photo you want to delete. You can click or press multiple photos to select more than one photo.
  Click or press "Delete". This link is in the top right corner of the page. Once you click on it, the tag will be removed from the photo.
Method 4 of 5: Rename or delete a label
 Open Google Photos. Start by opening Google Photos on your mobile device or by going to http://photos.google.com in your browser.
  Type the label in the search field. The label you want to change should appear in the search results.
  Select the label from the search results. Now you will see the face tag page with all the photos associated with that face tag.
 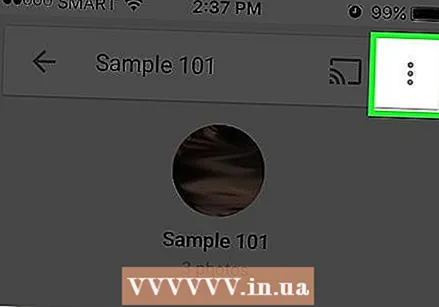 Click the menu ⁝ in the top right corner of the page. A short menu will appear.
  Select "Edit Name Label" to rename the label. To change the current label name, do the following:
 - Backspace over the current label name.
- Type a new name for the label.
- Press the backward arrow to save your changes.
 Select "Delete Name Tag" to delete the tag. The photos will not be deleted, only the tag will be deleted.
 - The next time you search for something in Google Photos, you will notice that the face previously associated with this tag is now no longer in the untagged face list. You can assign a new label to it at any time.
Method 5 of 5: Hide faces from the search results
 Open Google Photos. You can choose to hide all photos that match a particular face, regardless of whether you have tagged them or not. Use this method if there is a person in your photos that you don't want to see in the search results.
 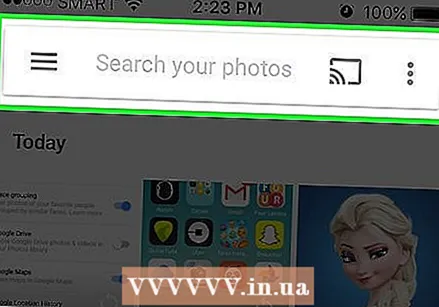 Click in the search field. The search menu will now appear and you will see a list of faces at the top.
  Click or press the right arrow to view all faces. In addition to all faces, the ⁝ icon will also be displayed in the top right corner of the screen.
  Click the ⁝ icon and select "Hide & Show People". If you're using the website instead of the mobile app, this link will be called "Show & Hide People."
  Click on a face you want to hide. This can be anyone you don't want to see right now.
 - Click or tap multiple faces in the list to hide more than one face.
- You will be able to unhide this person by returning to this page and clicking on their face.
 Click "Done" in the top right corner of the screen. Now you will no longer see this person's face in your search results when you search for photos.
Tips
- Some photos store location information inside the photo. Try searching for a city name in Google Photos to see all the photos taken in that city.
- To view all the videos in your Google Photos account, click in the search field and select "Videos" from the search menu.


