Author:
Roger Morrison
Date Of Creation:
7 September 2021
Update Date:
1 July 2024

Content
- To step
- Part 1 of 3: Preparing to start an IV
- Part 2 of 3: Puncturing the vein
- Part 3 of 3: Maintaining an IV
- Tips
- Warnings
- Necessities
An intravenous (or "drip") line is one of the most common, important devices in modern medicine. IVs allow healthcare professionals to deliver fluids, blood products and medication through a small tube directly into the patient's bloodstream. This allows for rapid absorption and precise control over the dosage of the administered substance, which is essential for a wide variety of medications, including administering fluid to combat dehydration, administering blood to a patient who is rapidly losing a lot of blood or administering antibiotics. To set up an IV, you must first be trained as a medical professional. Prepare the infusion, puncture the vein and maintain the infusion for best results.
To step
Part 1 of 3: Preparing to start an IV
 Collect your belongings. While starting an IV is nowhere near as much of a hassle as more complicated procedures, it also requires that the same basic level of preparation and precaution be followed as with any minor medical procedure. Before you begin, make sure you have all the instruments and equipment you need on hand and you want to make sure that all materials that come into contact with the patient (especially the needles) are unused and sterile. To create a regular IV you need the following:
 - Sterile disposable gloves
- Correct size 'through the needle' infusion catheter (usually size 14-25)
- Bag with infusion fluid
- Non-latex compression bandage
- Sterile dressing
- Mesh
- Alcohol wipes
- Medical tape
- Bin for sharp objects
- Sterile sheet or paper (put your small instruments on this to keep them close to hand)
 Introduce yourself to the patient. An important part of applying an IV is introducing yourself to the patient and explaining the upcoming procedure. By talking to patients and sharing this basic information, you put them at ease and ensure that they will not be surprised by parts of the process. Furthermore, you can be so sure that you have their full consent to proceed. When you are done, ask the patient to lie down where you will be administering the IV.
 - When patients are nervous, their veins can narrow a bit, which is called vasoconstriction. This will make it more difficult to apply an IV, so make sure your patient is as relaxed and comfortable as possible before continuing.
- You could ask if the patient has had any problems with IVs in the past. If so, the patient may be able to indicate which areas are best to target.
 Prepare the IV lines. You then prepare the infusion tubes by hanging the infusion bag from a stand, so that the tubes fill with saline solution and check everything for air bubbles. If necessary, clamp the hoses to prevent liquid from spilling onto the floor. By gently tapping and squeezing it, make sure that no air bubbles remain in the tubing. After that, a dated and signed sticker must be affixed to both the hoses and the bag.
 - Injecting air bubbles into a patient's bloodstream can cause a serious condition called an embolism.
- An easy way to remove air bubbles from IV tubing is to unroll the tubing to its full length and turn the roller valve all the way to the drip chamber. Then puncture the infusion bag with the tubing pin and squeeze the drip chamber. Turn the roller valve on and let go of the line - liquid without air bubbles should now run into the hose along its entire length.
 Select the correct catheter size. Normally, catheters are placed over the needle used to puncture the vein. After the vein has been punctured, the catheter will remain in place for easy access to the vein. Catheters are supplied in different sizes. The smaller the size, the thicker the catheter is and the faster the drug or blood can be drawn. However, a thicker catheter will also make puncturing more painful, so it is important not to use a catheter thicker than necessary.
 - In general, you will need a size 14-25 catheter for IVs. For children and the elderly, go for larger size (thinner) catheters, but use smaller sizes (thicker) if rapid transfusion is required.
 Put on sterile gloves. Insertion of an IV pierces the skin and carries a foreign instrument directly into the bloodstream. To avoid the risk of a dangerous infection, it is important that you wash your hands thoroughly and dry with a clean paper towel before starting, then put on sterile gloves before using instruments or handling the patient. If at any point the sterility of your gloves is no longer intact, remove them and use a new pair - err on the side of caution. Below are situations where most medical protocols require you to change gloves:
 - For touching the patient
- For clean / non-skeptical procedures (such as administering IV medication)
- Following procedures with risk of exposure to body fluids
- After touching the patient
- After touching the patient's environment
- Before moving on to another patient
 Look for the prominent veins. After this, you need to find a place on the patient where you will insert the IV. In adult patients, the long, straight veins in the arms, away from joints and as far from the body as possible, are most accessible. In children, the scalp, hand or foot are preferable as an infusion site over a leg, arm or elbow. While any accessible vein can be used to start an IV, it is best to avoid the patient's dominant arm. If it is known that your patient has veins that are difficult to puncture, ask about the places where it has worked before. Usually, patients with previous infusion problems know exactly where to puncture their veins. Know that, regardless of the presence of veins, you will not be drip in some areas want apply. These include:
 - Places where the IV gets in the way during an operation
- In the same place as a previous, recent IV
- In an area showing signs of infection (redness, swelling, irritation, etc.)
- In a limb on the same side of the body as a mastectomy or vascular bypass (as this can lead to complications)
 Use a compression bandage. To make the vein you have chosen to swell and puncture it easily, use a compression bandage behind (towards the torso) of the chosen site for the infusion. If, for example, you are going to put the IV on the commonly used area on the bottom of the forearm, you could put a compression bandage halfway down the upper arm.
 - Do not make the compression bandage too tight - this can lead to bruising, especially in the elderly. It should be tight, but not so tight that you can no longer get a finger under it.
- Letting the limb hang down limply, along with the application of a compression bandage, can cause the veins to become more prominent as blood flow in the limb increases.
 Palpate the vein if necessary. If it is difficult to find a good vein, palpating the patient's skin around the infusion site may help. Place your finger in the direction of the vein, then press on the skin above it. You should feel the vein push "back". Keep pushing with a spring motion for about 20 to 30 seconds. The vein should now be visibly larger.
Part 2 of 3: Puncturing the vein
 Disinfect the infusion site. Then take a clean alcohol swab (or use a similar disinfectant such as chlorhexidine) and apply it to the skin of the area in which the infusion will be applied. Wipe gently but thoroughly, making sure there is a layer of alcohol all over. This kills the skin bacteria, minimizing the chance of infection if the skin is punctured.
  Prepare the catheter for insertion. Remove the catheter from its sterile package. Check that it is intact and working. Press the chamber to make sure it is tight. Twist the catheter cap to make sure it is loosely on the needle and make sure the needle does not touch anything. If everything looks good, you can prepare to insert the needle.
 - Do not let the catheter or needle come into contact with anything other than the patient's skin at the site of the infusion. This can compromise sterility and increase the risk of infection.
 Insert the needle. Use the non-dominant hand to stabilize the patient's limb, being careful not to touch the infusion site directly. Take the catheter in your dominant hand and push the needle (beveled side up) through the skin. As you get further into the vein, decrease the angle at which you insert the needle - keep a small angle.
 - Look for a return of blood at the catheter cap. This shows that you have successfully punctured the vein. As soon as you see the return, push the needle an inch further into the vein.
 Take it out if you miss the vein and try again. Inserting an IV is precision work - sometimes even experienced doctors or nurses may initially miss the vein, especially if the patient has difficult veins. If you push the needle further and you don't see any return of blood, explain to the patient that you missed the shot and are going to try again. Stay friendly with the patient - this can be a painful job.
 - If you miss the vein several times, apologize to the patient, remove the needle and catheter, and try again on a different limb with a new needle and catheter. Trying to puncture the same vein several times can be very painful for the patient and cause permanent bruising.
- You could reassure the patient by explaining why it didn't work and also say something like, "Sometimes these things just happen. It's nobody's fault. It should work next time. "
 Remove and discard the needle. Keeping pressure on the skin, pull the needle (only the needle, not the catheter) about 1 cm back out of the vein. Slowly push the catheter into the vein while keeping pressure on the vein and skin. Once the cannula is completely in the vein, you can loosen the compression bandage and secure the catheter with a sterile bandage or bandage (such as Tegaderm) over the bottom half of the catheter cap.
 - Make sure you do not block the connection of the IV tubing to your bandage.
 Remove the needle and insert the tubing. Hold the catheter cap with your thumb and index finger. Hold it firmly in the vein. With your other hand, gently pull the needle (and only the needle) out of the vein. Dispose of the needle in a suitable sharps container. Then remove the protective cover from the end of the prepared infusion tubing and gently insert it into the catheter cap. Screw it into the catheter and lock in place.
 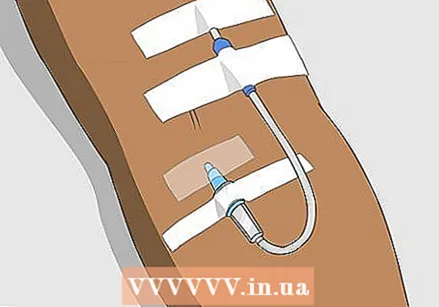 Secure the IV. Finally, attach the IV to the patient's skin. Place a piece of tape over the catheter cap, then make a loop in the catheter tube and tape it over the first piece with a second piece of tape. Using a third piece of tape, secure the other end of the loop above the infusion site. Placing loops in the tubing reduces the load on the infusion catheter, making it more comfortable for the patient to wear and less likely to be accidentally pulled out of the vein.
 - Make sure there are no kinks in the loop - this can interfere with the flow of fluids to the bloodstream.
- Do not forget to include a label with the date and time the infusion dressing was applied.
Part 3 of 3: Maintaining an IV
 Check the flow of fluid in the infusion. Open the roller clamp on the IV and look for drops that form in the drip chamber. Verify that the infusion is infusing into the vein by occluding the vein (by pushing to block the flow) distal to the infusion site (away from the trunk).The trickle flow should slow down and stop, then start flowing again when you stop closing the vein.
  Change the dressing if necessary. Long-term infusions are at greater risk of infection than infusions used only for a single surgery or procedure. To reduce the risk of infection, it is important to gently remove the dressing, clean the infusion site and apply a new dressing. In general, transparent dressings should be changed approximately every week, while gauze dressings should be changed more often because they do not show the infusion site.
 - Whenever you touch a patient's IV site, remember to wash your hands and put on a new pair of gloves. This is especially important when changing dressings, as long-term infusions have been associated with an increased rate of infection.
 Safely dispose of the IV. To remove an IV, first close the roller clamp to stop the flow of fluid. Carefully remove the tape and dressing to expose the catheter cap and infusion site. Place a clean piece of gauze over the infusion site and gently apply pressure while slowly pulling out the catheter. Instruct the patient to hold the gauze in place to stop bleeding.
 - You may want to secure the gauze to the puncture site with tape or bandages, such as Coban. But in most patients, the bleeding will stop quickly with light pressure, so this is not really necessary.
 Dispose of all used needles properly. The needles used to start an infusion qualify as medical sharps and should be placed in a well-marked sharps container immediately after use. Since needles can be infectious and can even transmit blood-borne diseases from person to person if not used properly, it is very important to ensure that these needles are not thrown away in the trash even if you know sure that the patient is just healthy.
  Know the drip-related complications. Although infusion is generally a safe procedure, there is always a very small but real chance that complications will arise from the infusion. It is important to know the most common signs of IV complications in order to provide the best care for the patient and, if necessary, when to need emergency care. Some IV complications (and their symptoms are listed below:
 - Infiltration: Occurs when fluid is injected outside the vein into the surrounding soft tissue. Will cause swelling and smooth, pale skin in the affected area. Can be a minor or serious problem depending on the drug being administered.
- Hematoma: Occurs when blood leaks from the vein into the surrounding tissue, usually after more than one vein wall has been accidentally punctured. Often accompanied by pain, bruising and irritation. Usually resolves within weeks.
- Embolism: occurs after injecting air into the vein. Often caused by air bubbles in the IV line. Children are especially at risk. In severe cases, it causes trouble breathing, chest pain, blue skin, low blood pressure and even stroke and heart attack.
- Thrombosis and endarteritis: Life-threatening conditions that can result from an injection into an artery, instead of a vein. Can cause severe pain, compartment syndrome (high pressure on a muscle leading to a very painful "tight" or "full" feeling), gangrene, motor impairment and even eventual limb loss.
Tips
- Write down everything you do while applying an IV. Good administration prevents unnecessary complaints and lawsuits.
Warnings
- Do not try to search for a vein more than twice. If you cannot find a vein with the needle after the second time, ask for help from another technician.
- Always check the patient record before applying an IV to ensure that no specific instructions for the individual are to be followed.
- Only apply an IV if you are a trained medical professional.
Necessities
- Patient card
- IV stand
- IV bag
- Compression bandage
- IV clamp
- Tape
- Gloves
- Needle
- Syringe
- Cannula
- Betadine solution (Or use a cotton swab with chlorhexidine such as ChloraPrep®)
- Cotton swab
- Tap water (hand hygiene)
- Antiseptic soap
- Waste bin for medical waste
- Sharps container


