Author:
Charles Brown
Date Of Creation:
1 February 2021
Update Date:
1 July 2024
Content
- To step
- Part 1 of 3: Setting up the hydroponic system
- Part 2 of 3: Adding the crops
- Part 3 of 3: Maintaining the hydroponic garden
- Necessities
Hydroponics is a gardening system where you grow the plants in a solution without soil, usually in water. A hydroponic garden grows 30 - 50% faster and produces a higher yield than a soil-based garden. Hydroponic gardens are also less affected by insects, pests and disease. To build your own hydroponic garden you must start by installing the hydroponic system. Then add the crops so they can grow. Maintain the hydroponic garden as it develops and enjoy happy and healthy plants at home.
To step
Part 1 of 3: Setting up the hydroponic system
 Build the overflow table. The overflow table will hold the water for your garden. You can build a simple flood table out of wood. The width of the flood table will depend on how much you want to grow in the garden and how much water you want to use.
 - For a small garden, make a rectangular carved wood frame with a width of 1.2 meters and 2.50 cm and a length of 2.4 meters and 2.50 cm. Cover the frame with a sheet of plastic made of polyethylene. This is able to hold 75 liters of water.
- You can also use a wide, deep plastic bowl as an overflow table. Choose a container that can hold 40 to 75 liters of water. You can cover the bowl with plastic so that it does not leak.
 Make a floating platform out of Styrofoam. To prevent the roots of the plant from rotting, make a floating platform so that they can float on the water. For a small garden, use a sheet measuring 1.2 by 2.4 meters and with a thickness of 3.8 cm. Make sure the edges of the platform can move up and down to allow the plants to float.
  Cut holes 5 - 7 cm wide in the platform. Use a plant pot as a guide when cutting out the holes with a saw. Cut enough holes for all the plants you want to grow. Make sure the pots fit snugly in the holes and don't go deeper than 0.5 cm below the Styrofoam platform.
  Install drippers on the overflow table. Drippers help to drip water from the garden so it doesn't settle in the overflow table. You can find them at local nurseries or home and garden centers. They have different drop rates based on a maximum amount of gallons per hour (gph).
 - For a normal garden, choose an overflow table that can hold 19 liters of water per hour. To do this, buy two drippers with a speed of 2gph.
- Drill two holes in the bottom of the overflow table. Then push the drippers into the holes. Seal any gaps around the drippers with epoxy resin or hot glue.
 Place the overflow table on a tripod with a bucket. The overflow table must be raised by means of a tripod or stool. Place a bucket under the overflow table, right below the drippers. The bucket will collect the water as it drips from the overflow table.
 - If you are building a hydroponic garden outside, place it in a sunny spot in your yard. Position the flood table so it gets the maximum amount of sunlight.
 Fill the overflow table with water. Pour in enough water to half fill the overflow table. Depending on the dimensions of your chosen overflow table, this may require 19 to 75 liters of water.
 - You can always pour more water into the overflow table once you add the crops.
 Install your grow lights if you grow indoors. Hydroponic gardens can be kept outdoors in warm climates, especially those that receive year-round sunlight. If you keep the garden indoors, you will need grow lights. Use fluorescent or sodium lamps.
 - Place the grow lights over the flood table so it gets plenty of light.
 Buy food for your plants. After that, you will need to add plant food or a fertilizer that is rich in nutrients so that the plants can thrive. Look for plant foods rich in calcium, magnesium and other nutrients.You can find these at a local garden center.
 - There is plant food that has been specially developed for hydroponic gardens. This will be rich in nutrients needed to grow plants in water.
Part 2 of 3: Adding the crops
 Choose leafy vegetables and herbs. Hydroponic gardens are best suited for plants with shallow roots such as leafy vegetables. Examples include lettuce, spinach and kale. You can also grow herbs such as mint, basil and dill.
 - Choose plants with similar water and light needs. This way, they will all thrive and thrive when grown close together.
- As you expand your hydroponic garden, it may become possible to grow deep-rooted vegetables such as beets, pumpkins and cucumbers.
 Make a soil mixture. Start with a foundation that will provide the plants with moisture and air. Use eight parts perlite to one part coconut fiber. Instead of coconut fibers, you can also opt for vermiculite or peat moss.
 - If you live in a dry climate, you will need to add more coconut fiber to the perlite. In a humid climate you should opt for less coconut fibers.
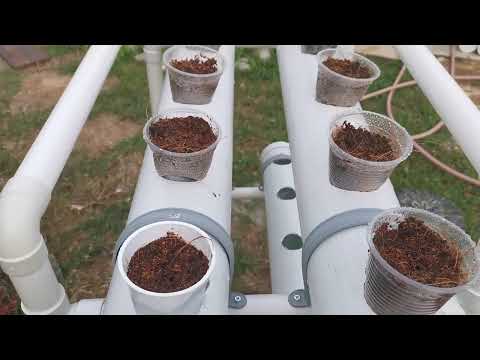
 Stick the mixture into the plant pots. Use 10 cm pots with holes in the bottom or opt for net pots. The holes will allow the plants to reach the water and plant nutrition in the hydroponic garden. Fill the jars one-third with the mixture.
  Plant the crops. Use germinated seedlings in plant cubes or soil. Place the cubes with the germinated plant in the pot. Pour the medium around and on top of the plant. The intention is for the plant to sit comfortably in the pot.
 - Use seedlings that have already been planted and have started growing to make it easier for your garden to get off the ground. Place a block with budded seedlings per pot.
 Place the crops in the overflow table. Water the crops a little and then place them in the overflow table. If you are using a floating platform, place the pots in the cut holes. If you are not using a floating platform, you can simply place them in the water in the overflow table.
 - Make sure that the roots of the plant are only about 0.4 cm under water. This will keep the roots from getting too wet but still get enough water to thrive.
Part 3 of 3: Maintaining the hydroponic garden
 Water the plants once a day. Water the plants near the base once a day. When they start to wilt, water twice a day. You should also add more water to the flood table when it starts to look skimpy.
 - If your plants aren't thriving as they should, they may be getting too little air and too much humidity. Check the roots of the plants for rot. When they start to rot or stink, place them higher so that the roots are less submerged.
 Add more plant food if necessary. The water in the overflow table should slowly drip from the drippers into the bucket below. This can take up to 10 days. When this is done, add a fresh amount of plant food and more water to the bucket. Then pour the contents of the bucket into the overflow table.
 - This will ensure that the plants are getting the nutrients they need while growing in the hydroponic garden.
 Make sure the plants get enough light. If you keep the hydroponic garden outside, make sure that plants get 10-15 hours of full sun per day at all times. If you keep the garden indoors, provide grow lights that burn for 15-20 hours a day. Install a timer on the lights so that they turn off automatically at a certain time of the day.
 - You can buy grow lights with a built-in timer. Or you can set a timer yourself and switch off the lights at will.
 Harvest the garden as it grows. Use clean garden shears to prune your garden. Prune the garden to size and to eat. Cut off leaves near the stem. Harvest as the plants grow so they can thrive.
 - After that, you can add new plants to the flood table or, depending on your needs, replace the existing ones.
Necessities
- Wooden or plastic container
- Styrofoam
- Water
- Drippers
- Bucket and tripod
- Plant nutrition
- Germinated seeds
- Soil mixture
- Grow lights (optional)
- Timer (optional)


