Author:
Charles Brown
Date Of Creation:
10 February 2021
Update Date:
1 July 2024

Content
- To step
- Method 1 of 2: Copy items to a memory stick
- Method 2 of 2: Get items back from the memory stick
- Expert advice
- Tips
- Warnings
- Necessities
A memory stick (also known as a flash drive or thumb drive) is used to store data in a convenient and portable way. Transferring data to or from these devices is quick and easy. Connect the device to your computer, locate it on your desktop, then click and drag your files.
To step
Method 1 of 2: Copy items to a memory stick
 Connect your memory stick. Plug the memory stick into a USB port on your computer.
  Wait a moment for the memory stick to appear. Once the computer has recognized the device, it will appear on your desktop.
 - If the memory stick does not appear, try connecting it again or use a different USB port on the computer. If many other USB devices are connected, try disconnecting the ones you are not currently using.
 Double-click the icon on your desktop to open the memory stick. Here you can view all files stored on the device. You can create a new folder by selecting "File> New Folder" from the menu bar. Click and drag items within the memory stick.
 - It is not necessary to open the memory stick in Finder to transfer files, but this makes organizing files considerably easier.
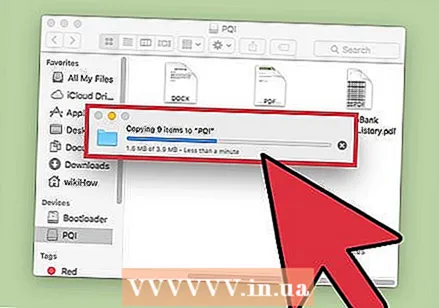
 Transfer files to your memory stick. Click on files and drag them to the stick. When you release the mouse, the files will be copied to the destination. A progress bar will appear to indicate the approximate amount of time remaining for the transfer.
 - You can click and drag the cursor to form a grid and select multiple files. Then click and drag the selected files to copy them at once. You can also press ⌘ Cmd + click to select multiple files that are not next to each other.
- By default, drag-and-drop will copy files between disks and move files within the same disk. So dragging to or from the memory stick will "copy" files, but dragging between folders on the computer will "move" files.
 Wait for the transfer to complete. Once the progress bar is filled, it will disappear. This indicates that the transfer is complete.
 - You will get an error if there is not enough free space on your memory stick. When this happens, you can delete items on the memory stick to free up space. Click and drag items to the trash, then go to the "Finder" menu and select "Empty Trash". The items will not be permanently removed from the memory stick unless you empty the trash.
 Eject the disc. When you are done transferring files, eject the disc before physically removing it. This is to avoid mistakes. Click the memory stick icon on the desktop and drag it to the trash. When the cursor is over the trash can icon, it will change and display the eject icon. Release and after a moment the icon will disappear from the desktop. Now it is safe to disconnect the drive from the USB port.
 - You can also press Ctrl + click the disk icon on the desktop and then select "Eject" from the menu that appears.
Method 2 of 2: Get items back from the memory stick
 Connect the memory stick. Insert the memory stick into a USB port on the computer.
  Wait a moment for the memory stick to be recognized. Once the computer recognizes the device, it will appear on the desktop.
 - If the memory stick does not appear, try connecting it again or use a different USB port on the computer.If many other USB devices are connected, try disconnecting the ones you are not currently using.
 Open the memory stick. Double-click the icon on the desktop to view the files in Finder. You can also open Finder first and select the drive from the list of connected devices. Here you can view all files stored on your memory stick.
  Transfer your files. Click on the files you want to copy from the memory stick to the desired location on your computer and drag and drop them. When you release the mouse, the files will be copied like this.
 - You can also use copy / paste to move files. You can do this by selecting the files you want to copy / paste and press ⌘ Cmd + C. (copy) (or ⌘ Cmd + X (to stick). Then select the folder or location you want to move the files to and press ⌘ Cmd + V..
- By default, drag-and-drop will copy files between disks and move files within the same disk. So dragging to or from the memory stick will "copy" files, but dragging between folders on the computer will "move" files.
 Eject the disc. When you are done transferring files, eject the disc before physically removing it. This is to avoid mistakes. Click the memory stick icon on the desktop and drag it to the trash. When the cursor is over the trash can icon, it will change and display the eject icon. Release and after a moment the icon will disappear from the desktop. Now it is safe to disconnect the drive from the USB port.
 - You can also press Ctrl + click the disk icon on the desktop and select "Eject" from the menu that appears.
Expert advice
"If the USB device does not work ..."
- The USB device may not be compatible with the system or it may be damaged.
- If the USB device has been verified on another computer system, the port on the device itself may be damaged. Try different ports if there are any.
- If you have a recent notebook model from Apple, it only has USB C ports, so you will need an adapter if your device has a standard USB connection. If you are using an adapter, make sure it is not damaged.
Tips
- You can drag and drop it to force copy (instead of move) through ⌥ Opt during the action.
- Memory sticks have all kinds of names, such as: jump drive, flash memory, pen drive, flash drive, thumb drive, etc.
- Files can be transferred between folders or copied directly to the desktop. Don't worry, the choice is not final and can always be changed later.
Warnings
- Do not attempt to remove the disc without ejecting it properly or you may lose some of your work.
- If you are transferring many or large files, first check the storage capacity of the memory stick by going to "File> Get Info". You must ensure that the files you are transferring do not exceed the available space on the disk.
Necessities
- A Mac computer
- A memory stick


