Author:
John Pratt
Date Of Creation:
13 April 2021
Update Date:
1 July 2024

Content
- To step
- Part 1 of 4: Determine the severity of the injury
- Part 2 of 4: Treat the finger on the way to the medical care
- Part 3 of 4: Get medical treatment
- Part 4 of 4: Take care of the injury
A broken finger is when you have a fracture in a phalanx. Your thumbs consist of two phalanges and your other fingers consist of three. Broken fingers are the most common of all fractures. You can suffer such injuries from a fall while exercising, getting your finger caught in the car door or other accidents. In order to properly treat your finger, you must first determine how serious the injury is. You can then start treatment yourself at home before going to the nearest hospital.
To step
Part 1 of 4: Determine the severity of the injury
 Check immediately for bruising or swelling. You are likely to experience bruising and swelling as small blood vessels in your finger are damaged. If you have broken your fingertip, you will likely notice purple colored blood under the nail and bruising on the skin of your finger.
 - You may also feel a sharp pain when you touch your finger. This is a symptom of a broken finger. Some people can still move their finger, although it may be broken and they may experience numbness or a dull pain. But these can still be indications of a broken finger and require immediate medical attention.
- Examine your finger for numbness or try to determine if there is delayed capillary filling. Capillary filling is the return of blood to the finger after pressure is applied.
 Examine your finger for any open cuts or exposed bone. You may notice large open wounds or pieces of bone that have damaged your skin and are sticking out. This indicates serious injury as you are dealing with an open fracture (also called a complicated fracture). If you observe these symptoms, you should seek immediate medical attention.
 - If a lot of blood is flowing from the open wound on your finger, see your doctor.
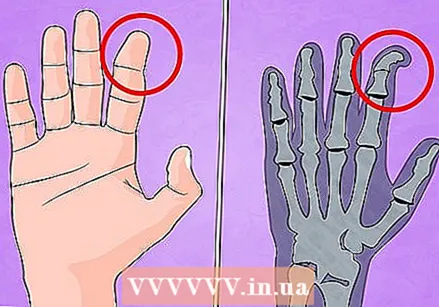
 Examine if the finger looks deformed. If part of your finger is facing the other way, the bone is likely broken or dislocated. A dislocated finger (finger dislocated) is when a skewed position of the finger is perceptible at the level of a joint. You should see a doctor when dealing with a dislocated finger.
 - There are three bones in each finger and they are all placed in the same way. The first bone is the proximal phalanx, the second bone is the middle phalanx, and the one furthest from your hand is the distal phalanx. Your thumb is the shortest finger and has no middle phalanx. Your knuckles are joints formed by the bones in your fingers. Often you break your finger at the knuckle, or the joints.
- Fractures at the base of your finger (the distal phalanx) are usually easier to treat than fractures at joints or knuckles.
 See if the pain and swelling subside after a few hours. If your finger isn't deformed or has turned blue, and the pain and swelling eventually disappear, you may have sprained your finger. A sprain means that the ligaments have been stretched. The ligaments are made of tissue and hold the bones in your finger in place at the joints.
 - If you suspect that you have sprained your finger, do not use this finger temporarily. See if the pain and swelling subside after a day or two. If the pain and swelling don't go away, you should seek medical attention to determine if the finger is only sprained and not broken. This is determined by a physical examination and X-rays.
Part 2 of 4: Treat the finger on the way to the medical care
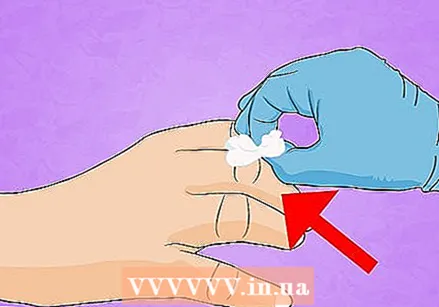
 Cool the finger with ice. Wrap the ice in a towel and then place it against your finger on your way to the emergency room. This will reduce swelling and bruising. Never let the ice come into direct contact with your skin.
 - Keep your finger up as much as possible while cooling with ice, preferably above your heart. This allows gravity to reduce swelling and bleeding.
 Make a splint. A splint holds your finger up and straight. This is how you can make a splint yourself:
 - Take a long, thin item, the same length as your broken finger, such as a popsicle stick or a pen.
- Place the item next to your broken finger, or ask a friend or family member to hold the splint in place.
- Use medical tape to connect the stick or pen to your finger. Apply the tape loosely. The tape should not pinch your finger. If the tape is too tight on your finger, it can cause additional swelling and cut off blood supply to the finger with the injury.
 Try to remove rings and other jewelry. Try to take your rings off before your finger swells, if possible. It will be a lot more difficult to take the rings off once your finger is swollen and starts to hurt.
Part 3 of 4: Get medical treatment
- Get a physical examination by a doctor. The doctor will ask you about your medical history and physical exam to get more information about you and how you got the injury. The doctor will examine you for deformations, damage to blood vessels, skew of the finger and cuts or other injuries to the skin.
 Have the doctor take an X-ray of your finger. This allows the doctor to determine whether there is actually a fracture in your finger. There are two types of fractures (fractures): simple (closed) and complicated (open) fractures. The type of fracture you have will determine the treatment you will undergo.
 - Simple fractures are breaks or cracks in the bone where the bone has not pierced the skin.
- Complicated fractures are those where the bone has pierced the skin.
 If you're dealing with a simple fracture, have the doctor splint your finger. A simple fracture is when the finger is stable and you have no open wounds or cuts on the broken finger. The symptoms are unlikely to get worse or cause complications with your ability to move the finger once it has healed.
 - In some cases, the doctor will tap your broken finger to the adjacent finger, also called “buddy taping”. The splint will keep your finger in the right place during the healing process.
- Your doctor may also need to return the bone to the correct position, a procedure known as "reduction". You will be given a local anesthetic to temporarily numb the area. The doctor will then return the bone to the correct position.
 Discuss the options regarding painkillers with your doctor. You can take over-the-counter medications to relieve pain and swelling, but you should first discuss with your doctor what medications are appropriate and what dose to take each day.
 - The doctor may also prescribe pain relievers for pain relief, depending on the severity of the injury.
- If there is an open wound on the finger, you may need to get antibiotics or a tetanus shot. This medicine prevents infections caused by bacteria entering the body through the wound.
 If the injury is complicated or severe, consider surgery. If there is a severe fracture, surgery may be necessary to stabilize the fractured bone.
 - The doctor might recommend surgery by a hand surgeon. The surgeon will make a small incision in your finger so that he or she can view the fracture and move the bone. In some cases, the surgeon will return the bone to the correct position and stabilize it with steel pins, screws or a plate with screws so that the finger can heal properly.
- These pins will be removed after the finger has completely healed.
 Get referred to an orthopedic surgeon or hand surgeon. If there is a complicated fracture, severe fracture, or damage to nerves and blood vessels, your doctor may refer you to an orthopedic surgeon (specialized in treating all conditions related to the support and musculoskeletal system) or a hand surgeon.
 - These specialists will examine the injury and determine if surgery is necessary.
Part 4 of 4: Take care of the injury
 Keep the splint clean, dry and raised. This will help prevent infections, especially if you are dealing with an open wound or cut on your finger. Holding your finger up also helps keep your finger in the right place and aids the healing process.
  Do not strain your finger or hand until the follow-up appointment has taken place. Use the uninjured hand to eat, wash yourself, and pick up items. It is very important that you allow your finger time to heal without moving or straining the splint.
 - Your follow-up appointment with a doctor or hand specialist should take place one week after the first treatment. During this follow-up appointment, the doctor will check that the bone fragments are in the right place and that the injury is healing properly.
- With most fractures, your finger should not be subjected to stress for up to six weeks before you can start exercising or working again.
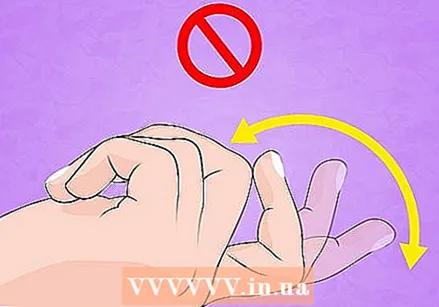 Start moving your finger once the splint is removed. Once your doctor has confirmed that your finger has recovered and removed the splint, it is important to move your finger. If you keep your finger splinted for too long, or hardly move it after the splint is removed, the joint will become stiff, making it more difficult to move and use your finger.
  Visit a physical therapist if you are dealing with a serious injury. The physiotherapist can help you with the recovery process and advise you on how to achieve optimal recovery of your finger function. He or she may also give you light exercises that you can perform to keep your finger moving and to minimize movement restrictions.


