Author:
Charles Brown
Date Of Creation:
8 February 2021
Update Date:
28 June 2024

Content
- To step
- Method 1 of 2: Using lashing straps
- Method 2 of 2: Attach a corner library with braces
- Necessities
- Use lashing straps
- Fastening a corner library with braces
Bookcases are great fixtures for your home, but it is important that they are properly secured. During an earthquake, an unsteady bookcase can topple over and catapult objects into the room. Valuable objects can thus be damaged. Smaller bookcases can be used by children on an obstacle course, which can lead to serious injuries. To prevent this, you can easily fix your bookcases with metal brackets or straps.
To step
Method 1 of 2: Using lashing straps
 Use a joist finder and point out where the joists are. Take a magnet with which you can search for joists and place it on the wall where you want to attach your bookcase. Once you have found the joists, mark their position with a pencil. This allows you to attach the straps to the wall frame once they are installed.
 - Make sure the joist marks are spaced 40cm apart if you don't have a joist finder.
- This method works best with metal and wood wall frames.
 Mark the height of your bookshelf on the wall. Use a tape measure to measure the height of your bookcase. Once you know how high it is, mark that height on the wall. Make sure that this mark matches the position of the joists as you will be drilling in this later.
 - Push the bookcase aside so that you have enough space to mark the measurements on the wall.
 Make 2 marks 20 cm below the first mark. Measure 20cm below the height of the bookcase and place 2 additional marks where you will be attaching the brackets. In the manual of the lashing straps you can check how far apart they should be.
 - The correct location of the wall straps may differ depending on the manufacturer. Consult the installation manual and make sure to mark the correct places.
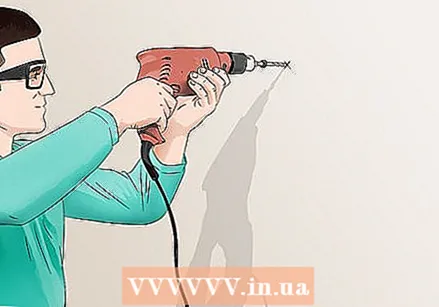 Drill holes in the places you marked for the brackets. Pre-drill two holes in the wall to facilitate the bracket installation process. Since you are drilling into the wall frame, it is important that the installation is done as firmly as possible. Having pre-drilled the entry holes will save time and effort later.
 - Make sure your drill is the same size as the screws you use to attach the brackets.
- Read the anchor bracket packaging to find out which screws to use to secure them. You may need a combination of 2.50 cm and less than 1.25 cm long serifs.
 Fasten the metal anchor brackets in the place you marked. Use a 1 inch screw and slowly drill it into the wall. Make sure the bracket is centered around the pre-drilled hole before screwing it into the wall frame.
 - Both anchors must be securely attached before attaching the bookcase brackets or the straps will not hold.
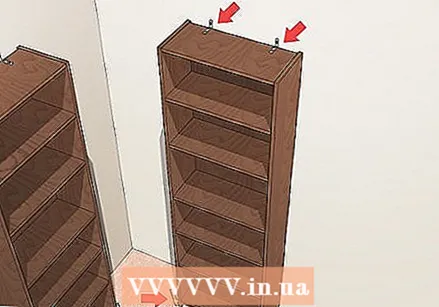
 Screw two brackets into the top edge insert of the bookcase. Find the top edge on the back of the bookcase where the wood is thickest. Measure this edge and attach the remaining two anchor brackets to this part. Like the wall anchors, place the metal piece on the 1/2-inch screw and slowly screw it into the bookcase with a drill.
 - It does not matter if the brackets are equidistant from each other as the brackets will not be visible.
- Be careful not to attach the bookcase bracket to the back of a shelf, as that is not secure.
 Fasten the tension straps to secure the bookcase to the wall. Take the straps attached to the brackets and hang them together. This movement should resemble fastening a belt. Use the extra space on the straps to tighten them and push the bookcase against the wall while doing this.
 - The lashing straps must be automatically attached to the anchor brackets. If not, check the installation guide and find out how to attach the straps to the anchor brackets.
- Have someone help you tighten the straps and push the bookshelf into place.
- Depending on the manufacturer, the lashing straps have a different type of tensioning mechanism.
Method 2 of 2: Attach a corner library with braces
 Measure how wide your bookcases are. Consider how wide your central bookcase is and how wide the side racks are. Depending on the manufacturer, chances are your corner library will have at least three shelves. To install this piece of furniture correctly, you need to have the correct dimensions at hand.
  Line up two wall brackets at the top of the bookshelf. take two L-shaped brackets and place them equidistant from the corner of the bookcase. They shouldn't be exactly the same distance, but if you measure the distance between the brackets properly, the final installation will look more professional.
 - If your bookcase is designed to fit in a corner, align the metal brackets so that they are both attached to another wall.
- If you buy a corner rack from a furniture company, chances are the necessary screws and brackets are included in the package. If not, buy different types of screws 2.5 cm or longer as well as 1.25 cm. Ask a DIY store for an explanation if you need help purchasing these materials.
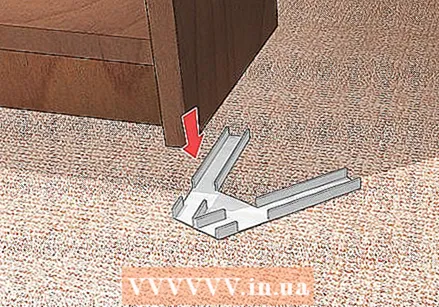 Place a V-shaped bracket under the left side of the bookcase. Lift the furniture so that the base of the bookcase closest to the corner is in the air. take a metal bracket and slide it under the base of the bookcase closest to the corner. Do not lift the bookcase yourself while placing the bracket - have someone lift the bookcase while you set the V-shaped metal piece in place.
 - This bracket has a side that is folded slightly upwards to keep it in place along the base of the bookcase.
 Drill two screws and nuts into each top bracket. Take a screw that is at least an inch long and drill it into the part of the bracket that touches the wall. If the manufacturer provides this, slip a thin metal nut onto the screw before drilling it into the wall. repeat this process to drill a shorter screw into the part of the bracket that touches the bookcase.
 - Check the manufacturer's instructions to know the correct size of the screws. Depending on the size and complexity of your bookcase, the size can vary.
 Repeat this process on the right side of the bookcase. Align the right side so that it is a mirror image of the left bookcase. Place a V-shaped bracket at the bottom of the left bookcase, then use the same screws and nuts to attach the two L-shaped brackets to the top of the bookcase. Make sure the center piece fits nicely between the two bookcases you have already installed.
 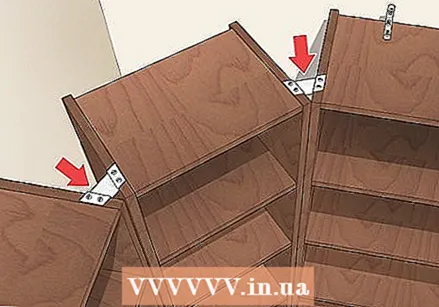 Connect the three bookshelves with two more V-shaped brackets. Get help from another person to slide the central bookcase between the two already installed components. Since there is a gap between the wall corner and the back of the central bookcase, this component is held in place by the adjacent V-shaped brackets that attach it to the side bookcases from top to bottom. Drill two 1/2 inch round screws into these brackets to keep them from moving.
 - If necessary, use a ladder to secure the brackets.
Necessities
Use lashing straps
- 4 metal brackets
- 8 1.25 cm screws
- Electric drill
- 2 long lashing straps
- 2 short lashing straps
Fastening a corner library with braces
- 2 metal brackets
- 2 long-pointed screws from 1.25 to 2.50 cm (per bookcase)
- 2 nuts
- Electric drill
- Adjoining brackets
- 8 short pointed screws (approximately 1/2 inch long)


