Author:
Roger Morrison
Date Of Creation:
1 September 2021
Update Date:
1 July 2024
Content
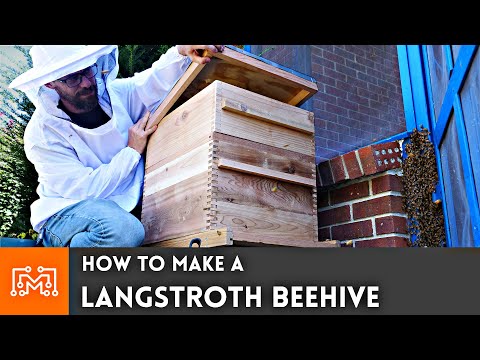
Gardeners who appreciate the importance of bees in nature may consider keeping bees themselves. Today's hives or hives are designed to keep the bees as healthy as possible and to make it easy for the beekeeper to get the honey out without disturbing the bees too much. A beehive consists of a lower stand on which the box stands, a lower flying board, breeding chambers, a smaller honey chamber and a cover plate. The brood chamber at the bottom is separated from the honey chamber above it by a queen grid. Here you will learn how to make a hive so you can start keeping bees.
To step
Part 1 of 2: Understanding the parts
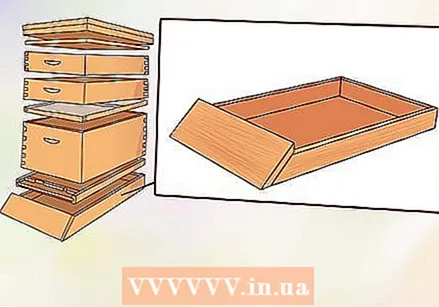 The standard. The standard is the part on which the hive is placed so that it does not stand directly on the ground. It may also have a landing board for the bees. A professional hive stand isn't really necessary, but you do need to have something that will keep your hive off the ground. A small table or a bench is also possible, as long as your hive fits well.
  Lower flying board. This is the bottom layer of your hive. It is a flat piece of wood that serves as the bottom of your cabinet. This bottom shelf can be plain wood, but it can also contain a screen. Bottom fly boards with screen provide better ventilation and better protect against pests. The bottom flyboard is also where your bees enter and exit the hive.
  Partly closed entrance. There is a small piece of wood in front of the entrance in the lower flying board that makes this entrance smaller. Because this board makes the entrance smaller, it protects your colony against larger pests and predators.
 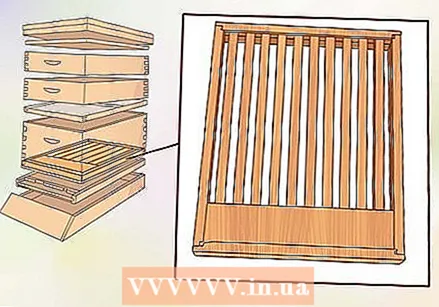 A rack. It is useful to make a flat rack made of slats between the flying board and the incubator. This provides better ventilation and makes it easier for the bees to enter the brood chamber. It also makes it easier for bees to build a good hive. This rack is optional but it is advisable to install it in your hive if possible.
  The brood chamber. The brood chamber is a large box in which bees build their hive. This is the largest part of your hive. You normally use 1 or 2 incubators per hive. Each incubator consists of 8 to 10 frames.
 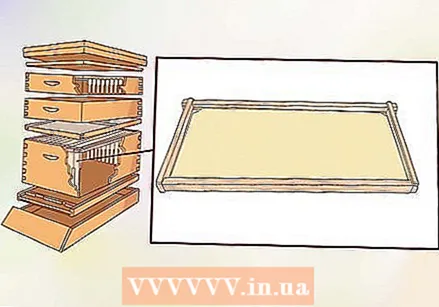 Frames for the brood chambers. These are the lists that you put in the incubator. The frames contain the foundation on which the bees will build their hive. The foundation consists of wax and thread. How many frames you need depends on the size of your hatchery, but usually 8 to 10 will fit.
  Queen grid. To prevent your queen from laying eggs in the honey chamber, there is a queen grid between these two chambers. This is a flat rack with small holes for the worker bees to pass through but which are too small for your queen.
 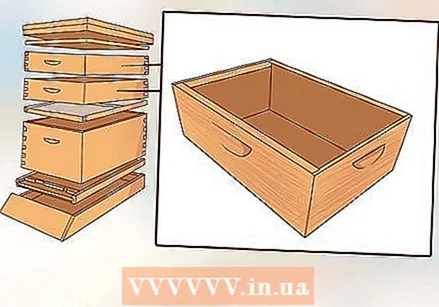 The honey room. The honey chamber is the place where the bees will store their honey. This is a large box that sits on top of the brood chamber. The queen grid is in between the two. It is normally easier to use smaller honey chambers. If the honey chamber is too big, it will be far too heavy to lift when filled with honey.
 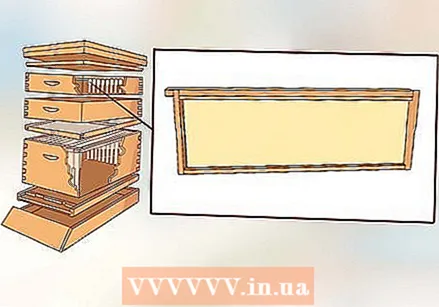 Frames for the honey room. A number of frames must be placed in the honey room. Usually these are made of wood or plastic. On these lists, the bees are going to make their wax and honey. You insert the frames vertically into the honey chamber and when they are full, you can lift them right out. The frames should be the same size as your honey chamber and the frames have a similar foundation to the frames in the brood chamber.
 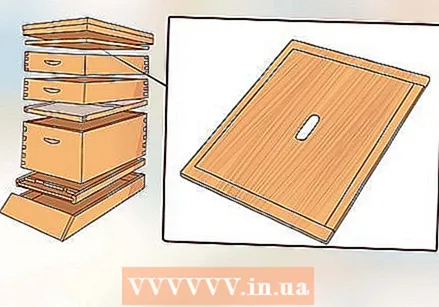 The cover plate. This is the last layer of your hive. It is a kind of lid that you place over the honey chamber. The cover plate has two sides. One for fall and winter, and one for spring and summer.
  The roof. A metal sheet is used as the roof, which ensures that your hive can withstand bad weather. This is the top of your hive, you put it on top of the cover plate.
Part 2 of 2: Building your hive
 Buy the supplies. You have 3 options if you want a hive. You can buy a complete hive, but this can be quite expensive. It is slightly cheaper if you buy the parts separately and then assemble your hive yourself, but you will save the most money if you build all the parts yourself. Whichever option you choose, make sure you buy your parts from a respected beekeeper. Not only do cheaper parts not last as long, they can also damage your colony and even harm your honey.
 - Always use untreated wood. Pine or cedar wood is best.
- The different rooms do not have their own bottom. So buy enough wood to make the exteriors of your rooms.
- Some supplies, such as the moldings and the roof, cannot be easily made yourself, so they will have to be bought.
 Build the brood chamber. There are 2 short sides that are 42 by 25 cm and 2 long sides that are 51 by 25 cm. These four boards should all have a tongue and groove or dovetail joint. Cut your wood to these dimensions and make sure that the boards have the right connections.
  Build the honey chamber. You have to choose the size of your honey chamber yourself. You can make a shallow honey chamber or a medium honey chamber. The length and width of your honey chamber should be the same as that of your brood chamber (the length: 51 by 25 cm, and the width: 42 by 25 cm), but the height will be different. If you want a shallow honey chamber you have to make it 14 cm high; if you want a medium-sized honey chamber you have to make it 17 cm high. As with the brood chamber, use tongue and groove or dovetail joints.
 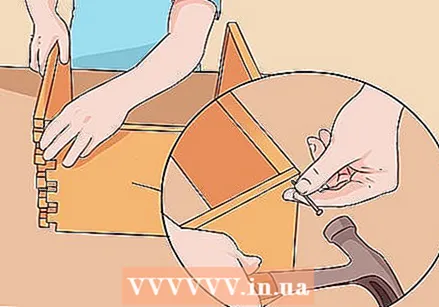 Assemble the rooms. Use glue that is waterproof to assemble your incubators. Put a little bit of glue on the joints and then push the joints together so that you get a box. Then use glue clamps to hold everything together while the glue dries. When the glue is completely dry, use a few small nails to finish your rooms.
  Buy or build your bottom flyboard with partially closed entrance. The fly board is the bottom part of your hive and is no more than a flat board with raised edges. The shelf should have the same dimensions as your rooms but the edges should be only 1 cm high. The small board is attached to the opening that partly closes it. This board should be 2 cm in summer and 1 cm in winter.
 - Larger openings can allow rodents to access your hive.
- You can buy a flying board with an adjustable opening. Because you can adjust the opening per season, you don't have to have 2 different boards that you have to change every six months.
 Paint the outside of your hive. Painting your hive is not mandatory, but a lot of beekeepers do this to reflect the sunlight. If you decide to paint your cabinet, use a white, non-toxic paint that is suitable for outdoor use and can withstand bad weather. Never paint the inside of your closet. This can be bad for your bees and your honey.
 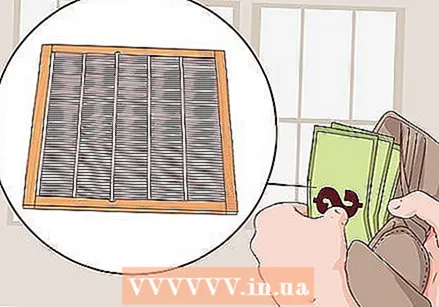 Buy a queen grid. This grid sits on top of your brood chambers and prevents your queen from accessing the honey chambers. You cannot make this grid at home so you will have to buy this.
 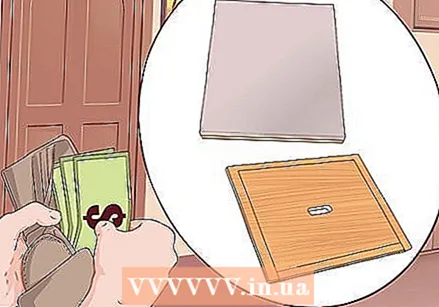 Buy your cover plate and roof. You need a cover plate and a roof for your hive. The cover plate is made of wood and has a hole in it that serves as an entrance. The roof is made of metal and serves as the top of your hive. The roof should protrude slightly over the edge of your closet on all sides and fit it properly.
  Buy the frames for your rooms. On these frames the bees build the hive with their wax. You cannot really make these yourself and if you want to do this it will be a long process that is not recommended for beginners. The frames are made of wood or plastic; you can use both. You will need 10 frames per incubator and 6 to 8 frames per honey chamber. How much depends on the size you have chosen. You can slide these vertically into your rooms until they are exactly in place.
  Assemble your hive. Now we are finally ready! To assemble your hive, you need to put all your parts on top of the stand. First the bottom flying board, then the slat rack if you have chosen that, then the brooding chambers, then the queen grid, on top of the honey chambers and then the cover plate.
 - The standard ensures that the hive is not on the ground and stays dry. You can use anything that keeps the hive above the ground or you can buy a real hive stand.
Tips
- Bees are very precise insects. Make sure you have all sizes just right.If you have too much space in your hive, bees can build up too much and if there is too little space, a colony can move away.
Necessities
- Wood for the rooms
- Wood glue that is waterproof
- Hammer
- Nails
- Newspapers or plastic
- White paint
- Brush
- Lower flying board
- Cover board
- A standard for your hive
- Lists


