Author:
John Pratt
Date Of Creation:
18 April 2021
Update Date:
1 July 2024

Content
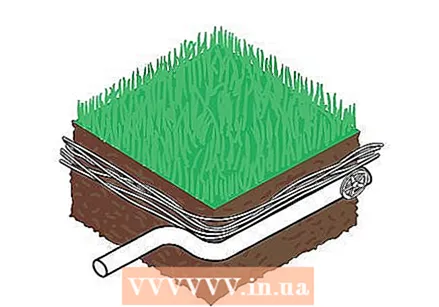
A French drain is a simple yet versatile construction that can be used to remove standing water from problem areas in your garden or basement. The process is quite simple. It requires some preparation and planning, the right materials, and a little DIY knowledge.
To step
Part 1 of 2: Planning and preparation
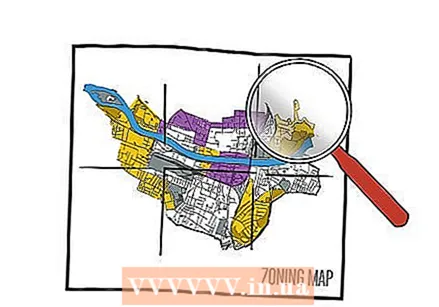
 Check out underground safety. Before you build a French drain in a particular area, you need to find all the underground cables, pipes and other installations that could make digging in that place dangerous.
 - Check the municipal records to make sure you have a clear area to build your French drain. In some countries there is a special telephone number for this. In the US, for example, that is 811.
- Also, make sure to plan the drainage route so that it is at least three feet away from any walls and fences. Also try to avoid posts, shrubs and tree roots.
- Other things to consider are the water source you will be draining, the greatest amount of water flow you can expect, and whether it is a dangerous or contaminated source.
 Check building and digging regulations. Some municipalities have specific regulations for digging and building on your own property. It is best for your project to talk to representatives of the city or region. It can be frustrating having to go through government channels to work in your own garden, but you have to remain patient and polite if you want to carry out this project. Stay organized and develop a good relationship with the appropriate authorities.
 - To get your project started, you may need to contact the local government or city council. It may sound strange, but even the smallest projects that involve moving land can require complicated permits from the local government groups. Know what the regulations are in your area before you start planning anything.
- You should also determine if your French drainage could be causing problems for your neighbors with regard to water drainage. The discharge of excess water to soil that belongs to someone else could lead to a lawsuit.
- Ideally, the French runoff should drain to a relatively unused area of land, away from buildings, in sandy soil that water can easily flow through.
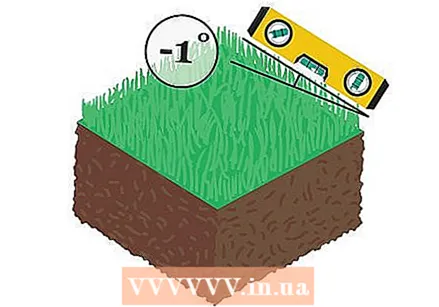 Find a downward slope. To work properly, the French drain must be built at a slightly downward angle. This allows the water to be diverted from the problem area by means of gravity.
 - If there is no natural downward slope, you can create a slope by progressively digging deeper as you excavate the trench. Experts recommend a 1% slope to make drainage effective. In other words, for which 100 meters of drain you have to descend about one meter (about one centimeter per meter of drain.
- Use gardening paint to mark the suggested path of the trench. Then use a few stakes, a piece of wire, and a wire level to measure the slope from one side of the trench to the other.
- If you can't determine the correct angle for your French drain yourself, you can hire a professional to help you determine the correct dimensions and placement for your drain. You can do the work yourself, but you may be more confident knowing that someone else has approved your plan.
- Another option is to rent a transport level (if you know how to use it).
- Keep in mind that the depth and slope of the trench do not have to be perfect, but you should make sure there are none tummies in your drains, which are areas where water can accumulate and remain.
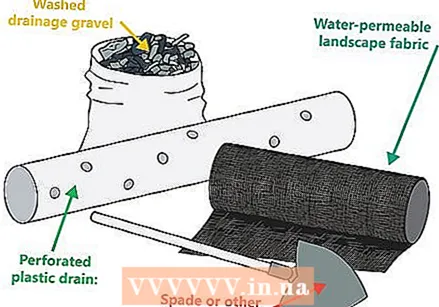 Gather your tools and materials. To build a French drain, you will need to purchase a few basic tools and materials. You need the following:
 - A roll of water-permeable garden textiles: it helps to keep your drain pipe clean and prevents clogging by preventing soil, sludge and roots from entering the drain. You can also buy an ADS perforated tube with a textile cloth around it.
- A perforated plastic drain: the diameter of the drain depends on how bad the drainage problem is and how big the trench is. You can choose a flexible drain pipe or a rigid PVC drain pipe (which is more expensive, but also sturdier and easier to unclog). Make sure the pipe is large enough to drain any water flow that collects in the trench.
- Washed drainage gravel: the number of bags depends on the size of the outlet. Use an online gravel calculator to get a rough estimate based on the depth and width of the planned trench. Some projects require more gravel than what is available in bags. If you need large quantities of rocks and / or gravel, contact a sand and gravel company for delivery information.
- Tools: if you plan to dig the trench by hand, you will need a shovel or digging hoe. If not, you can rent a trencher or excavator. Make sure the excavator is capable of digging a trench that is deep and wide enough for your pipe - most pushers can only dig a trench 10-15cm wide.
Part 2 of 2: Building the drain
 Dig the ditch. Digging the trench is the easiest step of building a French drain, but it requires the most work! Enlist the help of family, friends or neighbors if you can.
 - The width and depth of the drain you dig will depend on the severity of the drainage problem and the digging tools you are using. However, most standard French drains are about 6 inches (15 cm) wide and 18 to 2 inches (45 to 60 cm) deep.
- Trenchers create a wider trench (which is ideal for severe drainage problems) and cut excavation time in half. However, using a trencher also adds to the cost, as you have to pay for the rent and buy more land to fill the larger trench. Trenchers can be very difficult to control and operate and are very dangerous. If you don't know how to use this device, it's best to hire a professional for the job or use a digging hoe. If you do use a trenching machine, make sure that no one comes close to the chain when the machine is in operation.
- The same goes for hiring a person to use an excavator, as these machines dig very wide and deep trenches and have both rental and labor costs involved.
- Check the depth of the trench periodically as you dig to make sure it descends consistently.
 Cover the walls of the trench with garden textiles. Once you've dug the trench, you'll need to cover its walls with water-permeable garden textiles.
 - Leave at least 25 cm of extra textile on the sides of the ditch. Remember this can always be cut at a later time and the fabric will be pulled down when you fill the trench with rocks and gravel. You need to make sure that there is enough fabric on each side to fold over the stones so that the tube does not become contaminated or clogged.
- Temporarily attach the fabric to the walls of the trench with needles or nails.
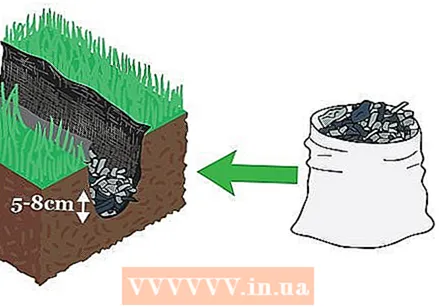 Add the gravel. Scoop about 2 1/2 inches of gravel into the bottom of the trench, on top of the garden fabric.
 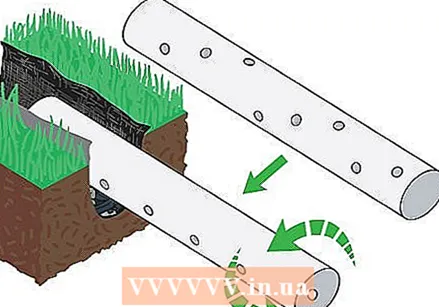 Place the tube. Place the perforated drain pipe in the trench, on top of the gravel. Make sure the holes down as it provides the best drainage.
 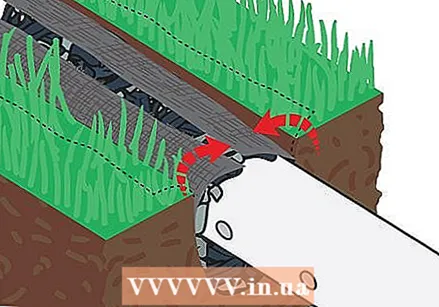 Cover the tube. Shovel more gravel over the pipe, until there is 7.5-12.5 cm of space between the gravel and the top edge of the trench.
 - Then pull the nails out of the garden textile and fold it over the layer of gravel.
- This prevents dirt from entering the drain, while water can enter it.
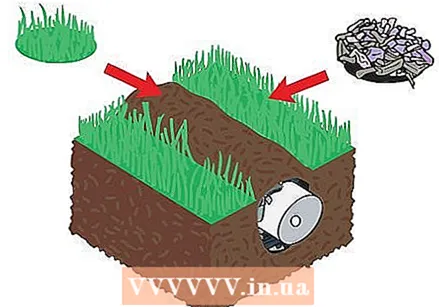 Fill the ditch. Fill the rest of the trench with the dug up soil. At this point you can finish the ditch any way you want:
 - You can put grass clumps on it, reseed grass or even put a layer of decorative stones.
- Some people even build their drain with a slight bend so that the result looks like a desired design.
Tips
- It is good to spray the area where the drain is located with water to compress the soil and anchor the system.
- Always work with the following in mind: You must ensure that the pipe and stones are kept as free of dirt and debris as possible, as this can clog and block the pipe.
- Use a good pair of leather work gloves while digging.
Warnings
- Never use a compacting tool or an electrical compactor, as these can break the pipe and cause the system to malfunction.
- Make sure you read up on any special equipment to avoid unsafe handling of excavators and other tools.


