Author:
Charles Brown
Date Of Creation:
7 February 2021
Update Date:
28 June 2024

Content
The power supply is often forgotten when looking for possible causes of computer problems. Checking the nutrition first can save you a lot of hassle later on. If your computer freezes frequently, or if there are problems with the hard drive, or if the computer does not start at all, there may be a problem with the power supply. Run the tests in this article before replacing other expensive hardware.
To step
Part 1 of 2: Checking if the power supply is working
 Turn off your computer. If the computer is off, or if the computer does not turn on at all, you can turn off the switch on the back of the power supply. Remove the plug from the wall socket.
  Open the computer case. Disconnect the power cables from all components inside the enclosure. Follow each cable from the power supply to the various components to make sure everything is loose.
 - Write down where all the cables belong for when you start reassembling.
 Use a paper clip to test. You can use a paper clip to test the power supply, which makes the power supply think it is on. To do this, first straighten a paperclip, then bend it into a "U" shape.
 - This paper clip replaces the pins that normally provide the "On" signal.
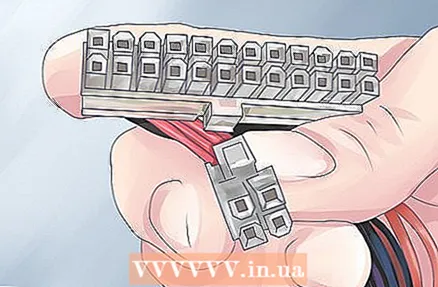 Find the 20/24 pin connector that is normally attached to your motherboard. It is usually the largest power supply connector.
  Find the green and black pins (pins 15 & 16). You will insert the ends of the bent paperclip into the green pin and the black pin next to it. Before you do that, check again that the plug is no longer plugged in, that the power supply has been switched off and that the power supply is no longer connected to the various components within the computer.
 - The green pin is usually pin number 15.
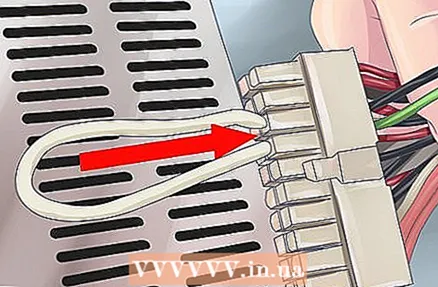 Insert the paper clip. After inserting the paperclip into both pins, place the cable somewhere where it cannot be moved. Plug in the power cord and turn on the switch on the back.
  Check the fan. When the power supply is working you can see or hear the fan spinning. Now you know that the food is working. If the power does not turn on, unplug the power cord and check the paperclip. Then try again. If nothing happens again, the power supply is probably broken.
 - With this test you only check whether the power supply is turned on, not whether the power supply is working properly. You need to run the following test to make sure the power supply is working properly.
Part 2 of 2: Testing the output
 Check the output with software. If your computer is still running and the operating system is loading, you can check the power supply output with software. "SpeedFan" is a free program with which you can read the activities of your computer, the program tells you the different temperatures and voltages of your computer. Check that the results are within normal values.
 - If the computer does not turn on, you can go to the next step.
 Turn off the computer. Remove the plug from the wall socket. Turn off the power by flipping the switch. Open the computer case and disconnect all components from the power supply. Follow each cable from the power supply to the various components to make sure everything is loose.
 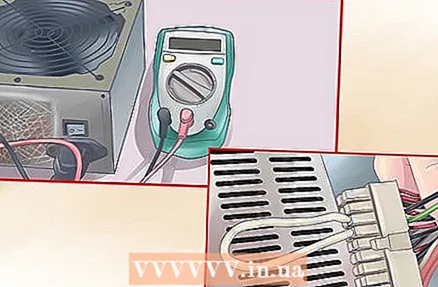 Test the nutrition with a nutrition tester. A nutrition tester can be purchased online or in computer stores and they are inexpensive. Find the 20/24 pin connector that is normally attached to your motherboard. It is usually the largest power supply connector.
 - Connect the connector to the power supply tester.
- Plug the power cord back in and turn it on. The power will turn on and the power tester will illuminate.
- Some testers require the power to be activated with a switch or button on the tester. In others, the power comes on immediately.
- Read the voltage. The 20/24 pin connector will give different values, but there are 4 important measurements to look at:
- +3.3 VDC
- +5 VDC
- +12 VDC
- -12 VDC
- Check that the voltages do not deviate too much. +3.3, +5, +12 may have a deviation of +/- 5%. -12 may have a deviation of +/- 10%. If the measurements fall outside these deviations, the power supply is no longer good and must be replaced.
- Check the other connectors. After you have determined that the values of the main connector are okay, you can check the other connector wires one by one. Unplug the power cord and turn off the switch between each test.
 Test the power supply with a multimeter. Straighten a paperclip and then bend it into a "U" shape. Find the green pin on the connector. Insert the paper clip into the green pin (pin 15) and one of the black pins next to it. That way the connector thinks it is connected to the motherboard.
 - Plug in the power cord and turn on the switch.
- Find a pinout schedule for your diet. On the basis of this diagram you can see which pins supply which voltages.
- Set your multimeter to VDBC. If the range is not automatically adjusted, set your multimeter to 10V.
- Connect the multimeter's negative probe to a ground pin (black) on the connector.
- Connect the positive probe to the first pin you want to test. Write down the voltage you see on the display.
- Check that the voltages are within the maximum deviations. If one of the voltages is outside the maximum deviation, the power supply is broken.
- Repeat the process for all connectors. First, find the specific pinout diagrams for each connector to see which pins to test.
 Reassemble your computer. After you have tested all power connectors, you can reassemble the computer. Check that all components are properly reconnected and that all connectors of the motherboard are tight. After this you can switch on the computer again.
 - If there are still problems, or if your computer does not start, then the problem lies elsewhere. Be the first to check your motherboard.


