Author:
Frank Hunt
Date Of Creation:
16 March 2021
Update Date:
1 July 2024
Content
- To step
- Method 1 of 3: Using CS6
- Method 2 of 3: Using CS3, 4, & 5 Extended
- Method 3 of 3: Using CS2
- Tips
- Warnings
Animated GIFs allow a designer to add movement to images for the web or avatars. Using Photoshop, you can create and edit movie clips and turn them into animated GIFs with no problem! We show you how to do this with the latest version of Photoshop, as well as previous versions of Photoshop CS. Just start with Step 1 or go straight to the specific sections for your version.
To step
Method 1 of 3: Using CS6
 Start Photoshop. To create an animation with Photoshop, you need at least CS3 Extended. Versions of Photoshop starting with CS6 have animation capabilities in all versions.
 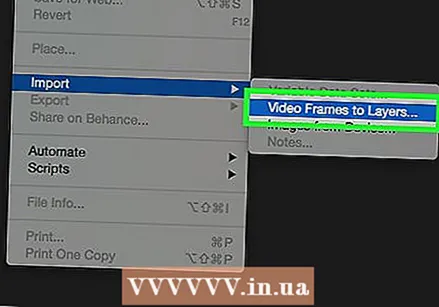 Open a video. From the File menu, choose Import > Video Frames to Layers ...
- Select a movie file. Photoshop can load a maximum of 500 frames. If your movie file is longer, you will have to trim it.
 Adjust the import settings. In the Import Video to Layers window, you can make the necessary adjustments. The options under Range to Import are the most important.
 - "From Beginning To End" is the clearest. Photoshop will try to import every frame of the movie. If there are more than 500 frames, the movie will be cut at that point.
- "Selected Range Only" lets you choose the start and end points using the controls at the bottom. use the scroll thumb to quickly search through the movie, and drag the brackets at the bottom to indicate the range of frames to import.
- Limit To Every [n] Frames will reduce the number of frames by at least half, causing a choppy picture.
- Make Frame Animation converts the movie into layers and animates those layers. Turning it off will still layer the movie, but not animation. We leave this option selected here.
- click on OK when you are ready to import the movie. This only takes a few seconds. After that you will see all the individual frames in the layers menu, and all the frames next to each other along the timeline.
 Adjust the animation. You can use Photoshop's adjustment layer to add effects such as color correction, brightness and contrast, and more. Adjustment layers are applied by default to all underlying layers.
 - You can apply a wide variety of built-in adjustments. You can also use a new layer with an overlay to change the character of the video, or add a new background with a base layer.
- For example, you can make a short video of someone looking around. In the bottom layer you put a picture of a city - or a country - to place it in a certain environment. You could then place an adjustment layer on top to give the layers below a sepia tone. You can even recreate the look of the animated newspapers from the Harry Pottermovies.
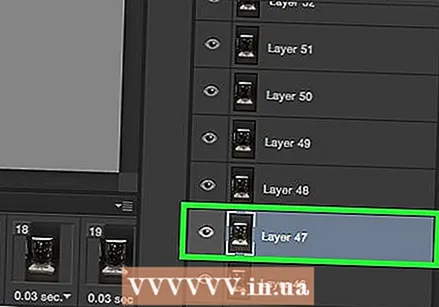
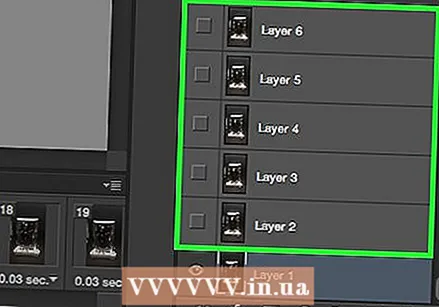
 Edit individual layers. Click on a frame in the timeline and find the corresponding layer. By default, the frame number is the same as the number of the layer, so frame 18 can be found in layer 18.
 - You can adjust any layer to add effects or clean up whatever you want. If you do this on different frames, you can even animate the effect.
- For example, if you apply a lens flare to a particular frame, you can apply the same filter in the next frame by pressing Control-Alt-F (Command-Option-F on the Mac). Decrease the effect by 10%, then move on to the next frame and repeat the procedure. Continue until you've reduced the effect to 0, and it will resemble a lens flare animation.
 Save the animated GIF. In the menu File select your Save for Web .... This allows you to specify the size and output options of the GIF, depending on your preference.
Method 2 of 3: Using CS3, 4, & 5 Extended
 Create a document. Place each frame of the animation on a separate layer.
 - Or open an existing video clip. Choose from the File menu for Import > Video Frames to Layers ...
 Select the layers. Select the layers you want to use in the animation from the Layers window. To select a group of layers, select the top layer, hold down Shift, then select the bottom layer of the group. With this you have selected all intermediate layers.
  Open the Animation window. In the Window menu, choose Animation. When the Animation window opens, it should look like the image above. If not, it is opened in the Timeline view.
  Change this to Frame Animation. Click on the "Flyout" menu in the top right corner of the animation window and select "Convert to Frame Animation."
  Create frames for each layer. Click on the "Flyout" menu in the Animation window and choose "Make Frames From Layers."
 - Not all layers need to be selected. To select a few layers, use the copy layer button at the bottom of the animation palette to add layers.
 Change each frame as desired. Select the frame in the animation window and change the frame as desired in the main Photoshop window.
 - To add or remove an image from another layer to or from any frame, select the frame from the layers palette. Click on the “eye” to turn the visibility of that layer on or off.
 Display the timing menu. Click the arrow below each frame to display the timing menu. Select this for each frame.
  Save your GIF. Choose File > "Save for Web and Devices" then GIF from the drop-down menu.
 - To save the video, select File > Export > Render Video to export the document as a movie.
Method 3 of 3: Using CS2
 Provide good screen captures. You need a number of good quality screen captures. These should be taken in close succession and come from a clean, clear video source. Netflix is a good option if you can take advantage of it.
 - Name them in order. If you keep the original screencaps, name them e.g. 1, 2, 3, etc.
- If you don't know how to get a screencap, check out wikiHow for tutorials. Usually you use the Printscreen (Prt Sc) button and paste the image into an image editing program.
 Drag them to different layers. Start with the first image as Layer 1 in a new Photoshop file, and drag each image into a new layer in that file. Make sure the order is correct.
 - You will have to open each file in Photoshop to be able to drag it into the main file. If dragging doesn't work, just use copy and paste and make sure the image is placed in a new layer.
- Make sure the images are properly aligned.
 Hide the top layers. Click on the eyes next to the layers in the layers menu, except for the first image, to hide all layers.
  Open the animation window. Click on Window in the top bar and open Animation.
 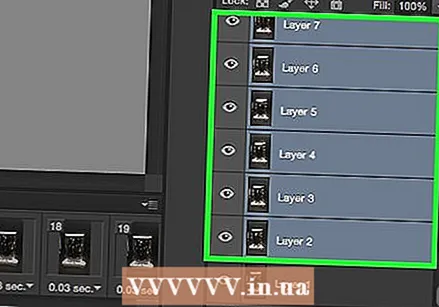 Make the layers visible again. Click "New Layer" (this button looks like a sheet of paper folded) in the animation window and click the eye button for the next image. Switch between New Layer and Unhide to make each frame an "animation cell".
  Trim the canvas. If you have any excess material you want to cut out of the screencap, such as the rest of your desktop, use the cropping tool to crop your images. The standard size for a GIF can be found online. Use the specific settings from the top menu to set the size, not manual cropping or via the Image Size menu.
  Identify the inbetweens. If the animation goes too fast you can make inbetweens. The button for that can be found next to the New Layer button in the animation menu. Play around with the settings until the animation looks good.
 - You must set the opacity to 79% for each inbetween frame.
 Save the file. Click "Save for Web" from the File menu. Make sure the file type is set to GIF and with 256 colors. Selective diffusion and dither are 100%. If the settings are correct, click on Save.
  Ready! Have fun with your GIF!
Tips
- Note: To have the animation loop continuously, choose "Save For Web and Devices" under the save option. Under "Looping options," select "Forever" and save the animation. You can also select "Others" and specify the number of times to repeat your animation.
- Since Adobe ImageReady is no longer in development, most of ImageReady's features are available in Photoshop CS3. The ones that are not available can be found in Adobe Fireworks.
- If you save an animated GIF file from Photoshop CS3, the animation frames will be lost. To fix this, open the animated GIF file in Adobe Fireworks, which has editable layers and timelines for GIF files.
Warnings
- Save your work regularly so you don't lose hours of work because you made a mistake.


