Author:
Ellen Moore
Date Of Creation:
14 January 2021
Update Date:
29 June 2024

Content
- Steps
- Part 1 of 5: Winding the coil
- Part 2 of 5: Threading the Needle
- Part 3 of 5: Using an automatic filling device
- Part 4 of 5: Insert the Coil
- Part 5 of 5: Pulling the Thread from the Spool
- What do you need
The Singer Simple 3116 is a beginner's sewing machine with several features that make it easy to use, including the automatic needle threader. Threading the machine is a fairly straightforward process, but you should still make sure everything is done correctly and in the correct order.
Steps
Part 1 of 5: Winding the coil
 1 Extend the spool of thread. Place the spool of thread on the spool pin at the top of the machine. Secure it by sliding the spool holder onto the inner shaft.
 - If you are using a small spool, cover the stem with the cap so that a small part of it is on the spool.
 2 Guide the thread. Pass the thread through the thread guide and around the bobbin winder.
 - Thread the thread through the small plastic thread guide to the left of the spool pin.
- When the thread is held by the thread guide, twist it clockwise around the bobbin winder in front of the holder.
 3 Pass the thread through the hole in the spool. Insert the thread into the hole of the empty spool from above.
 - Thread the inside of the thread so that the end is on the outside of the spool.
- If you are using a spool with holes on both sides, simply pull the thread through the hole.
 4 Place the coil in the desired location. Place the bobbin on the bobbin winder located on the right of the machine. Lock the bobbin.
 - The free end of the thread should protrude from the top of the spool.
- To fix the mechanism, move the coil to the right as far as possible. This turns on the "coil winding" mode on the typewriter.
 5 Step on the foot control. Hold the free end of the thread and step gently on the foot control. The machine should start winding the spool.
 - If you like, you can let go of the free end of the thread after the spool has made a few turns, but this is not necessary.
- The machine should stop automatically when the spool is fully wound.
- Note that the handwheel should not turn and the machine should not sew when bobbin winding is on.
 6 Remove the wound spool. Cut the thread to separate the bobbin from the bobbin. Open the bobbin winder and lift the bobbin to remove.
 - Open the mechanism by sliding it to the left. Remember that the machine will not sew until this mechanism is in its original position on the left.
- You should also trim the free end of the thread sticking out of the top hole of the spool after you remove it.
Part 2 of 5: Threading the Needle
 1 Raise the needle. Turn the hand control on the side of the machine to bring the needle to its highest position.
 - Turn off the sewing machine before threading the needle.
- Turn the hand control towards you.
- At this point, also raise the presser foot to loosen the tensioner.
 2 Extend the coil. Place the spool of thread on the spool holder on the top of the machine. Place the cap on the holder next to the thread spool.
 - You will need to lift the spool holder to place the spool of thread on it.
- When using large spools, the wider side of the cap should face the spool. If you are using a small spool, the smaller side of the cap should be facing the spool.
 3 Pull the thread through the top guide. Draw the thread through the top guide, then around it and through the pre-tension spring.
 - The top tensioner is the catch to the left of the spool holder.
- The pre-tension spring is located in the middle of the second detent in front of the top tensioner.
 4 Pull the thread into the modular compartment. Pull the thread to the right through the right channel at the front of the clipper, and then back through the left channel.
 - You may need to pinch or hold the thread between the spool and the top tensioner during this process to maintain the correct tension.
 5 Draw the thread through the take-up lever. Draw the thread through the hole in the take-up lever at the top of the left channel.
 - After you feed the thread into the take-up lever, guide it back down again through the left channel.
 6 Pass the thread through the lower tensioner. Pull the thread through the horizontal bottom tensioner and through the thin connecting clip.
 - The horizontal tensioner is a flat clip that sits under the left channel.
- The thin needle connecting clip is located just above the needle.
 7 Thread the needle. Thread the thread through the eye of the needle by inserting it from front to back.
 - Pull about 15.25-20.3 cm of thread through the back of the needle.
Part 3 of 5: Using an automatic filling device
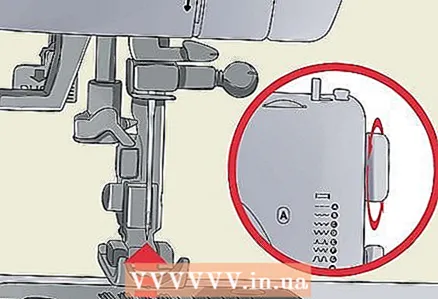
 1 Press down on the automatic threading lever. Press so that it goes down as low as possible. The threading device should rotate to the position required to start threading.
 - This lever should be to the left of the needle.
- Note that these instructions only apply to machines equipped with an automatic filler.
- Standard needle threading instructions also apply when using the automatic threading device.This device only helps you at the stage of threading the eye of the needle; the rest of the process proceeds as described above.
- Even if your clipper has this device, you can still thread the needle without his help. This device is optional.
 2 Pull the thread through the thread guide. Draw the thread through the hook in the thread guide to the left of and around the needle.
  3 Hold the thread in front of the needle. Pass the thread through the hook to the right of the needle.
 - After pulling the thread through the hook, wrap the thread from bottom to top.
 4 Release the lever and pull the thread. Return the lever to its original position to release the automatic threading system. Having done this, you should see how the thread is threaded through the eye of the needle.
 - Grab this loop and pull it through the back of the needle.
- Pull about 15-20 cm of thread through the eye of the needle.
Part 4 of 5: Insert the Coil
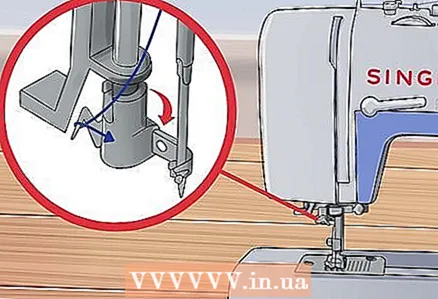
 1 Raise the needle. Rotate the manual control on the side of the clipper towards you until the needle is in the highest position.
 - Make sure the clipper is turned off when installing the spool.
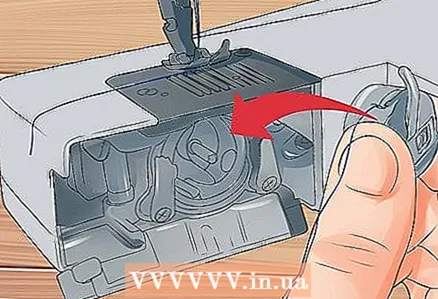
 2 Remove the bobbin case. Open the hinged cover at the front of the machine and pull out the bobbin case.
 - To open the lid, grasp the sides and push down. The lid will open but will not separate.
- To remove the bobbin case, pull on the tip of the bobbin case and lift the bobbin case towards you.
 3 Insert the spool into the cap. Hold the bobbin case with one hand and at the same time thread the bobbin into the bobbin case with the other hand.
 - The thread should be in a clockwise direction around the spool as you insert it into the cap.
- Leave about 10 cm of the free end of the thread sticking out of the cap as you insert the spool.
 4 Thread the thread through the notch. Take the free end of the thread and thread it through the notch at the top of the spool.
 - Continue threading through the notch until it passes through the cap indicator.
 5 Return the bobbin case to the machine. Hold the bobbin case by its loop latch and set it in place in the machine.
 - Release the latch. If the cap has been correctly installed, it should be securely attached to the inside of the machine. You shouldn't be able to pull it out until you lift the hinge latch again.
- Close the lid when everything is done.
Part 5 of 5: Pulling the Thread from the Spool
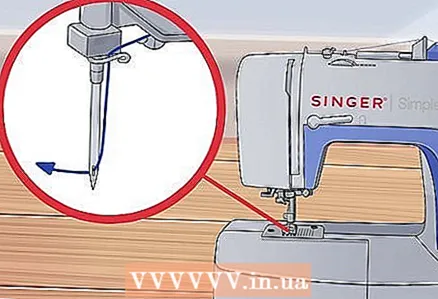
 1 Turn the needle. Turn the hand controls on the side of the machine towards you. Continue doing this until the needle makes a full turn, dropping down and up to its highest position.
 - For safety reasons, it is best to do this with the clipper turned off. The presser foot should also be raised during this process.
- When turning the manual control, you should see a loop of thread that appears in the hole in the needle plate under the needle. This loop of thread is from the spool.
 2 Pull out the bottom loop of the thread. Gently pull the upper thread to release the loop and guide the bobbin lower thread all the way through the hole in the needle plate.
 - Pull about 15-20 cm of bobbin thread through the hole in the needle plate.
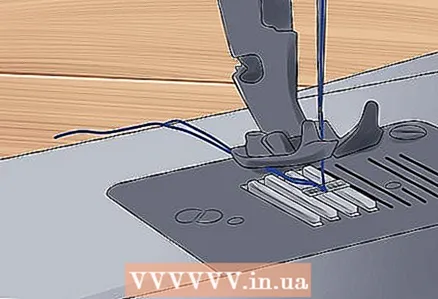 3 Arrange both threads. Place both threads so that they are towards the back of the machine.
 - Both threads must pass through the presser foot. The upper thread should pass through the toes of the presser foot.
- This step is the end of the entire threading process.
What do you need
- Clipper Singer Simple 3116
- Filament spool
- Empty spool
- Scissors


