Author:
Gregory Harris
Date Of Creation:
16 August 2021
Update Date:
1 July 2024

Content
- Method 2 of 3: How to combine two French braids into a half ponytail
- Method 3 of 3: How to braid two French braids with a basket
- Tips
- The parting in the hair does not have to be completely even. An uneven or sloppy parting can be part of a bohemian chic. Zigzag parting will add a touch of sensual funky style to your look.
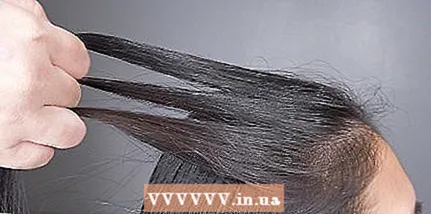
 2 Prepare the base of the first braid. Choose the side from which you start working. Select a triangular section of hair in front of the head from the forehead and about 5 cm deep to the crown of the head.Use your fingers to separate this section from the bulk of the hair. Divide the section into three strands. Prepare the base for the braid using the traditional first link weave. Slip the right strand over the center strand. Then, slide the left strand over the new center strand.
 - You can tie the other half of your hair, which you are not working on yet. This way you don't accidentally grab them in the first braid.
- The base of the braid in this case will not be in the center of the head, but on the side. Since you are braiding two full french braids, ending in a traditional braid, they will be placed on the sides. The pigtail on each side will start just halfway between the ear and the parting.
3 Start braiding your French braid. Tuck some loose hair into the right section. Then throw this strand over the center one, and take the old center strand to the right. Tuck some loose hair into the left section. Slip the left strand over the center strand, and move the old center strand to the left. - Keep your hands close to your head for a tight braid.
- Try to pick up the same amount of hair each time. This will give the weave a neat and even look, not a messy look.
4 Continue braiding. Moving further down the head, continue weaving the French braid. During braiding, you will need to pick up loose hair from the hairline near the face and along the back parting. Whenever you need to pull up your hair, separate it from the rest of your hair horizontally. - When you no longer have any more hair to add to your strands, you can continue braiding your classic braid.
- Make sure that the pigtail is tight enough. You can increase the density of the weave by tightening the strands at each step.
5 Secure the ponytail at the bottom of the braid. When you finish braiding to the length you want, secure the remaining ends of your hair with an elastic band. Further, this place can be decorated with a hair clip, ribbon or other hair accessories. 6 Repeat all steps for the other half of your hair. Repeat steps 2-5 on the other half of the head. The two braids should look the same. Finish braiding at the same level and try to use the same elastic bands and hair accessories on both sides. - If you wish, you can slightly change the hairstyle of the two French braids and, instead of finishing braiding to the end of the hair, stop at the base of the neck to tie the two tails with elastic bands. The remaining ends of the hair will hang freely, so they can be straightened or curled if desired.
- Another option for styling two French braids is twisting and combining them into a bun. When both French braids are done, twist the end of one into a small bun at the back of your head. Secure the bundle with hairpins or invisible pins. Repeat the procedure with the second braid, wrap its end over the previously created bundle and also secure. Use as many pins or hairpins as necessary to secure the bundle.
Method 2 of 3: How to combine two French braids into a half ponytail
- 1 Part your hair with a parting. Comb your hair and part in the center. The parting should only go from the forehead to the crown.
 2 Start the first braid. Pick the side of your head to start with. Take a small section of hair in the front and separate it from the rest of the hair. Divide the hair section into three sections. Form the base of the braid with the classic weaving of the first link - throw the right strand over the center one, and then throw the left strand over the new center strand.
 - You will weave two small braids that wrap around your head and meet at the back. You are not challenged to weave all your hair into these braids.
- An alternative version of this hairstyle can be a hairstyle with slightly longer braids. This will give you a slightly different final result. Follow the same steps, but make the braids slightly longer.They will be more inclined to the floor than small braids, and will meet each other no longer at the crown, but somewhat below it.
- When weaving the braid, guide it from your face to the back of your head. Do not braid downwards.
- 3 Braid a French braid. Tuck some loose hair into the right strand, then pull it (already enlarged) over the center strand of the braid. Tuck some loose hair into the left strand, then also sweep it over the new center strand. Continue to weave the braid in the same way, gradually bending it around the head.
- Stop when you get to the middle. Temporarily secure the braid with a barrette or hair tie.
- 4 Repeat the entire process with the other half of the head. Repeat steps 2 and 3 on the other side of the head. The two braids will have to meet at the back. Moreover, they themselves should turn out to be the same in size.
- The braids will form a braided semi-ponytail, and most of the hair will remain loose.
- 5 Combine the ends of the hair from the two braids. Remove the elastic bands or hairpins from the braids. Combine the ends of the hair from two braids.
- 6 Style your hair the way you like it. Now that you have two French braids on your head, you can style your hair as you like. You can fix the half-ponytail with a hair clip or an elastic band and you will get a stylish and slightly voluminous hairstyle. Also, hair can be collected in a full-fledged ponytail. If you want to add a little sophistication to your hairstyle, twist the ponytails into a bun and secure it with hairpins or bobby pins.
- In the case of a full ponytail or bun, the two French braids will converge directly above them.
- You can also join two braids into a single three-strand braid that goes down. To do this, connect the left and middle strands of the left braid in one strand, in the other - the right strand of the left and left strand of the right braid, in the third - the middle and right strands of the right braid. Then continue to weave your traditional three-strand braid.
Method 3 of 3: How to braid two French braids with a basket
- 1 Part your hair with a parting. Comb your hair and then part it with a center part. The parting should run in a continuous line from the forehead to the base of the neck.
- Secure one half of your hair with a rubber band. This will keep them out of your way while you work with the other half of your hair.
- Instead, you can part on the side so that the braids are of different thicknesses, or you can do a less crisp, sloppy part.
- 2 Form the base of the braid. Select the section of hair at the base of the neck. Divide this section into three strands. From the bottom, wind the right strand behind the central one, then also from the bottom, wind the left strand behind the central one. You will have one basic braid link.
- Another option is to make a basket by simply braiding two French braids on the sides and wrapping them around your head. Tuck in the ends of the hair and secure with hairpins closer to the scalp.
- 3 Start braiding your Dutch braid. Tuck some loose hair into the right strand and pull it past the center strand from the bottom. Tuck some hair into the left strand and pull it under the new center strand from the bottom. The weave will go up the head.
- The Dutch braid is also called the reverse French braid or the reverse dragon braid. The difference is that during weaving, the strands are applied from below, and not from above, as in a standard French braid.
- In this case, the braid is woven from bottom to top, not top to bottom.
- Before braiding, it will be convenient to pre-comb your hair up so that it immediately lies in the right direction.
- 4 Continue braiding up and to the side around your head. Since you are going to make a basket out of braids, the weaving should go around the head. Continue to weave the Dutch braid, gradually adding loose hair to the strands and pulling it in from the bottom of the center strand each time.
- Make sure that the amount of hair added to the braid is approximately the same each time. So the braid will turn out to be neat, otherwise it will be uneven.
- 5 When you get to the middle of your hairline, move on to a regular braid. At this point, you need to stop adding strands to the braid on this side. Instead of the Dutch braid, continue to weave your regular three-strand braid.
- 6 Secure the end of the braid. When you finish braiding the braid to the end, secure the end with an elastic band. Use a fabric covered elastic to minimize the risk of damaging your hair. Choose an elastic band that matches your hair color so that it is discreet.
- 7 Pin up your hair following the circumference of your head. Wrap the braid around your head as far as it will go. As you go, secure it with invisible ones. When you get to the end of the braid, tuck it under your hair and pin it up.
- Try to hide the end of the braid behind your ear.
- If you have very long hair, you may need to wrap the braid around your entire head, up to the back of your head.
- 8 Braid a second braid on the other side. Unlike the first braid, this braid needs to be woven from above. Starting at the top of the parting, repeat steps 2-5 and braid the second Dutch braid from top to bottom. Like the first, the second braid should also bend around the circumference of the head. Having reached the middle of the hairline, in the same way, proceed to weaving a regular braid of three strands. Then wrap the braid around your head and secure.
- 9 Wrap the braids around your head. Once both backward French braids are ready, wrap the ends further around the circumference of your head. Fix the braids with invisible ones. Hide the elastic bands on the braids and the ends of the hair sticking out from under them under the braids themselves. Also secure the ends of your hair with invisibility.
- 10 Your hairstyle is ready!
Tips
- On very oily hair, braids may not turn out very well.
- Do not pull the strands too tight while braiding, or you may get a headache.
- If the braid is too loose, the hair will fall out of it.
- If you're just learning how to braid, it may be more convenient to practice with someone else first before trying to braid yourself. On the other hand, some people find it more convenient to weave French braids on themselves than on other people.
- If you want your hair to become wavy when you release your hair, do not braid it immediately after you shower.


