Author:
Gregory Harris
Date Of Creation:
15 August 2021
Update Date:
1 July 2024

Content
- Steps
- Method 1 of 3: Steaming and moisturizing your hat
- Method 2 of 3: Shaping the hat correctly
- Method 3 of 3: Protecting the Hat from Warping
- Tips
- Additional articles
Straw hats deform quite easily, especially when traveling. However, don't throw away your wrinkled hat right away. It is quite easy for a straw hat to return to its original shape.
Steps
Method 1 of 3: Steaming and moisturizing your hat
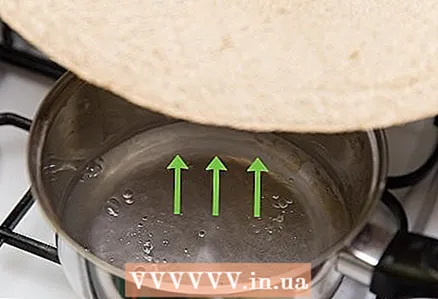 1 Consider steaming your hat. You may want to try steaming your hat first. This is usually done with a garment steamer or iron with a steaming function. You can also try taking your hat to a specialty hat store that has an industrial hat steamer, but this is not necessary.
 - The first step is to completely steam the brim of the hat. The steam will soften the straw and help the hat get its original appearance.
- If you don't have a steamer, you can try steaming your hat over a pot of boiling water, just be careful with the boiling water.
- If the steam is dampening the hat too much, take a few minutes off before continuing to steam.
 2 Lift the brim of the hat and strip it around the brim. Keep the steam source 15-20 cm from the hat to avoid scalding your hands. Then lower the margins back.
 - After finishing the brim of the hat, steam directly into the crown.
- Steam should begin to seep through the holes in the weaving of the straw. Do not allow the steamer or iron to touch the hat.
- Continue steaming until the hat is damp. Don't worry about wetting your hat too much, as the moisture will help you straighten it.
 3 Straighten the shape of the hat with your fingers. After the hat is well moistened and still steaming, begin to reset the deformed areas of the hat into place. Shape the hat with your hands constantly as you continue to steam it.
 - When shaping your hat, remember to evenly straighten the weaves of the straw. You can also use a spoon to straighten the hat over the steam instead of your fingers.
- After steaming the hat, place a round bowl, rolled towel, or other object in it to help the crown maintain its correct shape.
- When steaming your hat, you may need gardening gloves or oven mitts. Working with steam is quite dangerous, so you must be careful not to burn yourself.
 4 Moisten your hat with water. If steaming the hat doesn't work for you, you can try dampening the hat with water. This method is especially useful when the brim of the straw hat is crumpled. Spray the hat with a spray bottle. When dry, the straw should return to its original shape, since moisture makes it more plastic.
 - All you need to do is sprinkle water on the hat, but if that doesn't work, you can dip the crown into a bowl of warm water. The hat should not be too dry when straightening the mold, otherwise the straw may break.
- Make sure the hat is evenly wet with water. To do this, twirl it in a bowl. Once the hat is wet, you can straighten it with your fingers or other items.
- You may worry about getting your straw hat wet, but it's not worth it. Moistening your hat is one of the most common methods of getting it back into shape.
 5 Put your hat on and let it dry. When you've finished steaming or moisturizing the hat, it will need to be dried.
 - If the hat does not get its perfect shape after drying, repeat the steaming or moisturizing process again.
- It all depends on the degree of deformation of the hat. Some hats require just one steaming or moisturizing, while others require re-processing.
- However, try to fix it all in one go, as the constant shaping of the straw hat does not work well for it.
Method 2 of 3: Shaping the hat correctly
 1 Roll up the crown straightening towel. Instead of steaming or dampening your hat, you can simply try straightening it out. For the best effect, it will be helpful to dampen the towel on which you will straighten it. Moisture will help the straw to become plastic. A towel will replace your head.
 - Place your hat on a rolled towel. Leave it in this position for a while so that it can regain its correct shape.
- The towel should be rolled up as wide as possible and inserted into the crown of the hat to the limit. This method is great for a vacation situation where you don't have access to other handy items the size of your hat's crown.
- You can also try stuffing your hat with crumpled paper or newspapers.
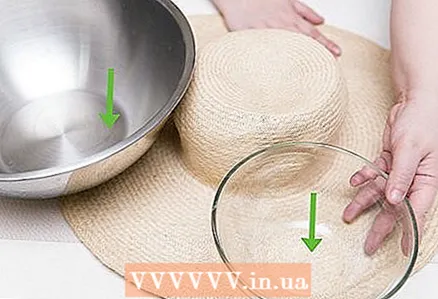
 2 Place your hat on a round object. Instead of a towel, you can take a bowl or other suitable item and place your hat tightly over it. This will give the crown its correct rounded shape.
 - To fix the hat on the object and ensure its guaranteed straightening, any weights, clamps, strings can be used.
- To straighten the hat, you can take any rounded object, but at the same time it must fit perfectly into the crown, otherwise it will not help you.
- If the object is too large, it can damage the hat or deform it further. To straighten your hat, you can use any item of a suitable shape that fits normally in the crown.
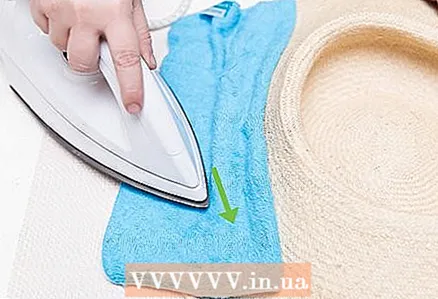 3 Iron your hat on. Place the brim with the back of the hat on the edge of the ironing board. Cover them with a damp cloth. Set the iron to a high enough temperature.
 - Iron the fields through a damp cloth. Do this very carefully and quickly, do not allow direct contact between the iron and the hat. This is very important as you can burn the straw.
- Rotate the hat while stroking it. Then iron the crown. Ironing the crown requires special care and consideration of the style of its decoration. Be careful when using a straw iron. If you don't put a damp cloth between the iron and the straw, you can set your hat on fire.
- Try not to wrinkle or deform the hat anymore, as the straw will be weakened after the first time. With each successive deformation, the hat will become less durable, individual straws will begin to weaken and crack.
Method 3 of 3: Protecting the Hat from Warping
 1 Get a head-shaped hat holder. You can purchase a styrofoam head rest that will hold your hat while you are not wearing it. It will also be the best object for straightening the shape of the hat, as it has the shape of the head.
 - Such a stand is not as difficult to find as you might think. It will be available at most beauty stores and is also used to store wigs. Just ask around these stores for a wig stand.
- After steaming or moisturizing the hat, place it on the head rest. Adjust the hat so that it sits securely on the stand. In the future, just always store your hat on this stand until you wear it.
- To shape the crown of the hat on a styrofoam head, you can use sewing pins and pin the hat to the head with them. The brim of the hat will need to be straightened by hand.
 2 Press down on the brim of the hat with a heavy object. To keep the brim of the hat flat and not start to curl, you can press it down with a heavy object.
 - For example, you can take a small trash can or bucket, turn it over and put your hats on the brim for several hours. Naturally, the diameter of the object taken should easily accommodate the crown of the hat.
- Under the weight of the basket or bucket, the brim of the hat should regain its flat shape. Just be sure to make sure the basket or bucket can hold the crown of your hat so you don't accidentally flatten it.
- This technique is suitable for straightening the deformed brim of a hat, but not for straightening dents on its crown.
 3 Handle your hat neatly. The first step is to make sure that the hat does not wrinkle. There are various techniques for this.
 - When traveling, pack your hat in a hatbox or keep it on your head. Stuffing a hat in a suitcase is a gross mistake.
- Avoid bending the hat too often, as it may lose its shape and break in places. You should not provoke the straw to loosen in any part of the crown or brim of the hat.
- To clean light-colored straw hats, you can use ½ teaspoon of hydrogen peroxide mixed with ½ teaspoon of warm water. To clean dark straw hats, mix ½ teaspoon of ammonia with 1/3 cup of water. You can also rub your hat with a steamed piece of velvet.
Tips
- If the brim of the hat is curled up, iron it gently with an iron to get it back into its even shape.
- Avoid direct contact of the iron with the straw hat.
Additional articles
 How to wear a beret
  How to keep a man's hat etiquette
  How to remove sweat stains from caps and hats
  How to measure height without a measuring tape
  How to remove fabric paint from clothing
  How to determine the temperature of the water without a thermometer How to wash things by hand
  How to fix a lighter
  How to remove dirt from clothes
  How to keep cockroaches away from your bed
  How to quickly clean a room How to remove turmeric stains How to remove greasy or oil stains from clothes
  How to kick a bird that has flown into the street


