Author:
Florence Bailey
Date Of Creation:
25 March 2021
Update Date:
27 June 2024

Content
- Steps
- Part 1 of 3: Getting Started
- Part 2 of 3: Installing the door
- Part 3 of 3: Finishing work
- Tips
Entrance doors do a useful job of protecting the entrance from outside and inside. But when the door is closed, the room can feel dark and stuffy. This is where storm doors come to the rescue. They allow you to open the main door and benefit from additional lighting while keeping out the weather and flying insects with window glass and mosquito nets. The skills and tools required to install a storm door are readily available at the average homeowner's arsenal. So see step 1 to get started.
Steps
Part 1 of 3: Getting Started
- 1 Decide what type of exterior door you would like to install. The first step in installation is to decide what kind of storm door you want. It depends on your personal preference and functionality requirements.
- Do you want a storm door to add security? Interested in ventilation and energy efficiency? Or do you just want to create a specific look? You can purchase storm doors made of metal, wood, or vinyl / plastic, depending on the look you want to install.
- Decide if you need a full opening, a ventilation door or a roller opening. The full opening is similar to a window, the ventilation consists of two glass panels sliding up or down to open the opening, the roller shutter has a lifting mechanism for the opening, which gives both a full view through the opening and ventilation.
- You also need to count on your budget. A standard storm door can cost $ 100-300 (RUR 3,500-10,500) (vinyl or plastic doors are usually cheaper than hardwood or metal doors), and custom doors can cost as much as $ 500 (RUR 17,500).
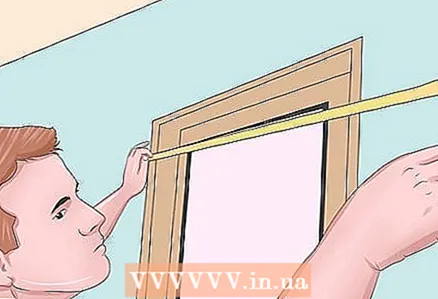 2 Find out the dimensions for your outer door. Before purchasing a storm door, you will need to measure the height and width of your doorway.
 - This will allow you to select the correct exterior door size from a range of standard offers, or if your doorway is non-standard, you can use your dimensions to order a custom door.
- To get the dimensions, measure the width of the doorway from the inside from one side of the trim to the other. And measure the height from the nut to the top edge.
- Do this in three different places, both in width and height, and remember the smallest size, which is what you will use. For more detailed instructions on how to measure the outer door dimensions, see this article.
 3 Collect all tools and materials. Once you've purchased the appropriate storm door and are ready to install, it's time to put all your tools and materials together. You will need:
 - Materials: storm door, # 8 x 1 "(2.5 cm) screws.
- Tools: Drill, hammer, hacksaw, level, screwdriver, goats, spirit level, tape measure.
- Open the storm door box, find the instruction manual. Review the parts list in the instructions and check the contents of the box to ensure that nothing is missing.
- Due to the difference in installation between storm doors, depending on the manufacturer, it is possible to use additional tools and materials.
- 4 Determine the side of the storm door canopy. Before starting, you need to determine the side of the storm door hanging.
- Most exterior doors will be installed on the same side as the front door, however in some cases you will need to hang the door on the opposite side. This may be necessary if there are obstacles that prevent the outer door from opening on one side, such as a mailbox, or poles on the porch.
- Use a piece of duct tape to mark the side of the storm door canopy. This will allow you not to get confused in the future.
Part 2 of 3: Installing the door
 1 Install the drip. The drip tray (also known as the rain seal) is the top of the storm door box. One side has a strip of fabric that keeps moisture out of the storm door.
 - Place the drip along the top of the doorway, pressing it tightly against the brickwork. Use a pencil to mark the holes for the screws, then install the drip tip and drill the holes with a drill.
- Change the position of the drip tip and then insert one screw in the side of the canopy. Leave the rest of the holes unscrewed - you can attach the drip tip immediately after installing the storm door.
- Note: Manufacturers of some storm door models even recommend putting the drip back in place after installing the storm door. If so, then you should refrain from installing a drip. Always follow the manufacturer's instructions.
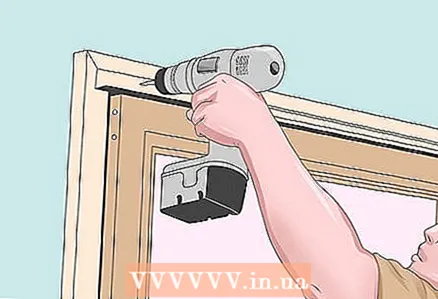
 2 Attach the canopy to the desired side of the door frame. This part of the awning is aluminum and fits over the awning on the storm door.
 - To attach it, lay the door frame on one side with the canopy side up. Take the canopy and trace it along the side of the door.
- Allow 1/8 '' (3mm) allowance for the canopy to extend the top of the door - this will ensure that the drip is cleaned after the door is closed.
- Use a drill to screw in the outer door canopies.
- 3 Cut the canopies to length from the hinge side. After attaching awnings, as a rule, they extend beyond the bottom of the door frame. This surplus must be removed to ensure that the door frame will enter the opening.
- Take a tape measure and measure the height of the doorway from the threshold to the bottom of the drip.
- Use these dimensions to select the appropriate point on the awnings, mark it with a pencil, then use a hacksaw to shorten the length of the hanging bar.
- 4 Adjust the storm door to the size of the opening. Lift the door up and set it to the open position, making sure the top canopy is flush with the drip tip. If you are happy, you can use a level to make sure it is vertical.
- Use a drill to secure the top of the awning with a screw. Make sure the door is level in the opening, then open and close it a couple of times to make sure it can move freely.
- Once you are satisfied with the position of the door, attach the remainder of the awning using a drill and screws.
 5 Measure and cut the profile from the side of the latch. Take the profile for the side of the latch and attach it to the brickwork.
 - If the profile looks outward to the eye, then it is positioned correctly. If it looks inward, turn it upside down. Use tape to mark the top end of the profile.
- Install the profile on the side, use a tape measure to measure the length of the doorway from the threshold to the bottom of the drip. Use these dimensions to mark the bottom of the profile, cut it off with a hacksaw.
- 6 Place the profile on the side of the latch. Press on the profile at the end, making sure that at the top, the profile is pressed against the bottom of the drip.
- Close the outer door and use a tape measure to make sure you have a 3/16 ”(5 mm) profile gap between the latch profile and the outer door.
- Keep the door closed, drill a hole in the top of the profile, secure it with a screw. Repeat this at the bottom and center.
- You can already finish attaching the drip.
Part 3 of 3: Finishing work
- 1 Attach the handles. How to attach the handle to your storm door depends on the type of handle the manufacturer offers.
- Therefore, you will have to find a description of the specific steps in the installation guide provided by the manufacturer.
- In general, make sure the storm door handle does not prevent the door from opening when it is closed. If it interferes, then you will have to rearrange the handle.
 2 Install the opening expander. The expander is used to close the gap between the threshold and the outside of the door.
 - If not installed, slide the black rubber strip (weather strip) along the rails, then cut off the excess. Use pliers to press the ends back down.
- Slide the expander onto the bottom of the outer door to enter the opening and close the door.
- Adjust the expander to close to its maximum, this will provide a tighter seal, preventing rainwater from entering.
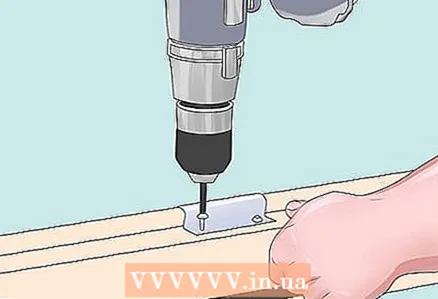
- Pre-drill two holes, then secure the expander with screws on both sides.
 3 Install the closer. Attach the mechanism closer to the inside of the storm door, according to the manufacturer's instructions.
 - Some storm door kits include top and bottom door closers.
- To adjust the speed of the door closer, you can loosen or tighten the screws on the top of the mechanism.Check the speed by opening the door, let it close itself.
 4 Attach the striker plate. The striker plate is the last stage of the work. A good tip to properly align the plank is to open the door and twist the lock.
 - Now gently close the door until the protruding tongue snaps into the frame. Use a pencil to mark the points where the top and bottom of the lock are framed.
- Open the door, and extend the pencil marks into the horizontal lines that outline the plank. Install the striker using these pencil lines for correct positioning.
- Fasten the striker with a few screws, then close the outer door. Make the necessary adjustments.
Tips
- Always measure twice before cutting. This will save you time and frustration.
- Achieve a good look for your hinge and opening profile ends by placing a square piece along the top of the door quarter. Press the metal part tightly against the doorframe. Tighten the metal canopy and move this angle along the length marked on the profile. The thresholds have an external slope to drain water away from the door.


