Author:
Gregory Harris
Date Of Creation:
13 August 2021
Update Date:
1 July 2024
Content
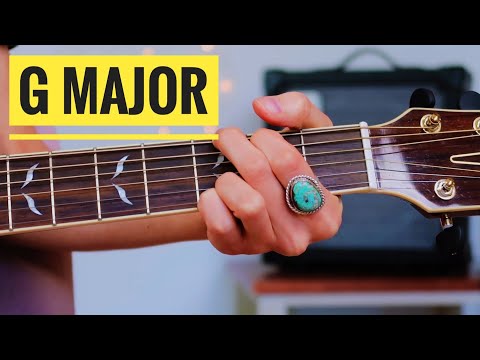
1 With your ring finger, pinch the third fret on the first string (high E). 2 Continuing to keep your ring finger on the first string (see. step 1), place your index finger on the second fret on the fifth string (string A). 3 While holding your ring and index fingers, place your middle finger on the third fret on the sixth string (low E). 4 When chords are recorded on a guitar tablature, each string is represented as a dash line, indicating the frets to be clamped. You can see that on the high E string (at the top of the tablature), you need to clamp the third fret. Find such matches for all other strings. 0 means you are playing an open string, which means the frets are not clamped.
 - E | -3 ---------------------------------------------- -----------------------
- B | -0 ---------------------------------------------- -----------------------
- G | -0 ---------------------------------------------- -----------------------
- D | -0 ---------------------------------------------- -----------------------
- A | -2 ---------------------------------------------- -----------------------
- E | -3 ---------------------------------------------- -----------------------
5 While playing a chord, play all the strings, and make sure that each string sounds clear. Make sure the sound is clear - if the note sounds unclear or muffled, correct the position of your fingers. Make sure you don't accidentally muffle strings that you want to play open with your fingers.It will take time to develop muscle memory and finger coordination to play just the right frets on each string. Practice until the chord is clear. 6 Learn to immediately place your fingers in the chord position. Take your hand off the guitar, and then place your hand in the chord position. Do this until it comes naturally. You can also practice moving from this chord to another chord to accommodate your fingers for changing positions. Method 2 of 2: Alternative fingerings
- 1 You can also play the high E string with your little finger. Like the standard fingering, the following fingering is also fairly common:
- Use your pinky to hold the third fret of the high E string.
- With your ring finger, grasp the third fret of the low E string.
- With your middle finger, grasp the second fret of the A string.
- 2 Play a D chord at the 7th fret. Take the D chord position and move your fingers to the seventh fret, keeping them on the three high strings. In this position, you play the G chord.
- 3 Play a G chord with a barre. If you know how to play the barre, the G chord is played at the third fret. It takes a little finger stretching and practice, but the barre chords make it even easier to play the songs on the guitar. Basically, a barre chord is an F chord that moves across the fretboard to other notes. To play it, use the basic fingering:
- The first finger grips the low E string, the B string, and the high E string at the third fret.
- The pinky and ring finger grip the A and D strings at the 5th fret.
- The middle finger grips the G string at the fourth fret.
- 4 Play a G7 seventh chord instead of a simple G chord. Use the first basic fingering of the chord, but move your finger from the third fret of the high E string to the first, and play all strings in the same way. The seventh step will give the sound a more bluesy touch.
Tips
- Practice every day.
- Remember - playing the guitar should be fun. Don't make it a competition.
- Be patient. It takes time to play well.
- Learn a song that uses a G chord - learning chords is much more fun if you play them in your favorite songs.
- Learn chords while training your finger stretches. A good stretch will make it much easier to play the G chord and other chords.


