Author:
Sara Rhodes
Date Of Creation:
9 February 2021
Update Date:
27 June 2024

Content
- Ingredients
- Curry Roux
- Curry base
- Side dishes and additional dishes
- Steps
- Method 1 of 3: Preparing the base
- Method 2 of 3: Making a roux
- Method 3 of 3: Finishing the curry
- What do you need
Japanese curry can be made in several different ways, but in general it is made by adding curry rue to a main meat, vegetable or gravy dish. The whole thing is then gradually cooked over low heat and served with rice.
Ingredients
For 3-4 servings
Curry Roux
- 4 tablespoons (60 ml) butter
- 7 tbsp (105 ml) flour
- 2 tbsp (30 ml) curry powder
- 2 tablespoons (30 ml) garam masala
Curry base
- 450 g beef, pork, chicken fillet, cut into small pieces
- Salt and pepper to taste
- 1 tablespoon (15 ml) vegetable oil
- 3 tbsp (45 ml) ketchup
- 3 cups (750 ml) water
- 1 large onion, peeled and coarsely chopped
- 3 carrots, peeled and diced
- 1 small apple, peeled and grated
- 1 large potato, peeled and cut into small pieces
- 1 cup (250 ml) fresh or frozen edamame, peeled
Side dishes and additional dishes
- Parboiled rice
- Fukujinzuke
- Rakkuyu
Steps
Method 1 of 3: Preparing the base
 1 Season the meat. Sprinkle the meat with 1/2 tsp. (2.5 ml) salt and 1/4 tsp. (1.25 ml) ground black pepper or season to taste. Set aside.
 - If you have one large piece of meat, cut it into 1/2-inch cubes before seasoning. You can also dry it dry with clean tissues or paper towels.
- Curry can be cooked in the same way, no matter what kind of meat you choose (beef, pork, or chicken), but you may want to use the spices to taste. For example, many people like to add more spice to their pork curry. You can do this by increasing the amount of pepper, or by sprinkling the base with chili sauce before making the roux.
- If you decide to cook your chicken in curry sauce, go for dark chicken pieces such as thighs. Remove the skin before placing the chicken in the pot.
- Alternatively, you can skip meat altogether and make a vegetarian curry by following the steps below.
 2 Heat vegetable oil. Pour vegetable oil into a large heavy saucepan and heat over medium heat. Give it a minute or so to warm up well.
 - Note that you must use a heavy-bottomed, thick-walled saucepan to prevent the curry from burning. The pot should also be large enough to hold 5 liters.
- For a richer flavor, use butter or ghee instead of vegetable oil. Ultimately, it will generally be very difficult to notice a difference in taste, as curry aromas tend to overwhelm any minor taste differences.
 3 Add onions. Place the chopped onion in hot oil and cook for about 5 minutes, stirring frequently, or until soft and translucent. Temporarily remove the onion from the pot and place it on a nearby plate.
 - If your pan is wide enough, you can simply press the onion to one side instead of removing it completely. The main thing is to keep the boiled onions separate from the meat during the cooking process.
 4 Stir the meat. Add the meat to the pot. Let the slices simmer on one side for 1-3 minutes, or until they are browned on the other side. Then continue simmering for another 5-7 minutes, or until all sides are lightly browned.
 - The ruddy meat ultimately adds flavor to every bite.
- If you decide to leave the onion in the pan while you cook the meat, ignore it. Onions can turn brown and still taste good, but if they go from dark to dark brown, remove them immediately before they burn.
 5 Add the rest of the main ingredients. Return the onion to the pot. At this time, you should also add ketchup, water, carrots, and grated apple. Mix well.
 - Note that the only main curry ingredients that don't need to be added at this point are potatoes and edamame.
 6 Simmer for 20 minutes. Reduce heat to medium to low until the liquid is barely simmering. Cook, uncovered, for 20 minutes. Stir the mixture from time to time to prevent sticking or scorching.
 - Once the curry base starts to simmer, you should start making the curry rue.
Method 2 of 3: Making a roux
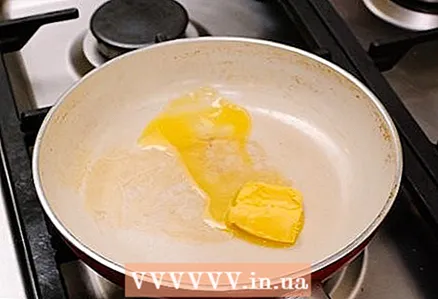 1 Melt the butter in a separate skillet. Add butter to a small skillet. Heat over medium heat, stirring occasionally, until the butter is completely melted.
 - To save time, you can skip the instructions on how to create your own curry rue and use the ready-made cubes you buy. You will need about 4 cubes or 100 g to replace the amount of curry ru needed for this recipe. Add them to your curry when you make your roux at home.
- Do not melt butter over high heat. Oil tends to evaporate when it reaches its boiling point. If you allow it, you will end up with hot, scalding oil splashes. The fats in the oil can also begin to break down, thereby affecting the flavor of the curry rue.
 2 Add flour. Pour flour into melted butter. Stir it in oil quickly and cook for 15-20 minutes, or until the roux is deep ruddy.
 - Stir the roux constantly during cooking, at least until the butter and flour mix and begin to flow. From now on, keep stirring the ru often.
- If you fail to stir the roux in time, it will quickly burn and start to give off a bad taste.
- Flour should be thoroughly mixed. If you don't fry the flour enough, it will retain a strong starchy flavor.
 3 Add spices. Add curry and garam masala to the roux. Stir the ingredients in the roux over the fire for about 30 seconds. Move the pyrolysis away from the fire as soon as you refuel it.
 - You will know that the spices have already melted into ru by their strong aroma.
 4 Scoop the preparation liquid into the ru. Remove about 1/2 to 1 cup (125 to 250 ml) of liquid from the curry base. Stir this liquid quickly into the roux until the paste is the desired consistency.
 - Add a little liquid first and stir in gradually. You need to use quite a bit to make a paste. If you add too much at once, mixing the liquid with the roux can become tricky.
Method 3 of 3: Finishing the curry
 1 Add ru to the base. Stir well to combine the roux with the liquid in the saucepan.
 - If you are adding purchased curry cubes instead of homemade curry, add them now. Break the cubes into several smaller pieces. Remove the pan from heat temporarily and add the cubes to the liquid, stirring well, until they are completely dissolved.
 2 Stir the potatoes and simmer. Add the peeled and chopped potatoes to the pot and stir to distribute them evenly. Continue simmering the curry over low heat for 1 hour, or until the meat and potatoes are tender and the curry is very thick.
 - Spend a full hour making curry with beef or pork. If the curry is with chicken, you will only need to simmer it for 30-45 minutes to keep the chicken from digesting and drying out.
 3 Mix with edamame. If you decide to add edamame, mix them within 5 minutes of the cooking process.
 - You can add the green pea curry if the mom is not there, or you can skip this part altogether.
- Make sure the edamama has been removed from the sinks before adding them to the curries.
 4 Serve. Divide curry into separate dishes. It is served with white or brown rice. Garnish with finely chopped fukujinzuke or rakku, if desired.
 - Traditionally, Japanese curry is served in one of two ways: you can put the curry sauce in a separate bowl and serve a separate rice dish with it, or you can put the rice on a dish and cover half of the curry dish.
- It is worth noting that fukujinzuke is a sweet mixture of pickled vegetables, and which is a small pickled shallots.
- If you wish, you can store the excess curry by freezing it, but then you need to cook it without potatoes if you intend to do so. Potatoes, first frozen and then defrosted, turn into an unappetizing mess. Boil the potatoes separately and add them to the frozen curry after heating.
- To freeze curry, place a portion in the freezer - in a resealable plastic bag. Make a date stamp on the contents of the package. Repeat for the remaining curry, preparing a bag for each individual serving.
 5finished>
What do you need
- Plate
- Sharp kitchen knife
- 5 liter heavy saucepan
- Heat-resistant mixing paddles or spoons
- Small frying pan
- Ladle or serving spoon
- Selected dishes
- Freezer - Safe Plastic Bags (Storage Only)


