Author:
Ellen Moore
Date Of Creation:
11 January 2021
Update Date:
1 July 2024

Content
- Steps
- Method 1 of 4: How to take a screenshot of the entire screen
- Method 2 of 4: How to take a screenshot of a portion of the screen
- Method 3 of 4: Using the Viewer
- Method 4 of 4: Using a terminal
- Tips
Screenshots (screenshots) are useful when you need to share information with someone or troubleshoot problems. MacOS has several utilities for taking screenshots, and the process itself can be controlled.
Steps
Method 1 of 4: How to take a screenshot of the entire screen
 1 Click on ⌘ Command+⇧ Shift+3. A shutter sound will be heard and a screenshot of the entire screen will be taken.
  2 Find the screenshot you just created. It (PNG file) is located on the desktop, and its name consists of the date and time of creation.
  3 Click on ⌘ Command+Control+⇧ Shift+3to copy the screenshot to the clipboard. This will simply copy the screenshot to your clipboard, rather than saving it to your desktop.
 - To insert a screenshot into a document or program window, open the document / program and click ⌘ Command+V.
Method 2 of 4: How to take a screenshot of a portion of the screen
 1 Click on ⌘ Command+⇧ Shift+4. A crosshair appears instead of the cursor.
  2 Hold down the mouse button and drag your crosshair across the screen to create a frame. A screenshot of the screen area inside the frame will be taken.
  3 Find the screenshot you just created. It (PNG file) is located on the desktop, and its name consists of the date and time of creation.
 - Click on ⌘ Command+Control+⇧ Shift+4to copy the screenshot to the clipboard instead of saving it to your desktop.
 4 Take a screenshot of a specific window. To take a screenshot of the entire window instead of the entire screen, press ⌘ Command+⇧ Shift+4and then press Space... The crosshair will turn into a camera icon. Now click on the desired window.
 - The screenshot will be saved to your desktop.
Method 3 of 4: Using the Viewer
 1 Start View. If you don't like working with keyboard shortcuts, or if you need a file format other than PNG, use Preview.
 - To launch the program, open the Applications folder, the Utilities folder and click View.
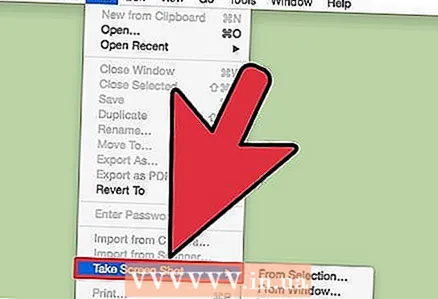 2 Open the File menu and choose Take Screenshot. Selecting the "Selected" option turns the cursor into a crosshair that can be used to outline an area of the screen and take a screenshot of it. If you select the "Window" option, the cursor will turn into a camera icon - now click on the window you want to take a screenshot of. If you select the "Full Screen" option, a screenshot of the entire screen will be taken.
 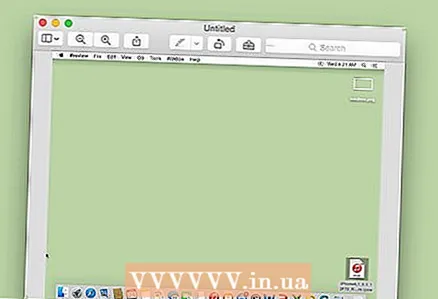 3 View the screenshot. When you take a screenshot, it appears in the Preview window. Now look at the screenshot and make sure it has everything you need, and there is nothing superfluous.
 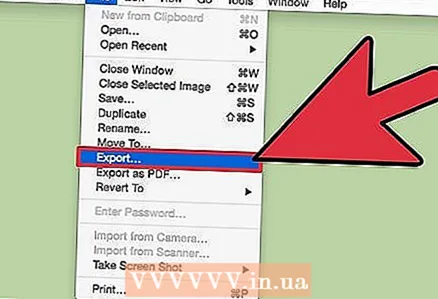 4 Save the screenshot. Open the File menu and select Export As. Now in the window that opens, select the target file format including JPG, PDF and TIFF.
Method 4 of 4: Using a terminal
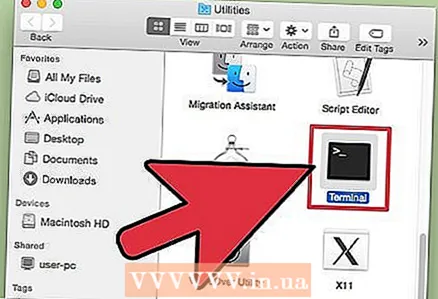 1 Open a terminal window. To do this, open the Applications folder, the Utilities folder and click Terminal.
 - In the terminal, you get additional features such as a timer or the ability to mute the shutter sound. You can also use SSH in the terminal to take snapshots of complex screens such as login windows.
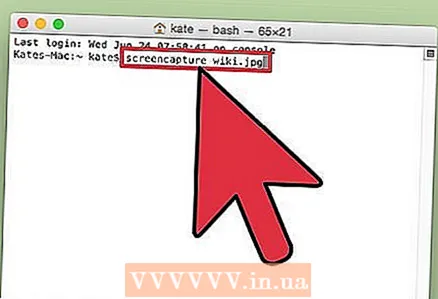 2 Take a simple screenshot. Enter screencapture File name.webp and press ⏎ Return... The screenshot will be saved in your home directory. You can enter the path in front of the file name if you want to change the folder for saving the file.
 - To change the format, enter screencapture -t png File name.png... Use as format pdf, gif or tiff.
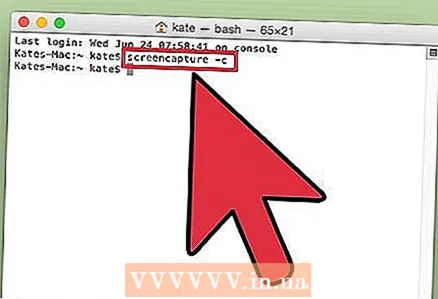 3 Copy the screenshot to the clipboard (if necessary). To do this, enter screencapture -c and press ⏎ Return.
 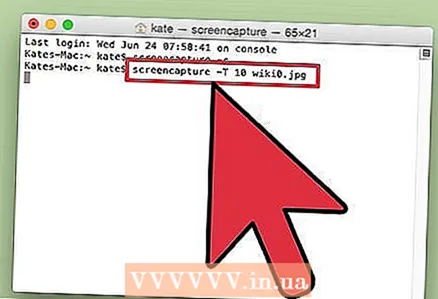 4 Add a timer to the command to take a screenshot. The standard command for taking screenshots allows you to take a screenshot instantly, which leads to the opening of a terminal window. Use the timer to temporarily hide the terminal window and display the content you want to screenshot on the screen.
 - Enter screencapture -T 10 File name.webp and press ⏎ Return... The screenshot will be taken with a 10 second delay. Number 10 can be changed to any other.
Tips
- There are programs that prohibit taking screenshots of their windows. Typically, video players and games are protected to prevent unauthorized copying of content.


