Author:
Alice Brown
Date Of Creation:
27 May 2021
Update Date:
1 July 2024

Content
- Steps
- Method 1 of 3: Using silicone and liquid soap
- Method 2 of 3: Using silicone and cornstarch
- Method 3 of 3: Using a two-piece silicone mold
- Tips
- Warnings
- What do you need
- With silicone and liquid soap
- With silicone and cornstarch
- With 2-component silicone
Silicone molds are popular with foundry workers because they are very easy to use, and you will need very little release agent for the mold. Although many shapes and sizes and configurations can be found on the market, it is difficult to find the right one when you need to create a custom product. In such a situation, do not give up, because you are able to independently build a suitable shape. You can always buy a set for making a two-component silicone mold in the store, so making it at home will be much cheaper!
Steps
Method 1 of 3: Using silicone and liquid soap
 1 Pour water into a bowl. The water should be at room temperature - not too hot or too cold.Take a bowl deep enough so that you can lower your hand into it.
  2 Pour some liquid soap into the water. Any liquid soap can be used, including body, hand, or laundry soap. Stir constantly to dissolve the soap completely and stop leaving streaks on the surface of the water.
 - For every 1 part of soap, use 10 parts of water.
- You can also add liquid glycerin. In the process of reaction with silicone, it improves the adhesion of the latter.
 3 Squeeze some construction silicone into the water. Buy a tube of non-additive silicone from a home improvement store; choose one that doesn't dry too quickly. Squeeze enough silicone into a bowl to completely cover the item you want to end up with.
 - Construction silicone is also sometimes labeled as a silicone sealant.
- It is necessary to purchase a syringe for sealing seams, if it is not included in the kit, screw it onto the tube, cut the tip on the tube, screw on the tip and then poke a hole in it.
 4 Mix the silicone with water. Put on a pair of plastic gloves and dip your hands into the water. Take the silicone in your fist and squeeze. Knead it under water for about 5 minutes, until it stops sticking.
  5 Form the resulting mass into a thick disk. Take it in the palm of your hand and roll it into a ball. Then press the ball against a flat surface and push lightly from the top. The resulting pancake should be thicker than the item you want to shape.
 - If the silicone sticks to your hands, apply a thin layer of liquid soap to your hands and work surface.
 6 Press the object you want to take the impression into the silicone. Press the product face down. Gently press the edges of the mold against the product so that there are no gaps.
  7 Wait for the silicone to dry. Silicone never hardens and always remains elastic. Just wait a few hours for it to dry but remain flexible enough to bend.
  8 Take the product out of the mold. Take the mold in your hands and bend its edges away from the product. This will weaken the adhesion force, and it will easily break out of the mold. Turn the mold upside down and release the product.
  9 Using the form. Fill the mold with clay, then remove and let dry. Alternatively, pour resin in, wait until it hardens, and remove.
Method 2 of 3: Using silicone and cornstarch
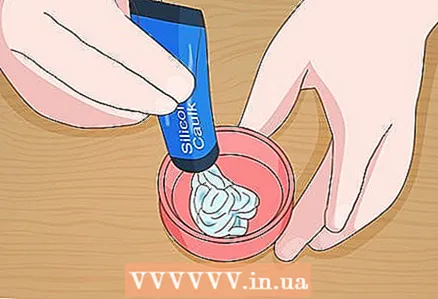 1 Squeeze some construction silicone into a container. Buy a tube of non-additive silicone, usually sold in tubes, from a home improvement store. Squeeze some silicone into a disposable container. You need to take so much that you can completely cover the copied item.
 - Construction silicone is also sold under the name silicone sealant.
- If you bought silicone in a large tube, you need to purchase a special sealing gun, insert the tube into it, cut the tip, and then make a hole in the tip.
 2 Keep in mind that there should be twice as much silicone as cornstarch. If you can't find cornstarch, use cornmeal or potato starch. Keep the box close in case you need to add more powder.
 - Add a few drops of acrylic paint to make a colored mold. This will not affect the properties of the finished form in any way.
 3 Put on plastic gloves and knead the ingredients. Knead until the silicone and cornstarch are combined to a viscous putty consistency. At first, this mass will be dry and crumbly, but after a while it will reach the required density. If the putty is too sticky, add more cornstarch to the grout.
 - It's okay to have some cornstarch left in the bowl. The silicone will absorb as much starch as it needs.
 4 Form the putty into a thick disc. Take the putty in the palm of your hand and roll it into a ball.Press it against a flat surface and press down lightly. The resulting pancake should be thicker than the item you want to shape.
  5 Press the product you are removing into the putty. Make sure to press the right side of the garment into the mold while keeping the back in plain sight. Use your fingers to press the edges of the mold against the piece, otherwise the shape will be slightly inaccurate.
  6 Wait for the silicone to harden. After waiting 20 minutes, you can proceed to the next step. Silicone should be flexible, but at the same time not lose shape if pressed or crumpled on it.
  7 Take the product out of the mold. Take the mold in your hands and bend its edges away from the product. Turn the mold upside down and release the product. Use your fingers to remove the item from the mold if necessary.
  8 Use a form. Fill the mold with wet clay, then remove and let dry. Alternatively, pour resin in, wait until it hardens, and remove. Remove the castings from the mold in the same way as the original object.
Method 3 of 3: Using a two-piece silicone mold
 1 Buy a silicone mold making compound. You can find these kits at specialized stores for casting and mold making supplies. Sometimes they can also be bought at arts and crafts stores. Most of these kits contain two containers labeled Part A and Part B, but you may need to purchase them separately.
 - Do not mix silicone yet.
 2 Cut off the bottom of a plastic food storage container. Find a cheap thin plastic container. Cut off the bottom with a blade. Don't worry about the quality of the cut edge as it will end up being the top of the form.
 - Choose a container that is slightly larger than the item being copied.
 3 Overlap strips of tape through the neck of the box. Remove the lid from the container. Cut a few long strips of packing tape and attach them to the side of the container lid. The overlap should be approximately 0.5 centimeters. Leave a couple of centimeters of tape hanging down the sides of the container.
 - Slide your finger along the edge to improve the fit.
- Make sure there are no gaps or the silicone will spill out.
 4 Fold in the edges of the tape on all sides of the container. Fill the container with silicone and be prepared for some leakage from under the tape. Tucking in the edges will help prevent silicone leakage and, as a result, damage to the workplace.
  5 Place the item (s) you want to copy into the container. Place the container on a flat, stable surface with the cut / open side up. Place the product in the box and press it against the tape. The products must not come into contact with the walls of the container or with each other. It is also very important to place the products face up and press the back against the tape.
 - This casting method is best for flat products.
- Clean the products beforehand if necessary.
 6 Measure out the required amount of silicone according to the manufacturer's instructions. In any case, it will be necessary to mix parts A and B. Some silicones are measured by volume, while others are measured by weight. Read the instructions carefully and only then proceed.
 - Pour the silicone into the included cup. If not included, use a plastic disposable cup.
- It is necessary to take enough silicone to cover the product from all sides with a layer of at least 0.6 centimeters thick.
 7 Mix the two parts until the color of the mass is uniform. You can use a skewer, ice cream stick, plastic fork, spoon, or knife to mix. The color of the thoroughly mixed silicone must be uniform and free of colored streaks.
  8 Pour the silicone into the container. Try to scrape any excess silicone off the sides of the cup so you don't waste it.The silicone layer should cover the top of the product by at least 0.6 centimeters. If the layer is too thin, the silicone mold may break.
  9 Leave the silicone to cure. The setting time depends on the selected brand. Some silicones can be used after a few hours, while others dry overnight. The setting time can be found in the instructions that come with the kit. During this time, do not touch the form or move it.
  10 Remove the silicone mold. When the silicone has hardened, remove the tape from the box. Pull out the silicone mold carefully. Thin "feathers" of silicone can be seen around the perimeter of the form. If they bother you, cut them off with scissors or a blade.
  11 Extract the items. The silicone fits snugly around the items immersed in the box. To release them, gently bend the edges of the silicone. This process is similar to removing cubes from an ice maker.
  12 Use a form. Now you can fill the mold with resin, clay, and even chocolate (if, of course, the silicone you are using is suitable for this purpose). If you are using clay, you can reach the item while it is still damp. The resin must be completely cured before it can be removed.
Tips
- To prevent anything from sticking to the silicone, it would be a good idea to spray a special plasticizer on the inner surface of the mold before pouring resin into it.
- Molds made with construction silicone and liquid soap or cornstarch are not suitable for baking in the oven and making candy. This silicone cannot be used for food.
- If you need to make a mold for fondant or chocolate, you should purchase a silicone two-component compound. Read the label and make sure it is food safe.
- 2-component molds last longer than those made from construction silicone, as they are made with professional injection molding components.
- Silicone molds do not last forever, and sooner or later they will collapse anyway.
- 2-part silicone molds are best for resin casting.
Warnings
- Try not to touch the construction silicone with bare hands to avoid skin irritation.
- Construction silicone gives off vapors that are harmful to health. There must be good ventilation in the work area.
What do you need
With silicone and liquid soap
- Water
- Liquid soap
- A bowl
- Item to be removed from
- Polyethylene gloves
Construction silicone or sealant
With silicone and cornstarch
- Disposable container
- Cornstarch or cornmeal
- Item to be removed from
- Polyethylene gloves
- Construction silicone or sealant
With 2-component silicone
- 2-piece silicone set
- Disposable cup
- Mixing device
- Plastic food container
- Blade
- Packing tape
- Item to be removed from


