Author:
William Ramirez
Date Of Creation:
19 September 2021
Update Date:
1 July 2024

Content
This detailed guide shows you how to create a quilted wall panel step-by-step to decorate the exterior of a building. In order to help you, we have included in this article a list of necessary materials, instructions and necessary illustrations.
Steps
 1 Collect in one place all the materials and tools you need to work. They are listed below.
  2 Take 4 strips of 5x10 centimeters and align them with the edges of the plywood sheet. You will have a wooden frame that you need to attach to the sheet with eight wood screws and a drill.
  3 Apply a coat of white outdoor primer to the plywood surface and allow to dry completely. In total, you will need to apply four coats of paint.
  4 Using a ruler and measuring tape, draw lines with a pencil on the painted surface. The surface should be divided into squares measuring 30x30 centimeters. After that, use a ruler to draw the diagonals so that you get the pattern shown in the illustration.
  5 Starting at the center of the sheet, place masking tape on the lines of the pattern. Use a razor or utility knife to position the strips neatly in relation to the center.
 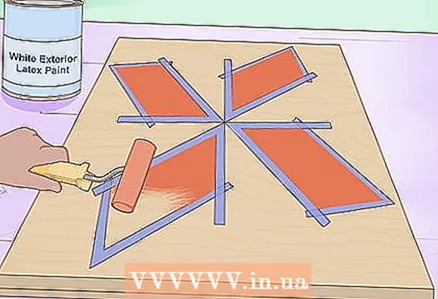 6 Take a clean paint roller and apply the desired color of outdoor latex paint to the area bounded by the tape. Let the paint dry and apply a second coat (you will need to repeat the process four times).
  7 To prevent paint from seeping under the tape, draw a thin line along the edge of the tape with paint of the same color with which the space under the tape is painted. Thus, if the paint seeps under the tape, it will match the background color. (Always start with a lighter paint).
  8 The next steps will repeat the previous one. Apply masking tape very carefully and remember not to work with several paints at the same time. You need to be patient and allow each color to dry completely before you start working on the next color. Use a clean paint roller for each paint.
  9 Now you can tape the edges around the outer perimeter and proceed to painting the frame of your panel. Also, now you have the opportunity to correct the flaws that have arisen during the coloring process.
  10 Remove the tape and admire the result of your work! Hang the mural on the façade of a barn, house, or other building.
Tips
- Allow the paint from the previous coat to dry completely before applying another coat.
- Press down firmly on the masking tape as you glue it to the plywood to prevent paint seeping underneath.
- Do not hurry. Roller too quickly will drip paint onto other surfaces of your panel.
- Most importantly, get creative and enjoy the creative process!
What do you need
- High quality extruded plywood for outdoor use (120x120 cm).
- 4 slats made of treated wood 115 centimeters long, 10 centimeters wide and 5 centimeters thick.
- White latex primer for outdoor use
- Outdoor latex paint (four colors)
- Masking tape
- Ruler or tape measure
- 8 wood screws and a drill
- Paint roller or brush
- Razor or utility knife


