Author:
Virginia Floyd
Date Of Creation:
6 August 2021
Update Date:
1 July 2024
Content
- Part 2 of 4: Pressing the olives
- Part 3 of 4: Getting the oil
- Part 4 of 4: Storing the Oil
- Tips
- Warnings
- What do you need
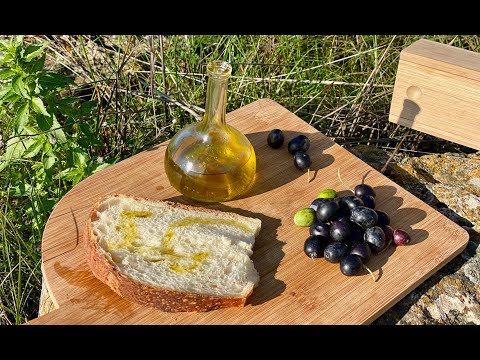
- Ripe olive oil contains more nutrients than unripe olive oil, but in terms of taste and smell, they are about the same.Also keep in mind that unripe olives produce a greenish oil, while ripe olives produce a golden color.
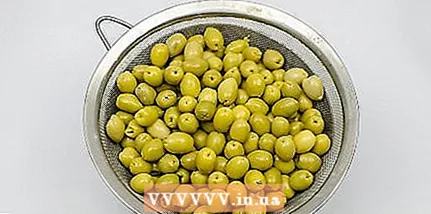 2 Wash the olives thoroughly. Place the olives in a colander and rinse them under cold running water. Rinse the dirt off the olives with your fingers.
 - Remove all leaves, twigs, and pebbles along the way. This debris can spoil the oil and damage the equipment that will be used to prepare it.
- After washing the olives, wait for the excess water to drain and pat dry with clean paper towels. It is not necessary to wipe the olives dry, as the water will still separate from the oil later on. However, they should not be very wet, especially if you are not going to immediately process them into oil.
 3 Use olives within a few days. It is best to squeeze the oil on the day you buy the olives. This can be done within two to three days, but after prolonged storage the olives lose their taste, which will certainly affect the quality of the oil.
 - If you want to make oil later than on the day you buy the olives, put the olives in an open plastic or glass container and store in the refrigerator.
- Before using, crush the olives that have been in the refrigerator to check their condition. Discard rotten, shriveled, or overly soft fruits.
Part 2 of 4: Pressing the olives
 1 Squeeze out the oil in separate portions. Although you are going to produce a relatively small amount of oil (500 ml), it is best to divide the olives into three to four servings depending on the size of your equipment.
  2 Place the olives in a shallow bowl. Take a shallow dish and place the washed olives in it, preferably in one layer.
 - When making homemade olive oil, it is best to use a bowl or similar dish with high sides, rather than just a flat plate. Although the first crushing of olives will not release much liquid from them, it is still better to use dishes that will not allow the liquid to drain out. A bowl works better than a plate in this case.
 3 Grind the olives into a paste. Take a clean mortar pestle or potato grinder and begin kneading the olives, turning them into a thick paste.
 - You can also crush the olives with a meat hammer. A metal or plastic hammer is recommended. Do not use a wooden one, as it can absorb some of the liquid. You can crush the olives with both sides of the hammer.
- It is best to remove the seeds at this stage, as they are quite fragile and you can crush them into a paste. This will not affect the quality of the oil, but seed particles can damage electrical appliances that will be used to prepare the oil in the future.
- Crush the olives thoroughly. You should have a thick, shiny mass. The presence of gloss means that the pressure caused the oil to come out of the pulp of the olives to the surface.
- 4 Transfer the pasta to a large, tall mug. Take a large, tall mug, glass, or similar container and fill it one-third full of the paste.
- You can leave the pasta in the bowl as well, but it can be easily sprinkled during the next step, so it's best to use a tall mug to avoid messing up your workspace too much.
- You can also transfer the pasta to a powerful stationary blender. Fill the blender one third or half full.
- 5 Pour water into a mug of paste. Use 2–3 tablespoons (30–45 ml) of hot water for 1 scoop (250 ml) of olive paste. Stir the contents of the container quickly to distribute the water evenly and allow it to settle to the bottom of the mug.
- Add just enough water so that the olive paste mixes better, no more. Of course, you do not need to completely fill the container with the paste with water.
- The water should be hot, but not boiling. More oil should come out of the paste due to the high temperature of the water. It is better to use filtered or distilled water. Tap water can be dirty.
- The water you added will separate from the oil later.
- 6 Grind the paste with a hand blender. Take a hand blender and start grinding the paste until bubbles of oil start to come to the surface.
- Grind the paste for 5 minutes. If you do this for longer, you will get more oil, but it will oxidize more, which can shorten the shelf life of the product.
- If you haven't removed the pits while crushing the olives, use a powerful blender. Otherwise, bone particles can damage the blades of the appliance. If you have removed the pits, you can use a medium blender.
- You can also use a stationary blender at this stage, but you will need to stop it once a minute to check if the pasta has been ground sufficiently.
- In professional oil production, this process is called pressing or squeezing. Its essence is to squeeze oil out of crushed olives.
Part 3 of 4: Getting the oil
- 1 Stir the olive paste until the oil separates from it. Stir the olive paste thoroughly with a spoon for a few minutes until the small bubbles of oil begin to turn into puddles.
- Try stirring the paste in a circular motion. With each movement, more oil will come out of the solid components of the paste.
- This step is also part of the oil squeezing process, but in manual production, the emphasis is not on high mixing speeds, but on continuous circular motions to separate the components of the paste from each other.
- 2 Leave the oil to settle. Cover the bowl with a clean tea towel, paper towel, or lid. Leave the contents to stand for 5-10 minutes.
- After the butter has settled, the oily layer will become even more visible on the surface of the paste.
 3 Place a piece of cheesecloth on top of a large sieve. Cut a piece of cheesecloth about twice the diameter of the sieve and place it in the center of the sieve. Then place the strainer in a large bowl.
 - A fine mesh sieve is best for this task, but if you are going to use a plastic colander with noticeably wider openings, the gauze will filter out large pieces of the paste.
- If you don't have gauze, try using large sheets of filtered paper or clean (never used) ink filters.
- 4 Spoon olive paste onto cheesecloth. Spoon the olive paste (both liquid and lumps) and place it in the center of the cheesecloth. Wrap the pasta by gathering the edges of the gauze together. You should end up with something like a pouch.
- The gauze should completely cover the paste. If the piece of cheesecloth is not large enough, use smaller portions of the pasta.
- 5 Place the bag under the oppression. Place a block or other weighty object on top of the bag of pasta. The object must be heavy enough to create constant pressure on the pouch.
- If you are concerned about sterility, wrap the item in cling film before placing it on the pouch.
- You can also place a small bowl on top of the bag that fits into the sieve. Fill it with dry beans or other heavy material that will create constant pressure.
- 6 Wait for the liquid to drain. Leave the bag under pressure for at least 30 minutes to drain the olive oil, olive juice and water. All liquid will collect in a bowl under a sieve.
- Every 5-10 minutes, gently but firmly press down on the bag with your hand to help the oil drain away.
- When a lot of liquid has accumulated in the bowl, and the cake looks relatively dry in the bag, proceed to the next step. At the end of the extraction, the cake can be thrown into the trash.
- 7 Collect the oil. Dip the end of a kitchen syringe or syringe into the collected liquid and gently suck in the top layer, leaving the bottom layer in the bowl. Transfer the collected liquid to a separate glass.
- Due to the lower density, the oil should naturally separate from the rest of the liquid and float to the surface.
- Learning how to collect oil with a syringe without allowing water and olive juice to enter takes practice. After pumping the oil into the syringe, see how many layers of liquid there are. If it has two layers, push out the bottom layer of water, leaving the top layer of oil.
Part 4 of 4: Storing the Oil
 1 Pour olive oil into a clean bottle. Insert a funnel into the neck of the glass bottle and pour in the oil.
 - Glass bottles, especially colored glass, are best for storing oil. Colored glass protects the contents of the bottle from exposure to sunlight. If you do not have a glass bottle, use a plastic container.
- Before using the bottle, wash it with dish soap and warm water, then rinse thoroughly and pat dry with a towel.
- 2 Cork the bottle. Remove the funnel and insert an appropriately sized stopper into the neck or close the bottle with a screw cap.
- The cover material does not matter. The main thing is that the bottle is tightly sealed.
- Gently wipe off any oil left on the bottle after pouring. Small drops can be wiped off with a paper towel. It is better to wipe off large splashes with a tea towel soaked in soapy water, then wipe the bottle with a clean, wet rag and finally walk with a dry rag.
 3 Store oil in a cool, dry place. The oil is received and ready to eat. Store the bottle in a cool, dry place such as a pantry or closet.
 - Homemade olive oil does not last as long as purchased olive oil. Use it within 2-4 months. During this period, it must retain its original qualities. By the fifth month of storage, it will most likely not be so tasty.
Tips
- If grocery stores in your city do not sell fresh olives, look at specialty gourmet stores. At worst, you can order olives on the Internet, but the shipping costs can be quite high, since you need to deliver the fruits quickly before they go bad.
Warnings
- During the process of obtaining oil, you can pretty dirty the space around you. Wear clothes you don't mind or an apron over your clothes. Also press and extract the oil in a room that can be easily washed.
What do you need
- Colander
- Paper towels
- Large shallow pan
- Meat hammer (metal or plastic)
- Tall mug or glass
- Hand or stationary blender (preferably high power)
- Stirring spoon
- Gauze
- Fine mesh sieve
- Large bowl
- Medium bowl
- A block or other weighty object of a similar shape
- Cling film
- Large syringe or kitchen syringe
- Funnel
- Glass bottle with a volume of 0.5 l
- Plug or screw cap
- Apron


