Author:
Janice Evans
Date Of Creation:
2 July 2021
Update Date:
23 June 2024

Content
1 Cut a rectangle out of the paper - this will be the base of your mask. Measure the distance along the face from one temple to the other. Also measure the height of your face from your nose to your hairline. Based on the measurements, draw a rectangle on a piece of paper and cut it out.- Use a measuring tape.
- This will be the base of the mask, so it is best to use regular printer paper. Later, you use prettier paper.
- As a rule, paper masks are made in a masquerade style, so that they cover only the upper half of the face.
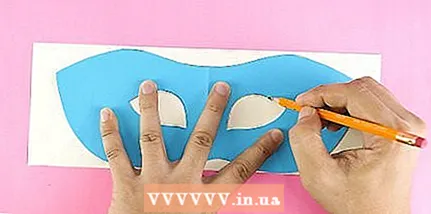
 2 Fold the paper in half and draw half of the mask on it. Fold a piece of paper in half along the long edge and line up the short edges. Draw half of the mask on the resulting rectangle, so that its middle matches the curvature of the paper. Fill the entire rectangular area with the pattern.
 - Make the mask curved towards the bottom edge of the fold. As a result, you will have a notch for the nose, and the mask will be more comfortable to wear.
- Can't decide what shape to give the mask? Place your palm on the paper with your wrist touching the folded edge and trace around it.
3 Mark the holes for the eyes. Measure the distance between the inner corners of the eyes and divide by 2. Draw an eye cutout at this distance from the fold of the paper. While this cutout can be shaped to any shape, it is best to make it in the form of an amygdala or a cat's eye. Cut holes slightly larger than your eyes to make the mask comfortable to wear. - For example, if the distance between the eyes is 2.5 centimeters, cut a hole 1.3 centimeters from the folded edge.
- At this stage, draw a hole for one eye. When you cut it out and unfold the mask, you will end up with 2 identical cutouts!
- It's best to measure the width and length of the eye so that the cutouts don't get too small.
4 Cut out the mask, including the eye holes, and unfold it. Now you can go to the next step, or attach the blank to more beautiful paper and cut a mask out of it. In any case, try on the mask and make adjustments if necessary. - After you try on the mask, attach it to new paper, circle and cut out.
- If you are making a mask with more colorful paper, do not fold it.
- Use a craft knife to cut holes for the eyes. Remember to place a cutting mat under the mask when doing this.
 5 Place the mask on cardboard, trace and cut it out. Although not necessary, this will create a thicker, more durable mask. Simply place a piece of paper on cardboard and trace it, then cut out the mask from the cardboard (do not forget about the slots for the eyes).
 - Do not fold the cardboard. Simply unfold the paper mask, place it on the cardboard, and trace around the edges.
6 Glue the cardboard to the back of the mask. Using a brush, apply a thin layer of liquid glue to the cardboard, and then press down on top of the paper mask. Smooth out the wrinkles and wait for the glue to dry. - You can also use a glue stick, but this is weaker and the mask will most likely come loose over time.
- To make the mask look neater, do not apply glue to the left and right edges (step back about 1.3 centimeters from the edges). You will attach a ribbon to these edges.
- Skip this step if you haven't cut the mask out of the cardboard.
7 Fold the mask over the edge of the table. Place the mask on the edge of the table with the paper facing up, press down on the center of the mask with your palm, and pull on the protruding edge so that it folds. - Do the same with the second end of the mask.
- This will give the mask a slight curve and will be more comfortable to wear. You can just fold the edges of the mask.
8 Decorate the mask if desired. At this stage, you can give free rein to your imagination. A simple mask can be painted over with a gold or silver permanent marker. A more sophisticated mask can be decorated with glitter glue or rhinestones. Choose a color that is sufficiently contrasting. Gold and silver tones work best, although you can paint the mask white and black. Below are some ideas on how to decorate the mask: - Trace the edges of the mask and eye cutouts with glitter glue or volumetric paint;
- stick rhinestones and sparkles on the mask;
- using hot glue, fix several long feathers in the right or left corner of the mask;
- apply hot glue to the edges of the mask;
- To give the mask a bump, glue lace on it, and then decorate it with glitter fringe.
9 Poke holes on the left and right sides of the mask and thread the tape through them. Take a hole punch and make a hole on the left end of the mask. Pass the ribbon through the hole and tie it. Then do the same from the right end of the mask. - The ribbons should be long enough to cover the head. It will be enough to have two ribbons 55 centimeters long each.
- Make sure the ribbon matches the color of your mask. For example, if you used a lot of gold to decorate your mask, choose a gold ribbon.
- If you left about 1.3 centimeters around the edges of the mask without glue, only punch holes in the cardboard and leave the outer layer of paper intact.
10 If you want to hold the mask in your hand, glue the stick to it with hot glue. Take a 30-36 centimeters long pin. Apply spray or acrylic paint to it if desired and wait for it to dry. Then glue the top end of the pin to the left or right edge of the mask using hot glue. - To add some extra touch to the pen, wrap it in ribbon like you do with candy canes. Hot glue both ends of the tape to the handle.
- If you are left-handed, glue the handle to the left, and if you are right-handed, to the right edge of the mask.
- If you can't find a suitable pin, roll up a piece of paper with a thin tube and glue the ends so that it does not unfold.
- Attach a tape or pen to the mask.Don't do both at the same time.
Method 2 of 2: Foil mask
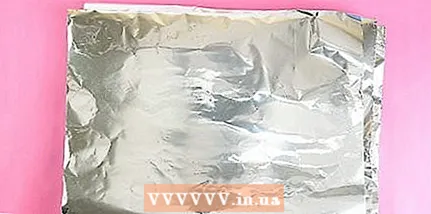 1 Stack 8-10 sheets of aluminum foil together to make a thick enough stack. Cut 8-10 roughly equal pieces of aluminum foil. They should be large enough to completely cover your face. Fold these sheets together and press down on them.
 - Remember the foil sheets slightly, then straighten them again. This way they "stick" to each other better.
- This will be the base of your mask. You can also purchase a pre-made plastic mask from the store. Here's how you can make your own foil mask.
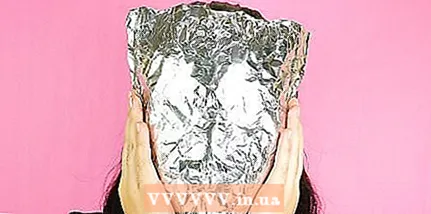 2 Apply the foil to your face and smooth it so that it adheres to your skin. Take a stack of foil sheets and place it on your face. Gently press the foil onto your nose, mouth, and eyes, and along the sides of your face. The foil should follow the outline of your face.
 - The mask should cover your entire face, from hairline to chin.
- 3 Cut out the holes for the eyes and the edges of the mask. There should be dents on the foil where the eyes were. If they are not visible, touch the foil to your face again, feel your eyes with your fingers and mark their location with a permanent marker. Be sure to also trim off excess foil around the edges of the mask.
- The mask can cover both the entire face and part of it. For example, a half mask can cover the face from nose to forehead.
- Scissors can be blunt on aluminum foil, so use old or cheap scissors at this stage that you won't be afraid to ruin.
- 4 Cut out the slots in the folded places, lay them on top of each other and fasten with tape. Cut a 1-inch (2.5 cm) slit on each side of your forehead. Place them on top of each other to form a folded edge, and tape together. If you are masking the entire face, repeat the same for the chin.
- The more the slits overlap, the more curved the mask will be.
- At this stage, it is good to secure with tape and other cut edges, including the slots for the eyes. This will make it easier for you to wear the mask.
- 5 Apply 3 layers to the mask. papier mache. Mix equal proportions of glue (or flour) and water, then cut the newsprint into thin strips. Soak paper strips in the prepared pasta, place them on the mask and smooth them out. Place the first 2 layers of paper one on top of the other, wait for them to dry (this will take 20-60 minutes), then apply the third layer. Wait for the last layer to dry.
- Cut newsprint into strips 2.5–5 centimeters wide and 7.5–10 centimeters long. Apply small strips to smaller areas, such as your nose. Larger strips can be used for wide areas such as the forehead.
- Be sure to fold the strips of paper around the edges of the mask, including the eye slots, to avoid scratching them on the aluminum foil.
- Alternatively, you can cover the mask with a tape or an adhesive bandage. Cut the patch into strips and moisten them if necessary. You only need two layers.
- To give the mask a cleaner look, cover the inside of the foil with one layer of papier-mâché. Do this after the outer layers of the paper are dry.
- 6 Take foil, duct tape, and paper and add additional details like ears. First sculpt the pieces out of foil and then attach them to the mask with duct tape. After that, apply three layers of papier-mâché to the parts and wait for them to dry.
- You can add details like nose, eyebrows and mustache.
- If you want the mask to be smoother, add 3 more layers of papier-mâché to it, but this time use paper towels instead of newsprint.
- If you are using a commercially available mask, you can attach a plastic-backed patch.
- 7 Apply white paint or plaster primer to the mask. Although not necessary, it is possible to cover the mask with a white base on which you can apply further details.Cover the mask with one coat of white craft acrylic paint or white spray paint and wait for it to dry. If paper towels show through the paint, apply a second coat.
- Apply acrylic with a synthetic taclon brush. Do not use a camel hair or pork bristle brush for this.
- Spray spray paint in a well-ventilated area. Keep the paint can 15–20 centimeters from the mask.
- For a smoother mask, apply several coats of white plaster of paris primer. Wait for the primer to dry and sand it with fine sandpaper. You can use paper with a grain size of 180-320.
- 8 Paint and decorate the mask however you like. Once the primer is dry, you can start painting and decorating the mask. For example, you can draw a pattern with a pencil, and then use a thin, pointed brush to paint it with acrylic craft paint. Below are some sample options:
- Color the mask to resemble an animal's face, a samurai or kabuki mask.
- Using hot or some other glue, attach various decorations to the mask: rhinestones, feathers, or glitter.
- Decorate the mask with glitter glue. You can also apply a pattern of white paper glue to the mask, then sprinkle glitter on the mask.
- Apply a glossy acrylic varnish to the painted mask to make it shine.
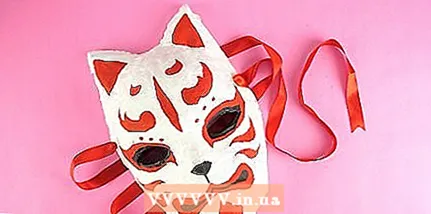 9 If desired, punch holes on the sides of the mask and thread the string through them. Use a hole punch to make holes on the sides of the mask at about ear level. Thread a piece of rope about 55 centimeters long into each hole and tie it around the edges of the mask. Place the mask on your face and tie a rope at the back of your head.
 - If you want to use the mask for decorative purposes, drive a nail into the wall and hang the mask on it.
- For a more subtle mask, use tape. Find the right color for your ribbon.
Tips
- Browse through the images of the different masks and choose the one that suits you.
- The mask does not have to represent any person or animal. You can think of something original.
- It is not necessary to make a mask from scrap materials. You can purchase a mask at the store and decorate it yourself.
Warnings
- Do not use oil paint as it can get on your face and eyes.
What do you need
Paper mask
- Paper
- Cardboard
- Yardstick
- Scissors
- DIY knife
- Pencil
- Hole puncher
- Dye
- Jewelry (sequins, rhinestones, etc.)
- Ribbon (optional)
- 30-35 centimeters long rod (optional)
Foil mask
- Aluminium foil
- Duct tape
- Scissors
- Newsprint
- Paper towels
- Flour
- White stationery glue
- White paint
- Dye
- Jewelry (sequins, rhinestones, etc.)
- Ribbon (optional)


